Security and compliance
Ensure data security and compliance with data masking, monitoring, and change traceability
Ensure data security and compliance with data masking, monitoring, and change traceability
Monitor and understand your databases with full visibility into performance and change
Build, test, and deploy database changes with confidence
Simplify and speed up database development workflows
Prepare reliable data foundations for AI initiatives
Simplify and secure database modernization across platforms
Control costs and boost efficiency in database operations
Simplify and speed up cloud database transformation
This walkthrough of SQL Backup Pro will show you:

To back up a database we launch the Back Up wizard from the Back Up button on the toolbar.

We now select the server from which we wish to back up the database. We can also choose to use settings from a template that we can customize and configure. In this case, we're going to create a new backup.

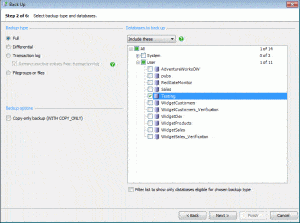
Next, we choose the type of backup we want to create and select the database we want to back up. If full backups have previously been made, we can decide to perform differential or transaction log backups. In this walkthrough, we create a full database backup.

In this step, we decide whether to back up to a single file, a single file mirrored to a second location, or split the backup over multiple, smaller files. Splitting the backup across multiple files can reduce the time needed to create it.
Here, we can also specify the file name of the backup or have it named automatically.
If we need to purge older backups as part of the process, we can choose to overwrite existing files or delete existing backup files by age or quantity.
If we want to copy the backup to a network location, we can also configure to which folder the backup should go and whether to purge existing backups at that location.

Next, we can select one of four compression levels for our backup. If we are unsure which compression level to use, the Compression Analyzer helps us by sampling data to suggest the optimal compression level for our database.
Here, we can also encrypt our data. With SQL Backup Pro, we can choose between 128-bit and 256-bit AES encryption.
SQL Backup Pro lets us optimize the performance of our backup by selecting the number of multiple threads to be used for the backup process. We can choose a maximum transfer and data block size for memory and disk optimization.
We can also protect our backup process against network outages, which can interrupt backup operations and cause job failure. SQL Backup Pro is designed to minimize the disruption caused by network outages by automatically continuing the data transfer once the connection is reestablished. By default, SQL Backup Pro is set to retry connecting to the network after 30 seconds and up to 10 times.

This new step gives us the option to test backup files when they are created by including CHECKSUM and RESTORE VERIFYONLY in backup jobs.
CHECKSUM will validate any page checksums and generate a backup checksum. RESTORE VERIFYONLY will check the backup is complete and readable, and will validate the checksums. The results of the CHECKSUM and RESTORE VERIFYONLY will be recorded in the Activity History.
We can choose to be notified by email with a copy of the completion log. By default, email notifications are only sent if errors occur during the backup process, such as the checksum failing if an error occurs. We can modify the email settings and choose to receive warnings or be informed about any outcome.

Before we start the backup we can review a summary of all the options we've chosen, and view the SQL script for use with the command line utility or stored procedure. We then click Finish to start the backup process.

We can now see from the timeline in the GUI that the database backup has been completed.
The activity log will be updated automatically.