

This article is part of Robert Sheldon's continuing series on Mongo DB. To see all of the items in the series, click here.
Throughout this series, I’ve provided a number of examples of how to run commands in MongoDB Shell (mongosh). However, the examples were limited to the version of mongosh that’s embedded in MongoDB Compass. Although mongosh can be a handy tool to use in conjunction with Compass, MongoDB also offers a freestanding version of mongosh that provides greater flexibility and gives you more control over the command environment.
To use the freestanding version of mongosh, you must first install it on your local computer. MongoDB provides versions for Windows, macOS, and several Linux distributions, any of which you can download for free. After you install mongosh, you’ll be able to access it through your system’s command-line interface (CLI), where you can connect to a local MongoDB instance or to a MongoDB Atlas cluster.
In this article, I demonstrate how to get started with mongosh and use it to run commands and script files. I also explain how to configure the shell’s settings and command prompt. To follow along, you must be able to download and install mongosh on your system, as well as access your system’s CLI. Beyond that, you should find it fairly straightforward to work with mongosh.
Note: For the examples in this article, I used the same MongoDB Atlas environment I used for the previous articles in this series. Refer to the first article for details about setting up this environment.
Installing MongoDB Shell (mongosh)
You can run mongosh on Windows, macOS, and Linux systems. Linux support includes Ubuntu, Debian, Amazon Linux, Red Hat Enterprise Linux (RHEL), and other distributions.
Not surprisingly, the process of installing mongosh differs from one OS platform to the next. In addition, each platform supports multiple installation methods. In Windows, for example, you can install mongosh from an .msi or .zip file. In macOS, you can use Homebrew or install it from a .zip file. And in Linux, you can install mongosh from a .deb, .rpm, or .tgz file.
The steps you take to install mongosh on your system will depend on both the operating system and installation type. For instance, you can quickly install mongosh on a Windows 11 computer in just a few steps:
- Download the .msi file.
- Double-click the downloaded file.
- Follow the prompts to complete the installation.
You can find information about the different installation options in the MongoDB topic Install mongosh, which provides specific details about the supported operating systems and installation packages. In addition, you can download installation files at MongoDB Shell Download, where packages are available for the different operating systems. If you’re using a package manager such as Homebrew, you won’t need to download a file in advance.
Whatever option you choose, be sure to follow MongoDB’s online instructions for installing mongosh in your environment. Also follow any prompts that are provided as part of the installation process. Again, the exact steps you take will be specific to your system and package type.
Connecting to MongoDB Atlas
Once you’ve installed mongosh, you should be able access it immediately through a CLI such as Command Prompt in Windows or Terminal in Ubuntu or macOS. Whenever you launch mongosh, however, you must establish a connection to a MongoDB deployment, either a local instance or an Atlas cluster.
For the examples in this article, we’ll be using Atlas, as we’ve been doing throughout this series. To connect to Atlas, you should first retrieve the connection string from the Atlas interface, like you did when you initially connected to Atlas in MongoDB Compass.
To retrieve the connection string, log into the Atlas website and select the applicable organization and project. For the examples in this series, I’ve been using the org1 organization and the proj1 project.
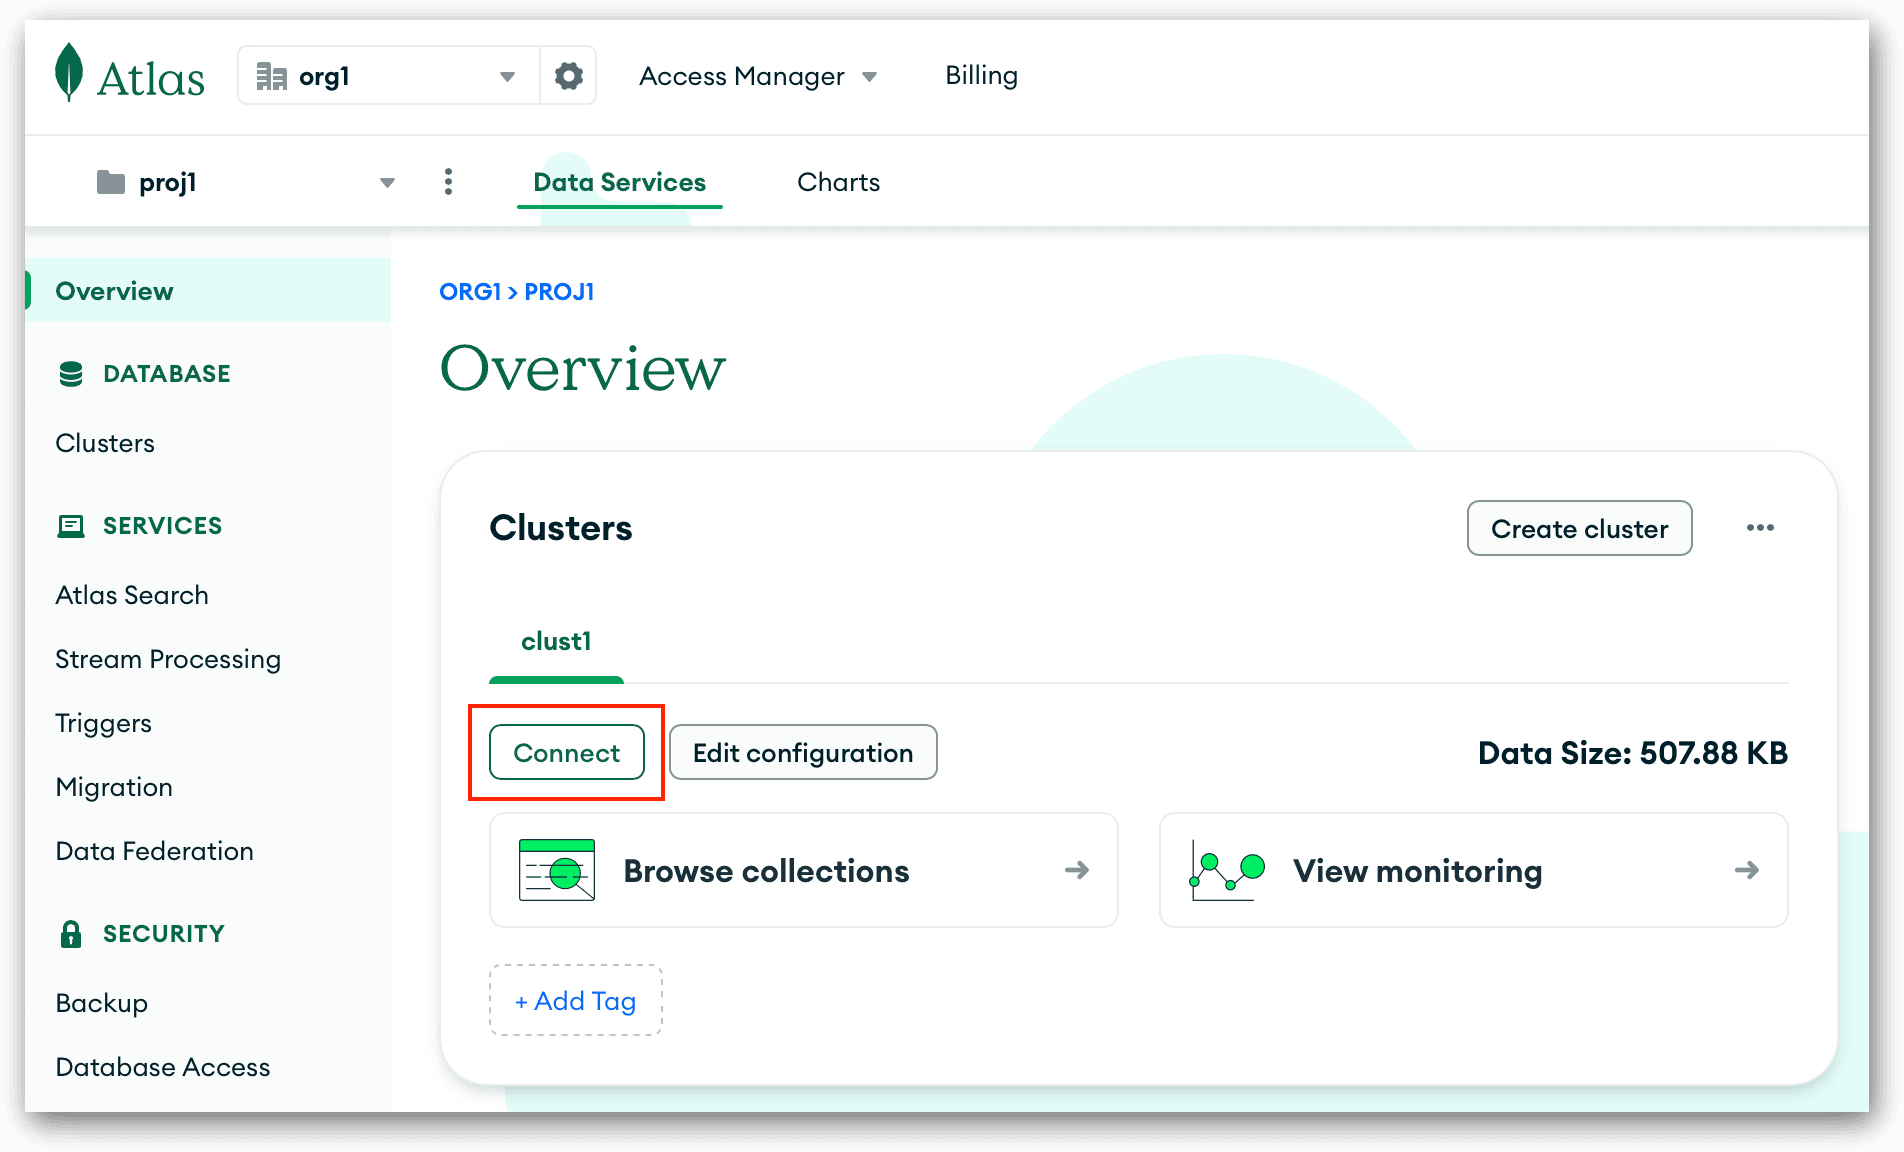
On the project’s Overview page, click the Connect button, which is outlined in red in the following figure.
Clicking the button launches the Connect dialog box, where you’re presented with multiple connection options, as shown in the following figure.
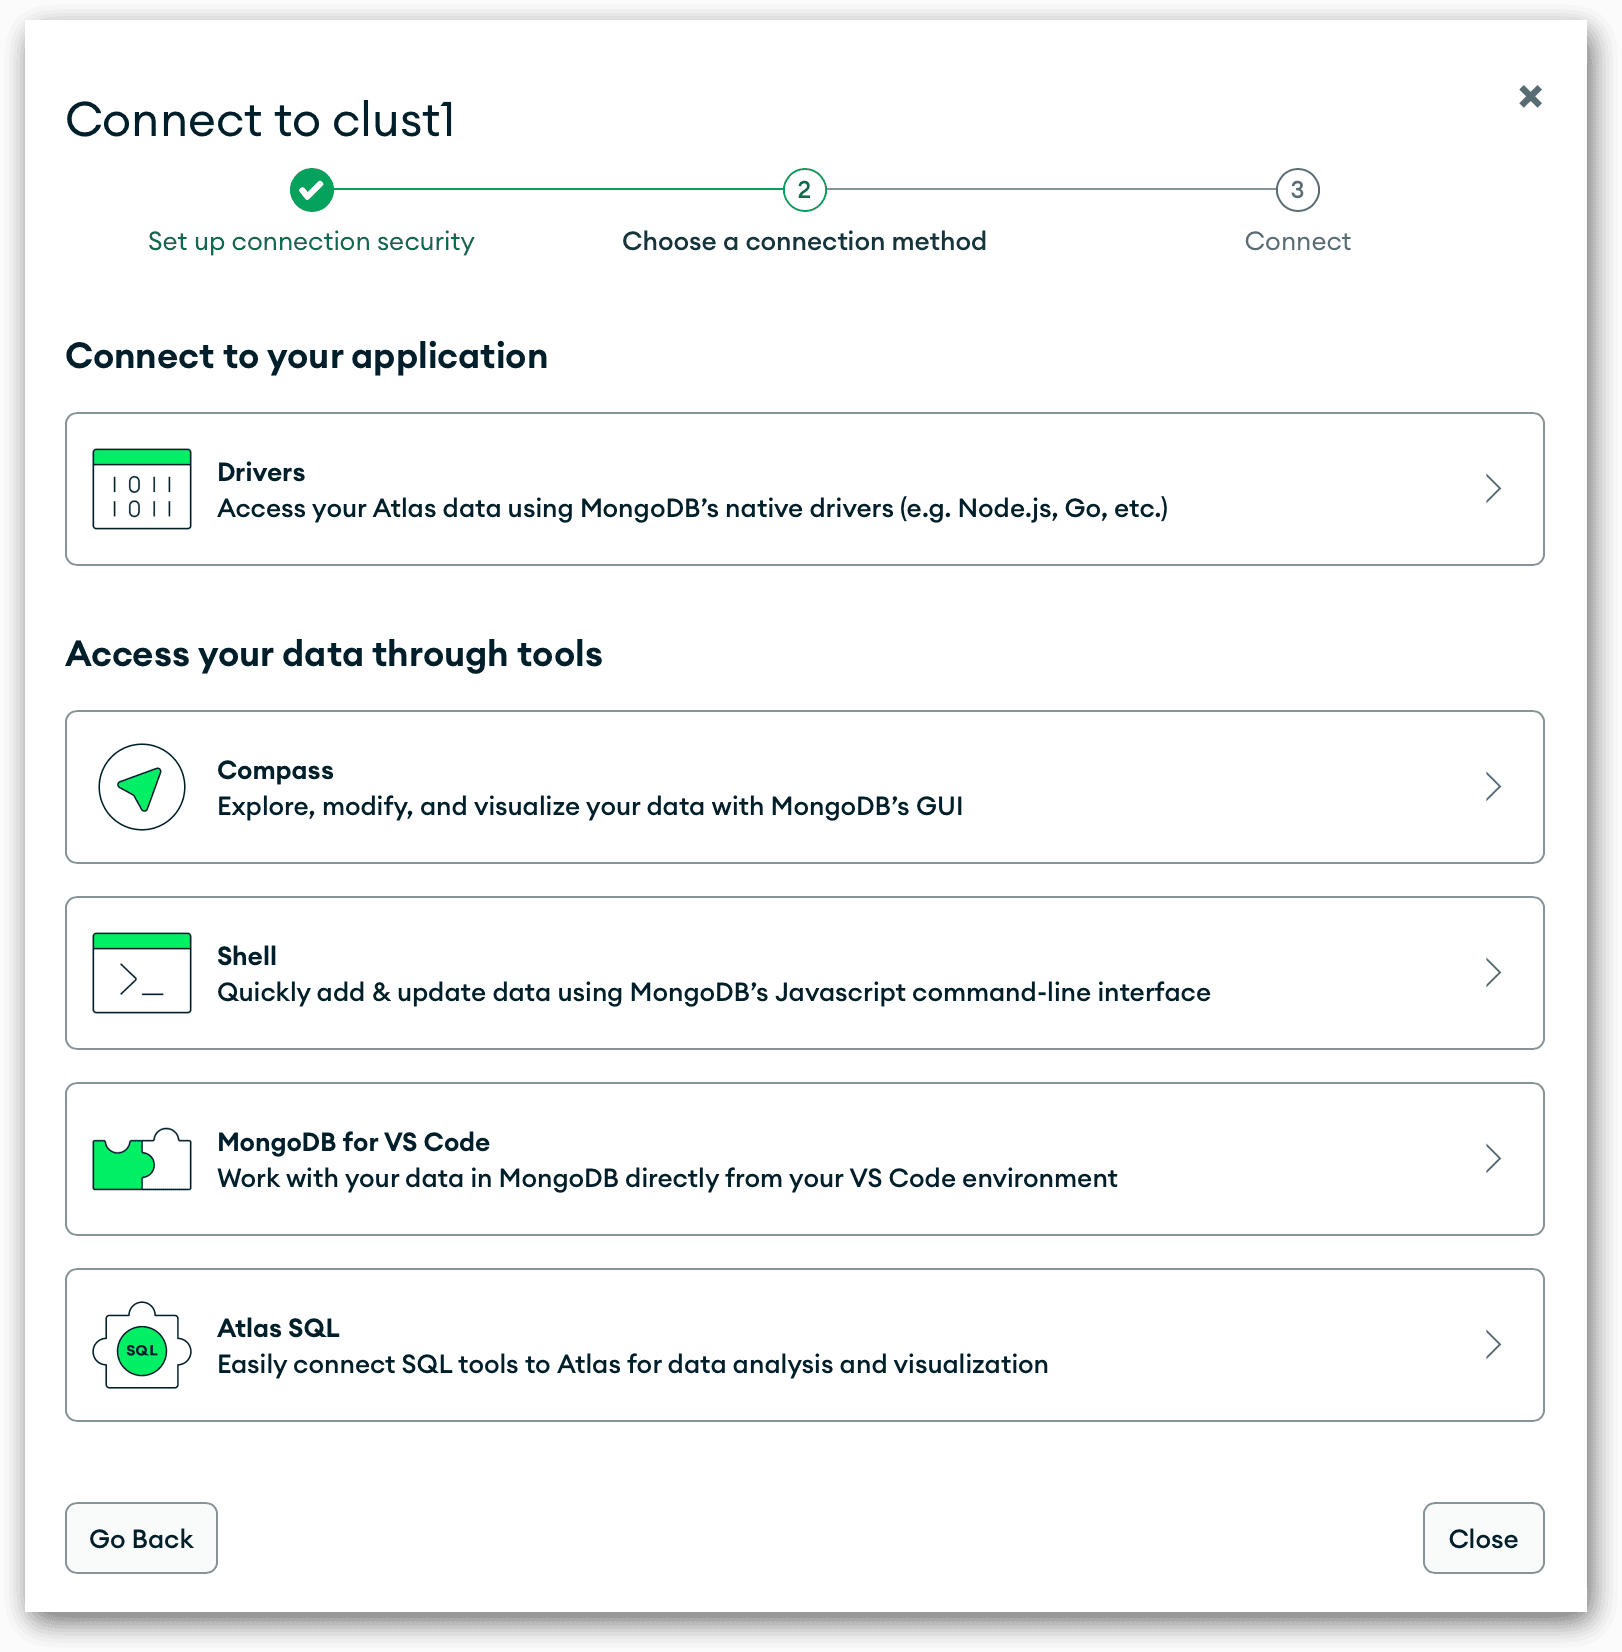
Click the Shell option. This will take you to the next screen of the Connect dialog box, as shown in the following figure. Here you’ll find the connection string you need to connect to your Atlas cluster from mongosh. You should be able to stick with the default options already selected, in which case, you need only copy the connection string to your clipboard.
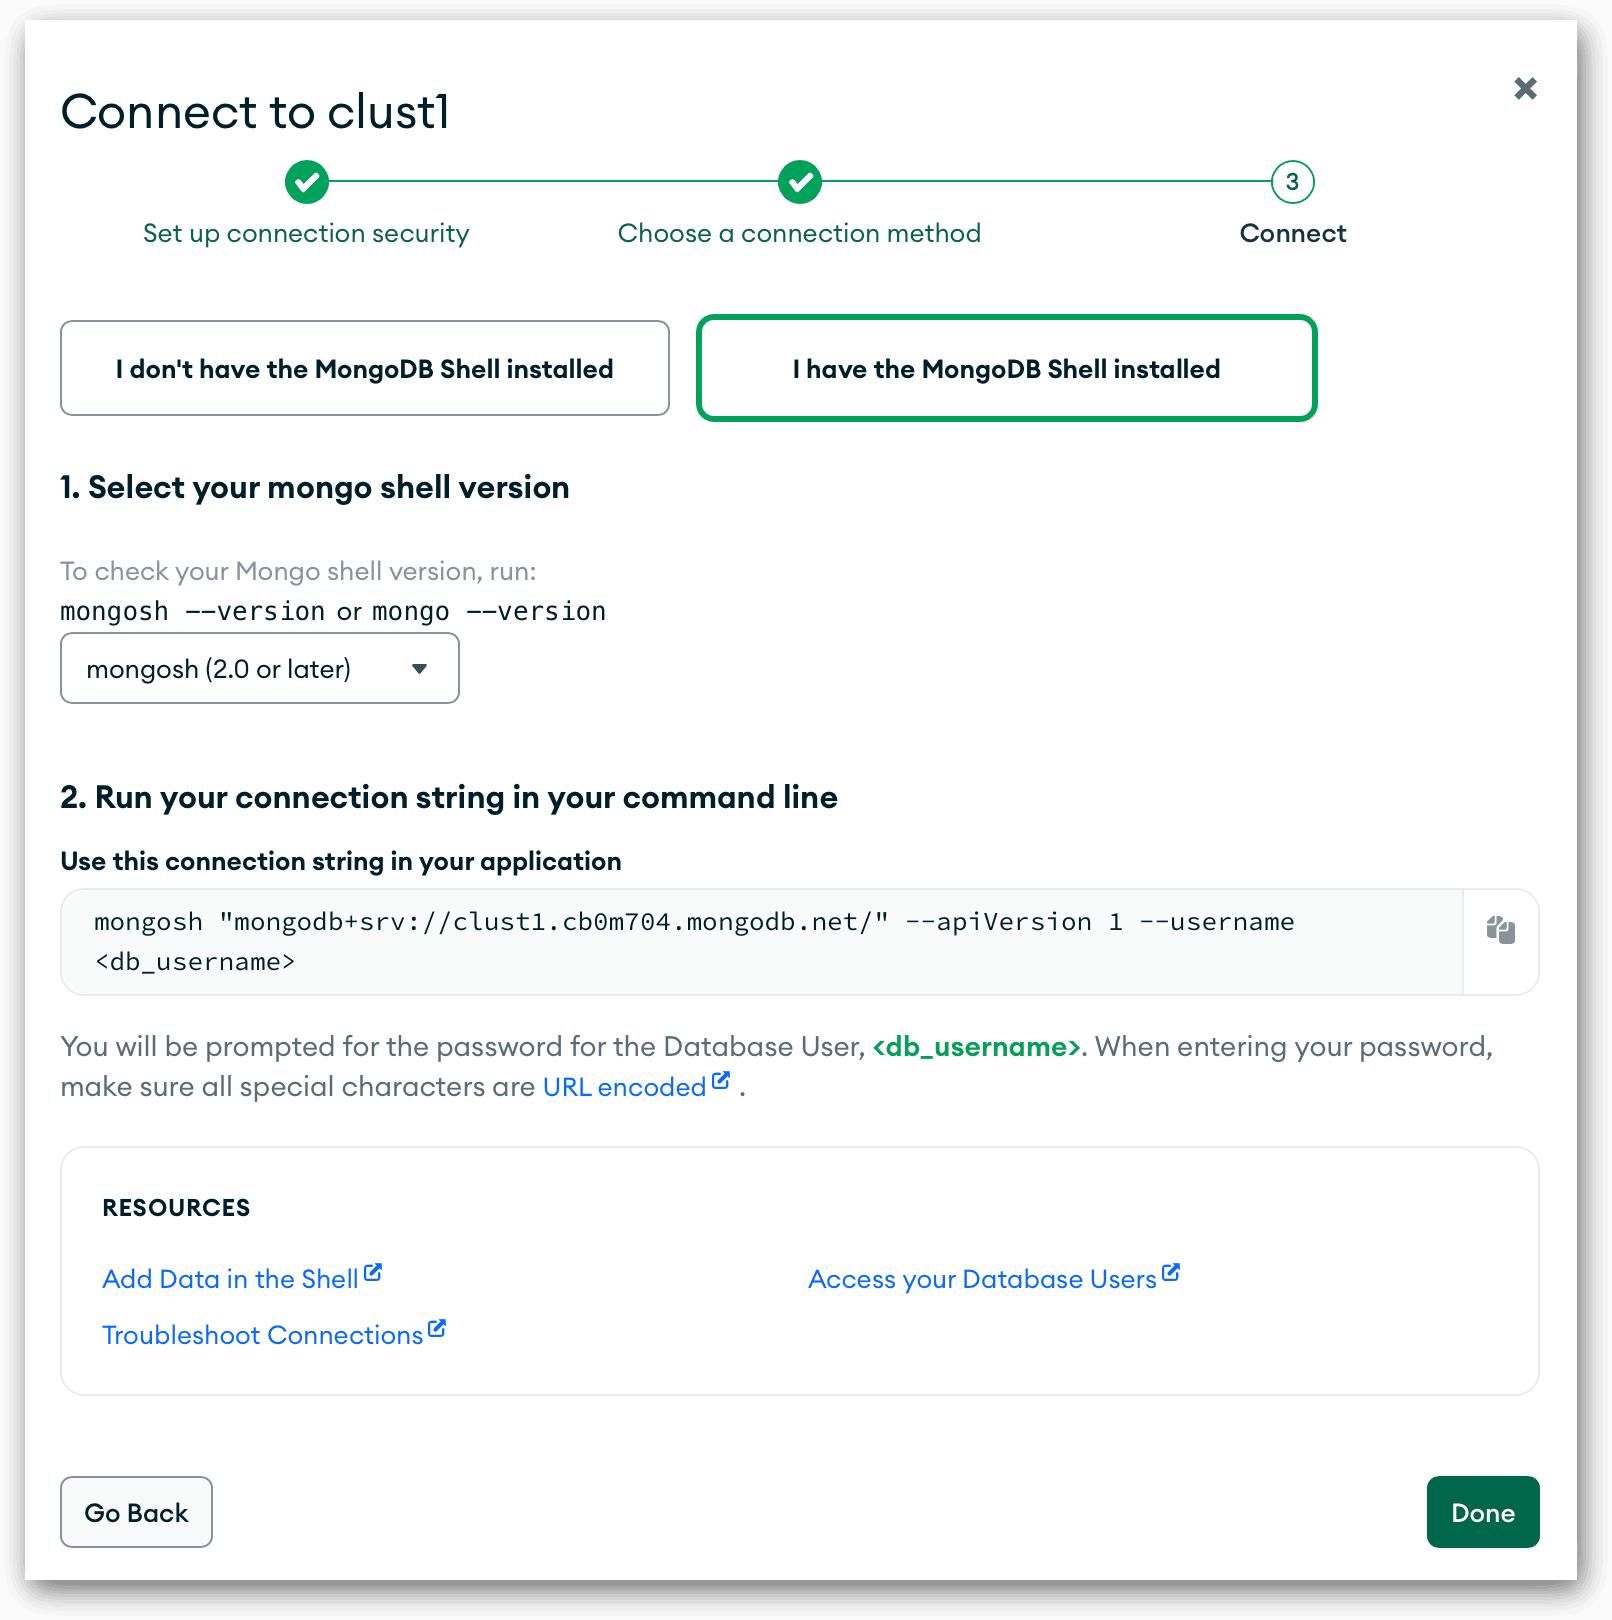
The connection string shown in the figure is specific to my Atlas cluster environment, as indicated by the clust1.cb0m704 portion of the string. I’ve copied the entire connection string here so you can more easily see it:
|
1 |
mongosh "mongodb+srv://clust1.cb0m704.mongodb.net/" --apiVersion 1 --username <db_username> |
The connection string specifies that the API version should be 1 and provides a placeholder for the --username option value. For the exercises in this article, I’m using the user1 account. You should use whatever account you have set up, as long as it has read and write access to the MongoDB data.
The connection string you copied from the Connect dialog box is specific to your Atlas cluster environment. As expected, you’ll need to replace the <db_username> placeholder with the appropriate username. You’ll also need to know the account’s password. You’ll be prompted for this when you connect to Atlas from mongosh.
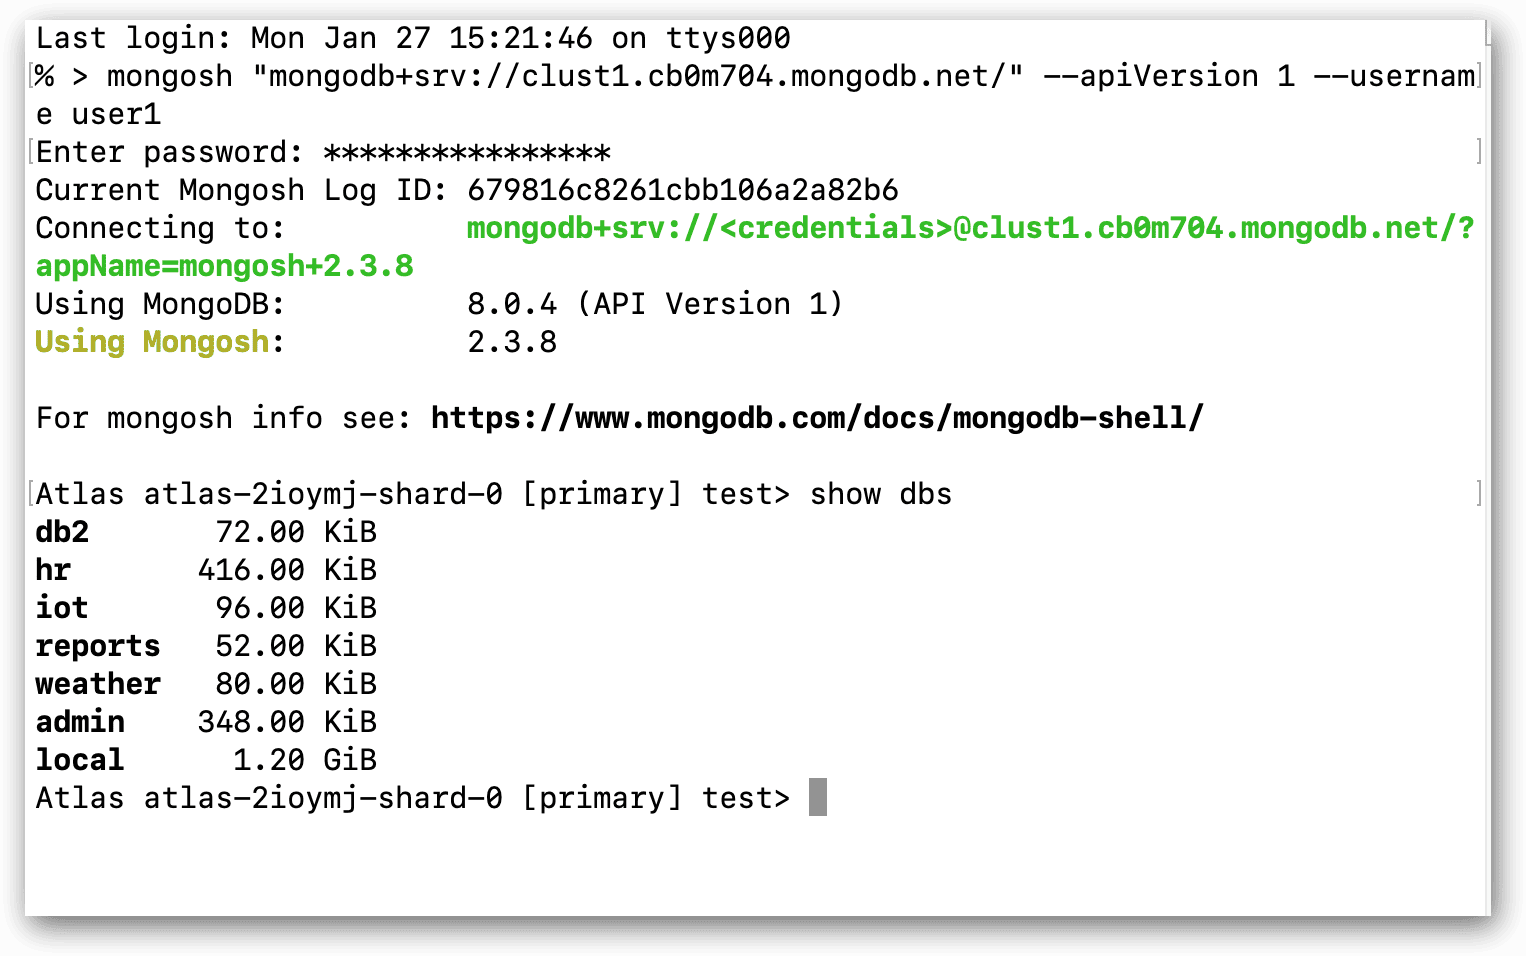
Once you’ve prepared your connection string, open your system’s CLI, paste in the connection string at the command prompt, and press Enter. When prompted, enter the password. This should launch mongosh and connect you to your Atlas environment. The following figure shows Terminal on my Mac computer, after I connected to Atlas.
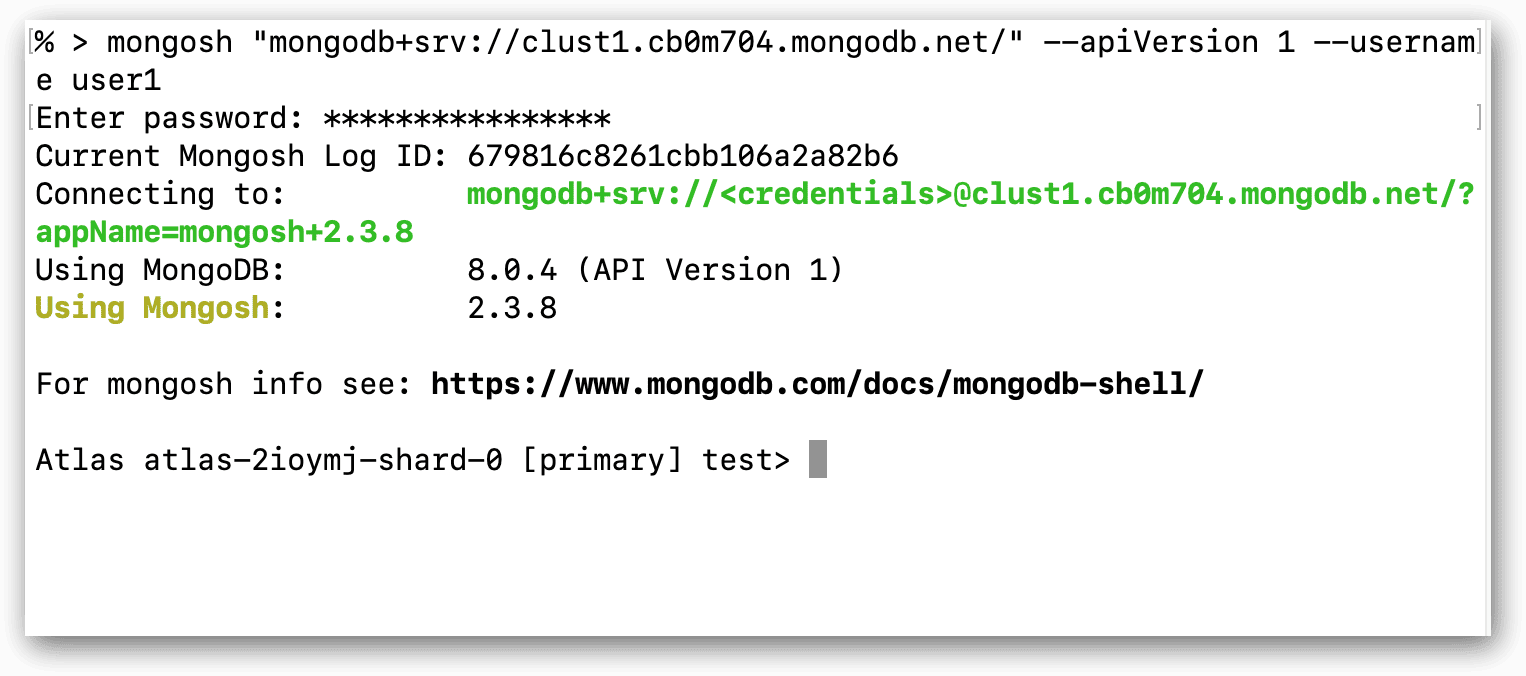
Notice that the command prompt now shows details specific to your Atlas connection, along with the name of the current database, which is test. This displayed database name refers to the database context in which you’re currently operating. The actual database might not yet exist.
Note that you can also include your password directly in your connection string. To do so, simply add the --password argument to your mongosh command, as shown in the following syntax:
|
1 |
mongosh "mongodb+srv://clust1.cb0m704.mongodb.net/" --apiVersion 1 --username <db_username> --password <password> |
Be sure to replace the <password> placeholder with your account’s password.
That’s all there is to launching mongosh and connecting to Atlas. You can now interact with your data, as you’ll see shortly. (Note that, if you’re connecting to a local instance of MongoDB, you need only specify mongosh for your connection command, without any arguments.)
Running commands in mongosh
If you’ve been following along with this series, you already know how to run commands in mongosh, even if you’ve been using the version embedded in Compass. The process of running commands is the same in either environment. You type or paste the command and press Enter.
For example, to return a list of the current databases in your Atlas cluster, you can run the following command:
|
1 |
show dbs |
When you press Enter, MongoDB will return a list of your current databases, as shown in the following figure. (The exact databases you’ll see will depend on which ones already exist in your Atlas environment.)
After MongoDB processes a command and displays the results, you’re returned to the command prompt, where you can enter your next command.
Let’s take a look at a few more examples that you can try to help you get comfortable with running commands. We’ll start with the following use command, which changes the database context to db1:
|
1 |
use db1 |
When you run the command, you should receive a message stating that you’ve switched to the db1 database. The command prompt should also show that the db1 database is now active. If the database does not exist, MongoDB will create it when you add a collection or data, such as in the following insertMany command:
|
1 2 3 4 |
db.col1.insertMany([ { "_id": 101, "name": "Harper" }, { "_id": 102, "name": "Avery" } ]) |
The command adds two documents to the col1 collection. The db at the beginning of the command is a system variable that references the current database object. The variable is followed by the col1 collection object. If the collection does not exist, MongoDB will create it. The collection object is then followed by insertMany, a method available to the object for adding documents to the specified collection.
When you run the command, MongoDB will create the collection in the db1 database and insert the documents into the collection. MongoDB will then return the following message:
|
1 |
{ acknowledged: true, insertedIds: { '0': 101, '1': 102 } } |
You can verify that the documents have been added to the collection by running the following command:
|
1 |
db.col1.find() |
The command uses the find method to return all documents in the collection. When you run the command, you should receive the following results:
|
1 |
[ { _id: 101, name: 'Harper' }, { _id: 102, name: 'Avery' } ] |
Now let’s take a look at how to delete one of the documents. The following command uses the deleteOne method to remove the document with an _id value of 101:
|
1 |
db.col1.deleteOne( { "_id": 101 } ) |
When you run the command, MongoDB should return a message stating that a document has been deleted. You can confirm this by again running a find command. This time the returned results should include only one document.
There are, of course, many other types of commands you can run at a mongosh command prompt, including aggregations. You can find numerous examples of shell commands earlier in this series, in MongoDB documentation, and in many third-party online resources.
At any point, you can quit the mongosh environment by running the following command:
|
1 |
quit |
When you run the command, you’ll exit from mongosh and return to your CLI’s regular command prompt. Whenever you want to return to the mongosh environment, simply run your mongosh connection command.
Configuring the mongosh environment
One of the advantages of using the mongosh standalone version is that you can configure different settings to meet your specific needs, something you cannot do in the Compass embedded version.
MongoDB Shell provides two methods for viewing and configuring settings. The first is to use the config API, which is built into the mongosh environment, and the second is to deploy a configuration file that mongosh can read upon startup.
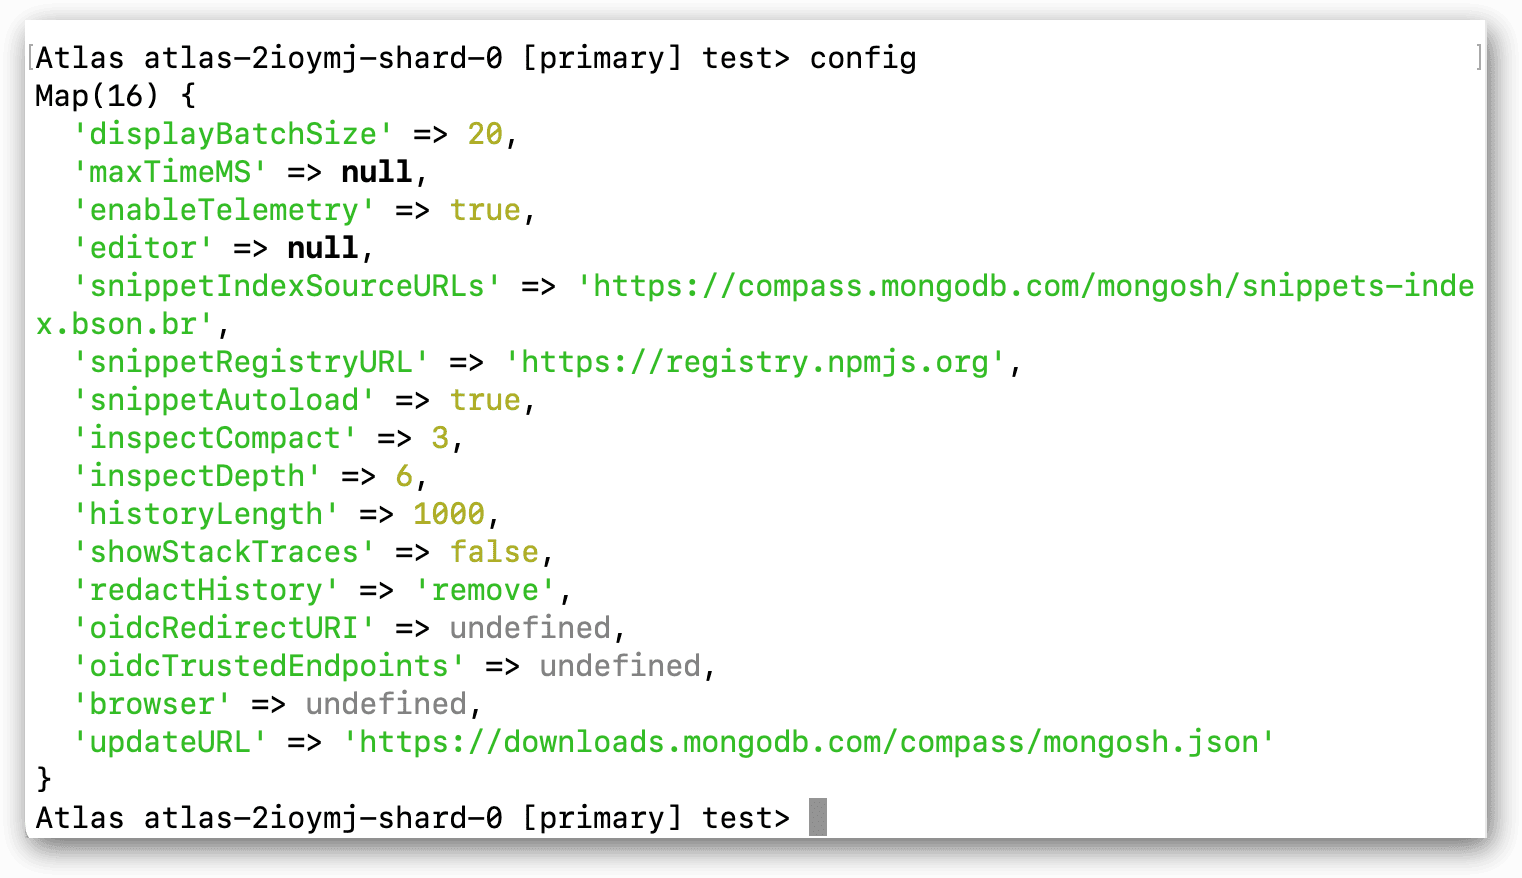
The API approach requires the use of a config command, which provides several methods for carrying out different tasks. You can also use the command without specifying a method, in which case, MongoDB will return a list of all the available settings and their current values. To run the command, simply type config at the mongosh command prompt and press enter:
|
1 |
config |
The following figure shows the results returned by the config command on my system. At this point, I have not modified any of the settings, so the values shown here are the default values.
You can find information about the settings in the MongoDB topic Configure Settings, which provides a description of each setting, along with its data type and default value.
In some cases, you might want to retrieve the current value of a specific setting. For this, you can use the get method as part of your config command, specifying the setting name as an argument to the method:
|
1 |
config.get("showStackTraces") |
In this case, the command retrieves the current value for the showStackTraces setting, which determines how a stack trace and its error messages are displayed. Because the setting is still configured with its default value, the command will return false. The setting’s data type is Boolean, so its value can be only true or false.
You can also use config command to update a setting’s value. For this, you need to specify the set method and then provide the setting name and its new value, as in the following example:
|
1 |
config.set("showStackTraces", true) |
The command sets the showStackTraces setting to true, which will cause MongoDB to return more detailed stack and error messages. When you run the command, you should receive a message indicating that the setting has been changed. You can confirm your changes by again running a config. get("showStackTraces") command, which should now return a value of true.
After you modify a setting’s value, you might want to return it to its default value. For this, you can use the reset method, as shown in the following config command:
|
1 |
config.reset("showStackTraces") |
The command should return a message stating the setting has been reset to its default value. You can confirm this by once again running a config. get("showStackTraces") command, which should now return a value of false.
Creating a mongosh configuration file
The config API provides a straightforward method for viewing and modifying your configuration settings. In some cases, however, you might want to save your settings to a configuration file so the settings are applied to mongosh each time you start it up.
Before I explain how to do that, it’s important to understand how mongosh treats API settings compared to those defined in a configuration file. Settings configured through the API always take precedence over those defined in a configuration file, even if you restart mongosh. Once you use the API to change a setting, the configuration file will have no impact on that setting.
With this in mind, let’s look at an example of how to implement a configuration file. First, create a text file and name it mongosh.conf. You can then add the settings, which should be written in the YAML format and organized under the mongosh namespace. For example, the following code sets the snippetAutoload setting to false and the inspectDepth setting to 10:
|
1 2 3 |
mongosh: snippetAutoload: false inspectDepth: 10 |
After you add your settings to the configuration file, you need to save the file to a location that mongosh can access. The exact location depends on the operating system:
- In Windows, save the file to the same directory as the mongosh.exe binary.
- In macOS, save the file to the /etc/, /usr/local/etc/, or /opt/homebrew/etc/ folder.
- In Linux, save the file to the /etc/ folder.
Once the file is in place, you need to quit mongosh if you’re still connected and relaunch the program. Next, rerun the config command. Your settings should now reflect the values you specified in the configuration file.
Configuring the mongosh prompt
You might also find it beneficial to change the default command prompt in mongosh. This can be especially useful when connecting to Atlas, which displays a rather lengthy prompt.
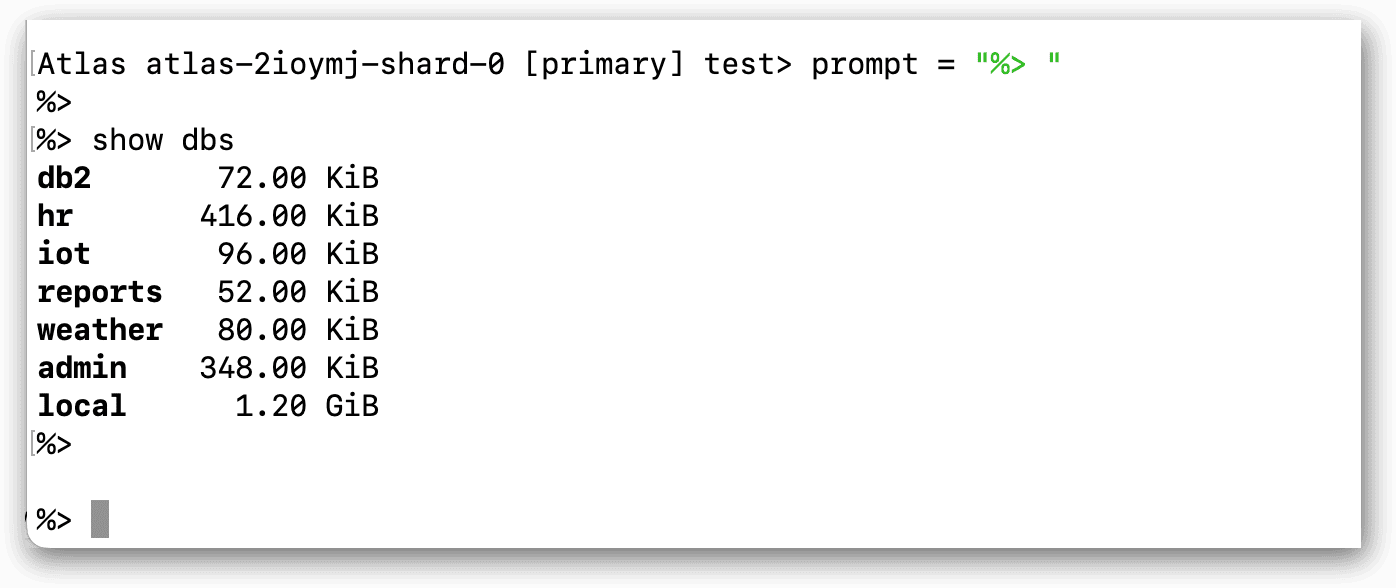
To change the prompt for the current session, set the prompt property to the desired value. For example, the following command sets the property to %> (space included):
|
1 |
prompt = "%> " |
After you run the command, the command prompt should reflect the new setting, as shown in the following figure. You can also run a show dbs command to get a better sense of how the new command prompt looks.
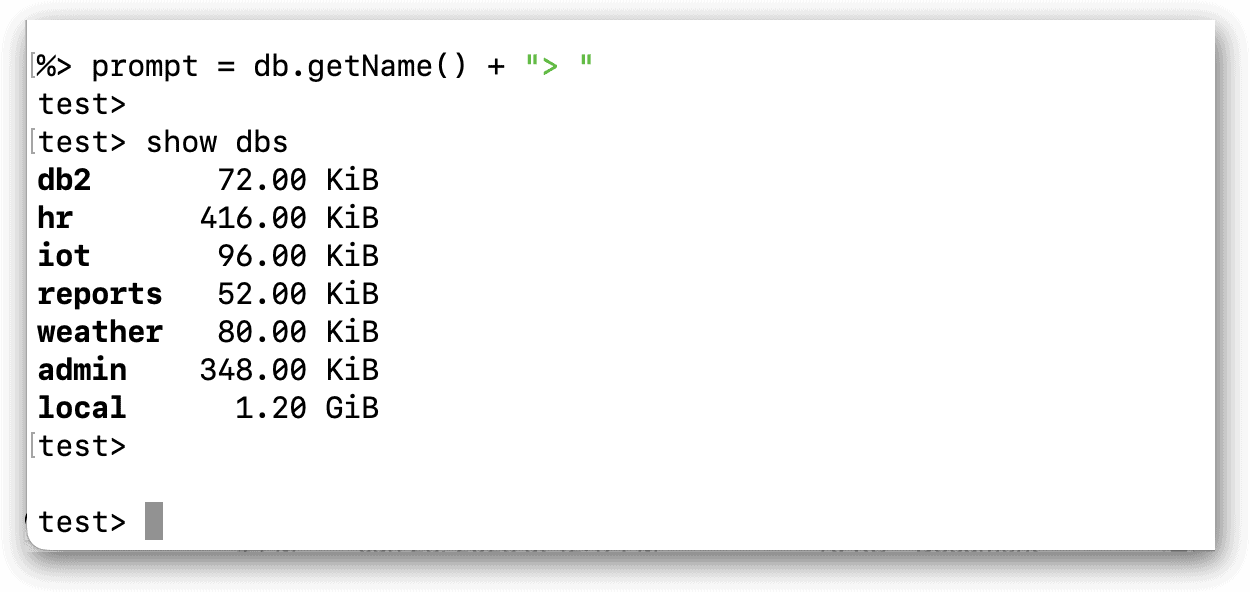
Users might prefer a simpler prompt such as this, and they can change the prompt in other ways as well. For example, the following command uses the getName method to retrieve the name of the current database, which is then concatenated with a right arrow and space:
|
1 |
prompt = db.getName() + "> " |
Now the prompt will display the database name, followed by the arrow and space, as shown in the following figure.
Again, this is a much cleaner prompt than the default one you get with an Atlas connection. In fact, this is the same prompt you get by default if you connect to a local instance of MongoDB.
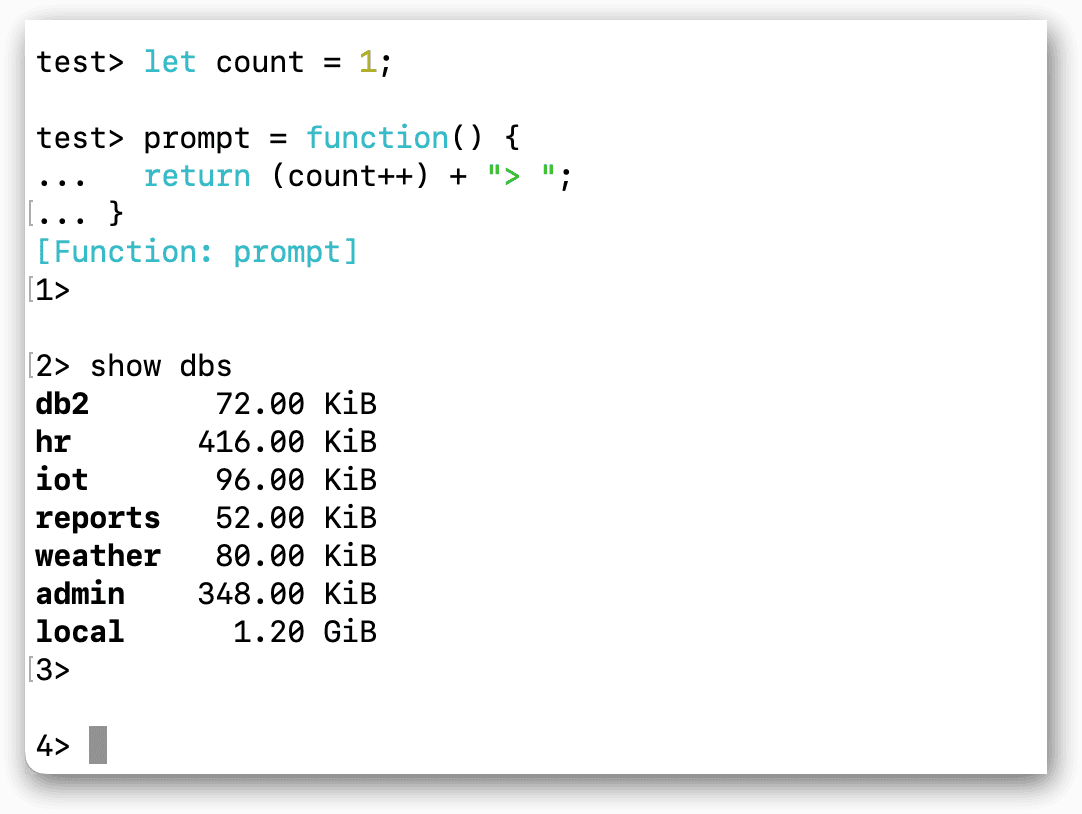
You can also create more complex prompts, depending on your preferences. For instance, the following command uses JavaScript code to create a prompt made up of the line number followed by a right arrow and space:
|
1 2 3 4 |
let count = 1; prompt = function() { return (count++) + "> "; } |
The code begins with a let statement that sets the count variable to 1. The code then defines the prompt property value, which is a function that increments the count variable by 1 with each new line. The variable’s value is then concatenated with a right arrow and space. The following figure show what the new prompt now looks like.
You can make all sorts of changes to the prompt property, but as already noted, your changes persist only during your current session. However, you can persist your changes across sessions by creating a JavaScript file name .mongoshrc.js and saving it in to your home directory.
In the file, you should include a JavaScript command that defines the prompt property, just like you saw in the previous examples. After you create the file, you’ll need to restart mongosh for your changes to take effect.
Running shell scripts in MongoDB Shell
Another advantage of using the mongosh standalone version, rather than the Compass embedded version, is that you can run JavaScript files from the command prompt. To demonstrate how this works, start by creating a JavaScript text file named db2_data.js and then add the following code:
|
1 2 3 4 5 6 7 8 9 10 11 12 13 14 15 16 17 18 19 20 21 22 23 24 25 26 |
db = connect("mongodb+srv://<user>:<password>@clust1.cb0m704.mongodb.net/db2") db.col2.insertMany([ { "_id": 101, "name": "Drew", "position": { "title": "Senior Developer", "dept": "R&D" }, "yrs_exp": 18, "skills": [ "Java", "SQL", "Python", "PHP" ] }, { "_id": 102, "name": "Parker", "position": { "title": "Data Scientist", "dept": "R&D" }, "yrs_exp": 14, "skills": [ "Python", "SQL", "R", "Scala", "Java", "Julia" ] }, { "_id": 103, "name": "Harper", "position": { "title": "Marketing Manager", "dept": "Marketing" }, "yrs_exp": 22 }, { "_id": 104, "name": "Darcy", "position": { "title": "Senior Developer", "dept": "R&D" }, "yrs_exp": 6, "skills": [ "Java", "Csharp", "Python", "R" ] }, { "_id": 105, "name": "Carey", "position": { "title": "SEO Specialist", "dept": "Marketing" }, "yrs_exp": 7 } ]); |
The code begins with a connection string that connects to the db2 database on Atlas. Be sure to replace the <user> and <password> placeholders with the correct account information.
The connection string should also be specific to your Atlas cluster. For example, the clust1.cb0m704 portion of the connection string is specific to my cluster environment, so you need to replace this portion with the correct information for your environment. The cluster information is the same as what you used for your initial mongosh connection to Atlas.
The remaining part of the code is an insertMany statement that inserts five documents into the col2 collection in the db2 database.
After you add the code to your db2_data.js file, you can save it to your system’s home directory or another directory. You can then run script at your convenience, either within the mongosh shell or from your system’s command prompt. To run the script within mongosh, use the load method and specify the script file as the method’s argument, as in the following example:
|
1 |
load("db2_data.js") |
If you saved the script file to a location other than your home directory, you must specify the file path, either the relative or absolute path. MongoDB will return true if the command runs successfully, otherwise it will return an error message.
In this case, you can also verify whether the script was successful by running the following find command, which should return the five documents you just added:
|
1 |
db.col2.find() |
The mongosh program also lets you run a script file from your system’s CLI command prompt. Before I demonstrate how this works, you should remove the five documents from the collection, just to keep things simple. To remove them, run the following deleteMany command:
|
1 |
db.col2.deleteMany({}) |
The command should return a message that confirms the deletions. You should then quit mongosh, but leave your CLI open. You can now run the script using a mongosh command. At the CLI’s command prompt, run the following mongosh command:
|
1 |
mongosh --file db2_data.js |
The command includes the --file argument, which specifies the db2_data.js file. Again, if the file is stored somewhere other than the home directory, you must specify the relative or absolute file path. When you execute this command, MongoDB will run the script, although it will not return a message unless there’s an error.
Getting started with MongoDB Shell
As you gain more experience working with MongoDB, whether using Atlas or a local instance, you likely find yourself relying more and more on the freestanding version of mongosh. It provides greater flexibility than the Compass embedded version and is often more expedient when carrying out data-related operations. Be sure to check out the topic Welcome to MongoDB Shell (mongosh) for more detail abouts working in the shell environment. The more familiar you become with using mongosh, the sooner it will become second nature and the more efficiently you’ll be working with MongoDB data.


Load comments