
I started using SQL Server Integration Services (SSIS) when I had a job that required me to move and manipulate data between files and other data sources. I did a bit of research using the resources available-Twitter, Simple-Talk, SQL Server Central, etc.-and concluded that SSIS was the right way to go. I had to get my head around it quite rapidly, but I couldn’t find help at the level I required. For that reason, I noted the points where I had struggled so that, once I’d learned more, I could help others who might otherwise struggle as I did.
In this article, the first of the “SSIS Basics” series, I go through the basics required for anyone starting out with SSIS, before he or she can venture off into more exotic uses for the tool. In subsequent articles, we’ll cover such topics as variables, for-each loops, and XML. If you’re already a regular SSIS user, this series is not for you!
What can you use SSIS for?
Essentially, SSIS can be used for any task related to files or data. You can, for example,
- Move and rename files
- Delete, update or insert data
- Execute SQL scripts or stored procedures
- Import and export data between different file types, such as Access, Excel, or any data source that supports an ODBC connection
These are, of course, only a few of the tasks you can perform in SSIS. As we work through this series, you’ll get a better sense of how extensive SSIS actually is.
Getting Started
SSIS is available only in SQL Server 2005 onwards. You create and develop SSIS in SQL Server Business Intelligence Development Studio (BIDS), a visual development tool based on Microsoft Visual Studio. (BIDS has morphed into SQL Server Data Tools (SSDT) in SQL Server 2012.)
Before going further, there is some terminology that’s important to understand. SSIS files are organized into packages, projects and solutions. The package is at the bottom of the hierarchy and contains the tasks necessary to perform the actual extract, transform, and load (ETL) operations. Each package is saved as a .dtsx file and is part of a project. You can include one or more packages in a project. That project, in turn, is part of a solution, which is at the top of the hierarchy. You can include one or more projects within a solution.
When you first open BIDS, you’re presented with the interface shown in Figure 1.
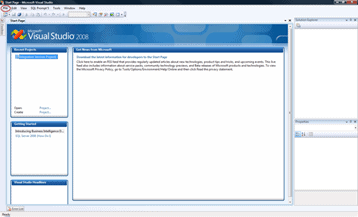
Figure 1: The SSIS interface in BIDS
To create an SSIS package, point to the File menu, point to New, and click Project. This launches the New Project dialog box, shown in Figure 2.
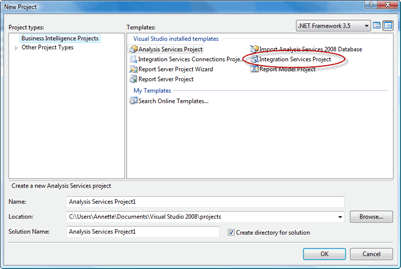
Figure 2: The New Project dialog box in BIDS
In the New Project dialog box, select the Integration Services Project template. Then, provide a name for the project in the Name text box. Next, in the Location text box, specify the folder where your project files should be saved, and then provide a name for the solution in the Solution Name text box.
After you’ve entered the project and solution information, click OK. Your new package will open in the SSIS window, as shown in Figure 3.
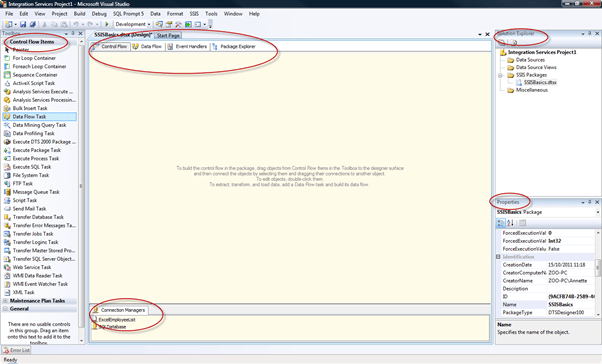
Figure 3: Creating a new SSIS package in BIDS
Notice that the SSIS interface is divided into the following five sections (windows):
Control Flow Items: The components necessary to control a package’s workflow. For example, the section includes components that let you move or copy data, run SQL statements, or send emails. (The components will be explained in more detail in this article and in articles that will follow.)Connection Managers: The connections to your data sources (whether retrieving or loading data). Your data sources can include SQL Server databases, CSV files, Excel spreadsheets, and a variety of other sources.Solution Explorer: A hierarchical view of the data sources, data source views, packages, and other components included within the current solution.Properties: The properties and their values for the package or the selected component within that package.SSIS Designer: The main working area for developing your SSIS package.SSIS Designeris broken into four tabs:ControlFlow,DataFlow,EventHandlers, andPackageExplorer. We’ll look at each of these in greater detail as we progress through this series.
Control Flow Items
In this article, I focus on setting up the SSIS package and defining the data connections. I do not cover all the components in the Control Flow Items window. In the next article, I will demonstrate using, what I think is, the most important of these components-the Data Flow Task-and cover other control flow tasks in subsequent articles.
Connection Managers
I will now explain how to create connection managers that connect to both Excel files and a SQL Server database. However, it is important to note that any connection created through the Connection Manager window is available only to the package it is created in.
Connecting to an Excel File
One of the first steps you’ll often take when developing an SSIS package is to create the connection managers necessary to retrieve data from or load data into your data sources. You can also set up connections “on the fly,” so if you miss creating one here it can be done as part of other tasks. This approach is most commonly used when you wish to create a connection based on the source. For example, if you wish to copy data out of a SQL Server database and export it to an Excel spreadsheet, you can create the connection manager when you set up your data flow.
To add a connection manager, right-click the blank area in the Connection Manager window, where it says Right-click here to add a new connection manager to the SSIS package, as shown in Figure 4.

Figure 4: Adding a connection manager to your SSIS package
This will launch a context menu that provides a number of options for creating various types of connections, as Figure 5 illustrates.
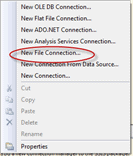
Figure 5: Selecting which type of connection manager to create
Notice you can create connections for such sources as OLE DB, ADO.NET, Analysis Services, and different types of files. In this case, we want to create a connection to an Excel file, so click the New File Connection option. This will launch the File Connection Manager Editor dialog box, shown in Figure 6.
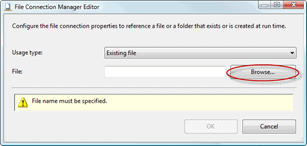
Figure 6: The File Connection Manager Editor dialog box
For this example, we’ll be connecting to an Excel file I created for demonstration purposes. Figure 7 shows the worksheet I set up in this file.

Figure 7: Excel worksheet used for demonstration purposes
I named the Excel file Employees.xlsx and saved it in the C:\Users\Annette\Documents folder.
In the Usage type drop-down list in the File Connection Manager Editor dialog box, select Existing file. Next, click the Browse button, navigate to the folder that contains the Excel file, and select the file. The dialog box should now look like the one shown in Figure 8.
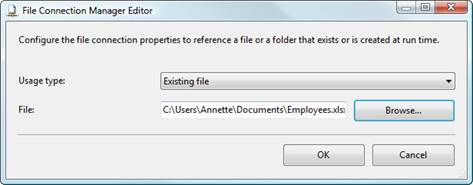
Figure 8: Configuring the File Connection Manager Editor dialog box
Once you’ve selected the file, click OK. The new connection manager will be added to the Connection Managers window and will be assigned the name of the file, as shown in Figure 9.
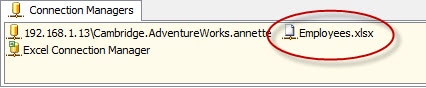
Figure 9: Viewing the new connection manager in the Connection Managers window
It is very easy to rename the connection manager to something that may be more appropriate. To do so, right-click the new connection manager and select Rename from the context menu, as show in Figure 10
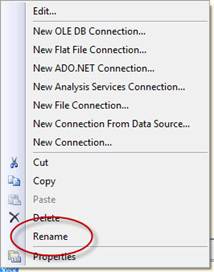
Figure 10: Renaming a connection manager
The name then becomes updateable and you can rename it to whatever you like. In this case, I renamed the connection manager Employees (Excel), as shown in Figure 11.

Figure 11: Viewing the new connection manager name
When you view a connection manager in the Connection Managers window, you’ll see that each connection type is associated with a different icon. If you created an Excel connection from here, it is displayed with the same icon used for any flat file connection. However if you create an Excel connection when adding a component to the Data Flow tab, the connection manager will display an Excel Icon.
Connecting to a SQL Server Table
Because our example will retrieve data from a SQL Server database, you’ll also need to create a connection manager for that database. To do so, you should again right-click the Connection Managers window to open the context menu, but this time, click the New OLE DB Connection option. The Configure OLE DB Connection Manager dialog box will appear, as shown in Figure 12.
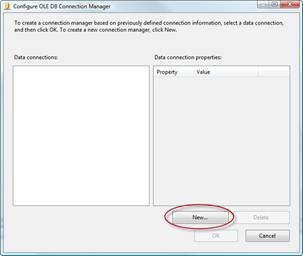
Figure 12: Creating an OLE DB connection manager
If any OLE DB connections have already been defined on the package, they will appear in Data connections list. You can use one of these, if it fits your needs, or you can create a new one. To create a new connection, click the New button to launch the Connection Manager dialog box, shown in Figure 13.
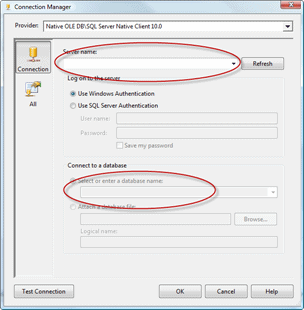
Figure 13: Configuring an OLE DB connection manager
To configure the connection manager, select the SQL Server instance from the Server name drop-down list, and then select the authentication type. In this case, I selected the Use SQL Server Authentication option and provided a username and password. You might decide to select the Use Windows Authentication option, in which case your current Windows credentials will be used to establish the connection with SQL Server. In a later article, when we look at deploying the package, we will look at how the connections can be altered at run time and therefore how the login details can be changed then. For now, ensure that you set up the login the way you need it to run the package while you’re developing it.
From the Select or enter a database name drop-down list, select the name of the AdventureWorks database. Your Connection Manager dialog box should now look similar to the one shown in Figure 14.
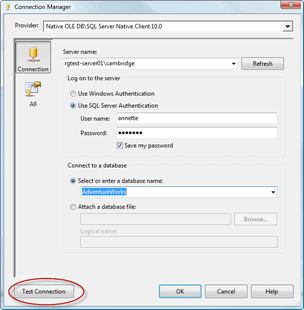
Figure 14: Configuring an OLE DB connection manager
Be sure to click the Test Connection button to verify that you can connect to the target database. The system will display a message similar to the one in Figure 15 to confirm whether you’ve successfully connected to the database.

Figure 15: Testing your database connection
After you’ve confirmed your connection, click OK to close the message box, and then click OK to close the Connection Manager dialog box. You will be returned to the Configure OLE DB Connection Manager dialog box, shown in Figure 16.
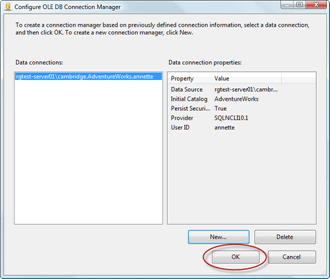
Figure 16: Finalizing your OLE DB connection manager
Notice that your new connection has been added to the Data connections list. Click OK to close the dialog box. The Connection Managers window will show your two connections. You’re now ready to start working with them.
Solution Explorer
Within Solution Explorer, you can view all projects, packages, data sources and data source views that make up the solution.
Adding New Projects
If you wish to add an additional project to a package, point to File on the menu bar, point to Add, and click New Project, as shown in Figure 17.

Figure 17: Adding a new project to a solution
The Add New Project window opens. Select Integration Services Project and in the Name box enter the name you wish to call the new project as shown in Figure 18.
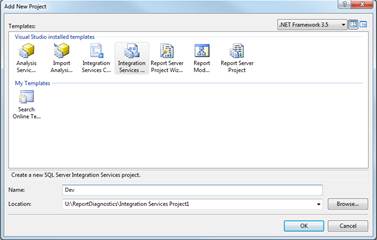
Figure 18: Add New Project Wizard
As you can see in Figure 19 a new project is added to the solution named “Dev” and will appear in Solution Explorer. The project will contain three empty folders named Data Sources, Data Source Views and Miscellaneous. The project will also contain a folder named SSIS Packages and within the folder a file named Package.dtsx, which is an empty SSIS package created automatically when the project is created. Figure 19 shows the new project and its folders in Solution Explorer.
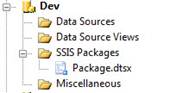
Figure 19: The folders and package created in a new SSIS project
Data Sources
Earlier I showed you how to create connections in the Connection Managers window. As I mentioned, if a connection is created in the Connection Managers window, it is available only to the package it was created in. However, you can also create connections known as data sources, which are available to all packages in a project.
To create a new data source, right-click Data Sources in Solution Explorer to open the Connection Manager dialog box (shown in Figure 20). Then fill in the options as you did when you created an OLE DB connection manager. Be sure to click Test Connection to confirm the connection has been created successfully.
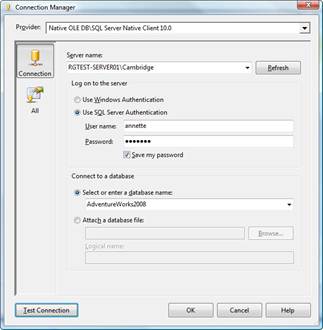
Figure 20: Creating a new data source connection
The Data Source Wizard will appear, with the new data connection highlighted, as shown in Figure 21. After you review the settings, click Next.
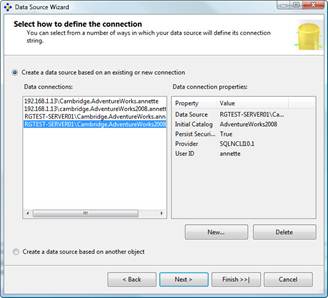
Figure 21: The data connection in the Data Source Wizard
When the next page of the wizard appears, type in a name for the data source. As this is project wide, I would recommend you fully describe the source using the server and database name. I have renamed my data source RGTest_AdventureWorks2008, as shown in Figure 22. I try to set up and follow consistent naming conventions.
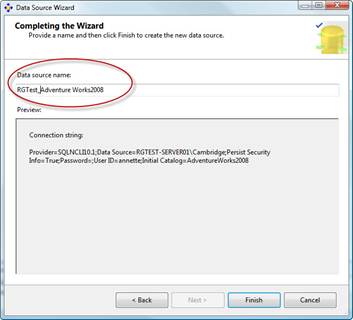
Figure 22: Renaming the data source
After you’ve renamed the data source, click Finish. Your Data Source should now be listed under Data Sources in Solution Explorer, as shown in Figure 23. Notice that the data source is saved with the .ds file extension to indicate that it is indeed a data source.
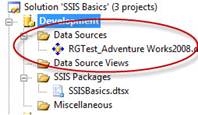
Figure 23: Creating a data source in Solution Explorer
Initially, the new data source is not listed in your package’s Connection Managers window; however, it is available to your package. Once you have made use of the data source in the package it will be visible in the Connection Managers window.Data Source Views
Data source views, like data sources, are available to all packages in a project. A data source view is used to define a subset of a data from a data source. The data source view can include only some of the tables or it can be used to define relationships or calculated columns.
Because a data source view is based on a data source, you would normally create the data source before starting to create the data source view. However, this is not compulsory because you can create the data source when you’re creating the data source view. To create a data source view, right-click the Data Source Views folder and click New Data Source View, as shown in Figure 24.
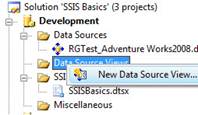
Figure 24: Creating a data source view in Solution Explorer
When the Data Source View Wizard appears, click Next. The next page shows the data sources available to the project, as shown in Figure 25. (In this case, there’s only one.)
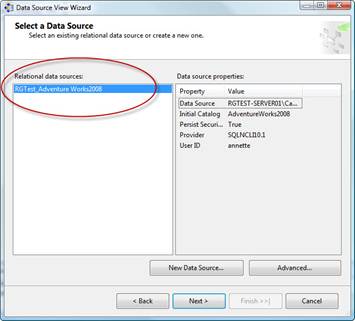
Figure 25: Available data sources
As you can see, the page shows the name of the data source in the Relational data sources list. The properties for the selected data source appear to the right, in the Data source properties window. A data source must be selected before you can continue with the wizard. If you haven’t created the data source you need, you can create one now by clicking the New Data Source button.
Once you’ve selected the necessary data source, click Next. The new page provides a list of the tables and views available through the selected data source. If you wish to filter the list, type the filter criteria in the Filter text box below the Available Objects list, and then click the filter icon to the right of the text box. For example, I typed Emp in the Filter text box, which reduced the list of available objects to those that contain “Emp” in their name, as shown in Figure 26.
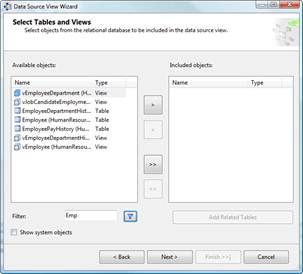
Figure 26: Filtering tables and views in the data source
The next step is to determine which tables and views you want to include in your data source view. From the filtered list of tables and views in the Available Objects list, select the objects you want to include. You can select more than one object by clicking the first one, holding down the Ctrl key, and then clicking the additional objects. Once you’ve selected the objects, click the single right arrow button to move those objects to the Included Objects window. If you want to move all the listed objects, simply click the double right arrow button.
Once an object has been moved to the Included Objects list, the single left arrow button and double left arrow button become active. These work the same as the right arrows. The single left arrow moves a single selected object or multiple selected objects from the Included objects list back to the Available objects list. The double left arrow moves all objects in the Included objects list back to the Available objects list.
Figure 27 shows the full list of available objects (without filters), minus the two objects that have been moved to the Included objects list. Notice that two additional objects are selected in the Available objects window. As you would expect, you can move the files to the Included objects list by clicking the single right arrow button.
If you click the Add Related Tables button beneath the Included objects list, all tables related to the objects in the Included objects list will be automatically added.
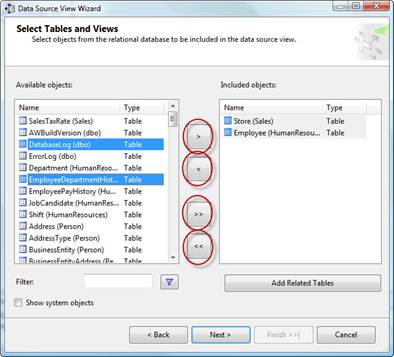
Figure 27: Adding tables and views to a data source view
Once all required objects have been selected, click Next. You can now see a preview of what you have selected, and you can rename the data source view to something more appropriate. If you have missed an object, click the Back button to return to the previous page.
For this example, I renamed my data source view AW2008-Employees. As you’re changing the name in the Name textbox, the name is also updated in the Preview window, as shown in Figure 28.
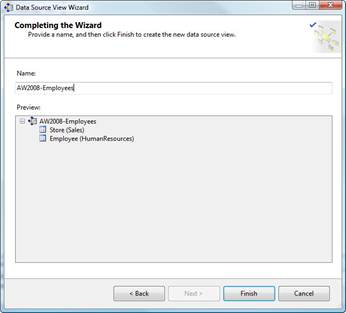
Figure 28: Renaming the data source view
If you are happy with the configuration, click Finish. The data source view is saved with the .dsv file extension and is added to the Data Source Views folder in Solution Explorer. A new window appears in SSIS Designer and shows the data source view in design mode, as shown in Figure 29.

Figure 29: Data source view in design mode
Amending a Data Source View
SSIS provides a number of options for modifying a data source view. Most of those options are at the table level. If you right-click the table name either on the design surface or in the Tables pane (on the left side of the screen), you can choose from the following options:
Adding a calculationAdding a relationshipReplacing a tableDeleting a tableReviewing data
Deleting an object
Suppose I added the Store table in error. I can delete from table from my data source view by right-clicking the table name and selecting the Delete table from DSV option, as shown in Figure 30.
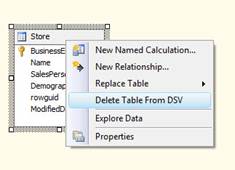
Figure 30: Deleting a table from a data source view
You’ll then be prompted to confirm your deletion. When the Delete Objects message box appears, click OK, as shown in Figure 31.
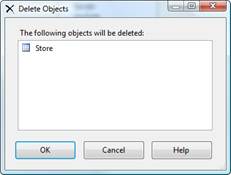
Figure 31: Deleting objects from a data source view
When you click OK, the object is permanently removed from the data source view.
Adding a new column
To add a calculated column to a data source view, right-click the table name and select New Named Calculation to open the Create Named Calculation dialog box. Enter the new column name in the Column name text box, add an appropriate description in the Description text box, if required, and then create the calculation in the Expression text box. For this example, I’ve assigned the name Age to the column and added the description Current Age based on Birth Date. For the expression, I added the one shown in Figure 32. Note that, at this stage, there is no way to test whether your code is correct!
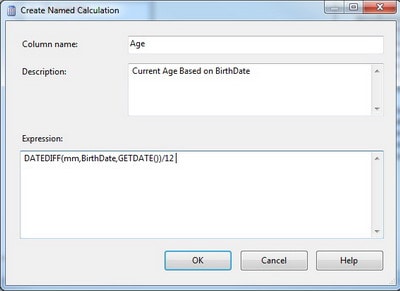
Figure 32: Creating a calculated column
Figure 33 shows us that the Age column has been added to our table. The icon next to the column shows that it is a calculated column.
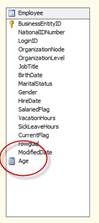
Figure 33: Verifying that the calculated column has been added
To view the data in the table and verify that the new column has been created correctly, right-click one of the columns and then click Explore Data, as shown in Figure 34.
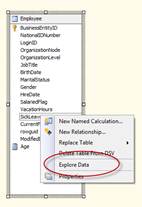
Figure 34: Viewing the data in the table
The Explore Employee Table window appears, as shown in Figure 35. We can now view all the data in the Employee table. Notice that the Age column has been added to the table (on the far right side) and displays the data returned by our expression.
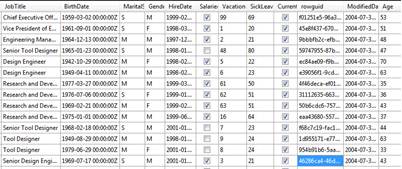
Figure 35: Viewing data in the Employee table
Once you have made all the necessary changes, save the data source view. It will then be available for you to use in any of your packages in the project.
Summary
In this article, I’ve shown you how to create an SSIS package and set up connection managers, data sources, and data source views. In the next article, I will show you how to set up a package that retrieves data from a SQL Server database and loads it into an Excel file. I will also show you how to add a derived column that calculates the data to be inserted into the file. In addition, I will demonstrate how to run the package.
In future articles, I plan to show you how to deploy the package so it can be run as part of a scheduled job or called in other ways. I also plan to cover how to use variables and how they can be passed between tasks. I also aim to cover more control flow tasks and data flow components, including those that address conditional flow logic and for-each looping logic. There is much much more that can be done using SSIS, and I hope over the course of this series to cover as much information as possible.
Load comments