

Applications built today pass through different phases before going live; most organizations use development, testing, and production, while others employ development, staging, and then production. Regardless of the number of phases, it all follows the multi-environment concept. In Kubernetes, this is no different; however, Kubernetes is already complex as it is, so adhering to the concept of multi-environments again is not a piece of cake. But there are two well-known options; Helm and Kustomize.
Helm simplifies the process of deploying applications, which is good for managing packaged applications across different environments. On the other hand, Kustomize excels at customizing configurations without altering the original templates. But then, there is Kluctl.
What is Kluctl
For every phase or environment in which you run your applications, there are configurations, resource requirements, or other settings that are unique to each environment. Kluctl allows you to define environment-specific parameters and configurations in a structured and maintainable way. To reduce the risk of human error and to ensure consistency across environments, Kluctl can automatically apply the correct configurations for each environment during deployment. It achieves this through a declarative approach, where you define the desired state of your applications and services, and Kluctl ensures that the Kubernetes cluster reflects this state.
Kluctl is robust in the sense that teams already utilizing the package management capabilities of Helm or the configuration customization features of Kustomize can combine them with Kluctl. Kluctl integrates seamlessly with these tools and even enhances their capabilities by providing a higher level of abstraction for managing deployments. This integration ensures that you can leverage the features of these tools while also enjoying the simplified, unified management interface that Kluctl offers. This method minimizes manual intervention, supports reproducibility and traceability, which are crucial for maintaining system reliability and compliance in complex deployments.
Prerequisites
The following sections will be hands-on. To follow along be sure to meet the following requirements:
- A Kubernetes cluster up and running. Either a local or cloud-based cluster will work fine.
- Kluctl, Helm and Kustomize installed, see the following guide from their official documentation respectively kluctl-project, helm install and kustomize site.
Using Kluctl
Kluctl is not a standalone deployment tool in the sense that it doesn’t replace the functionalities of Helm or Kustomize. Instead, Kluctl is designed to work with these tools, and then enhance the management of deployments that are defined using Helm charts or Kustomize configurations.
Therefore, to fully utilize Kluctl, you would typically have your deployment configurations already set up in Helm or Kustomize, and then use Kluctl to orchestrate these deployments across different environments or manage complex scenarios more seamlessly.
Begin by checking the version of Kluctl using the following command:
|
1 |
kluctl --version |
As of this writing the latest version is 2.24.1 as shown below in the expected output from that statement (with different prompt value, of course):
|
1 2 |
mercy@mercy:~$ kluctl --version kluctl version 2.24.1 |
Using Kluctl with Kustomize
The official Kluctl documentation provides example projects to demonstrate the use of Kluctl. To begin, you will be using the Simple project from the examples repository to see how Kluctl works with Kustomize.
Clone the repository using the command below:
|
1 |
git clone git@github.com:kluctl/kluctl-examples.git |
Once cloned, cd into the kluctl-examples/simple directory and run the tree command to see the project structure:
|
1 2 |
cd kluctl-examples/simple tree |
You should have the following output:
|
1 2 3 4 5 6 7 8 9 10 11 12 |
mercy@mercy:~/kluctl-examples/simple$ tree . ├── deployment │ ├── deployment.yml │ └── nginx │ ├── deploy.yml │ ├── kustomization.yml │ ├── namespace.yml │ └── service.yml └── deployment.yml 2 directories, 6 files mercy@mercy:~/kluctl-examples/simple$ |
Here’s a brief explanation of what is contained in the Simple project directory:
- The **deployment** directory: Located within this directory is a
deployment.ymlfile that provides configurations more specific to the resources being managed. It directs Kluctl to deploy resources specifically defined within thenginxsubdirectory, focusing on the specific components necessary for the Nginx service. - The **nginx** subdirectory: This subdirectory contains all necessary files for deploying an Nginx service:
deploy.yml: Defines the Kubernetes Deployment for Nginx, specifying the deployment’s desired state, including replicas, container image, and ports.kustomization.yml: A Kustomize configuration file that aggregates all related Kubernetes resources to be applied together, such as namespace, deployment, and service.namespace.yml: Defines a Kubernetes Namespace, with its name dynamically set based on theenvironmentargument passed from.kluctl.yml.service.yml: Outlines a Kubernetes Service to expose the Nginx deployment externally on port 80.
- **deployment.yml**: This file is located at the root of the
simpledirectory and serves as the primary entry point for deployment configurations. It uses theincludedirective to incorporate deployments from thedeploymentdirectory, ensuring a modular approach to resource management. Additionally, it definescommonLabelsthat are applied across all resources managed by this project, aiding in resource identification and management. - **.kluctl.yml**: This configuration file is what Kluctl watches out for defining deployment targets and providing necessary arguments to them. It includes multiple targets named
simpleandanother, each configured with anenvironmentargument to adapt to different deployment scenarios. Thediscriminatorfield uniquely identifies deployments from this project, beneficial in complex environments with multiple ongoing deployments.
Navigate to simple/.kluctl.yml and add a context in the targets section to minikube like so, this enables Kluctl deployments to work with different Kubernetes environments:
…
|
1 2 3 4 5 6 7 8 9 10 |
targets: - name: simple context: minikube ... If you are using kind instead of minikube modify the context as follows: ... targets: - name: simple context: kind-kind ... |
For cloud-based clusters, add the appropriate context, you can find out using the following command:
|
1 |
kubectl config get-contexts |
Next, we deploy the sample project using the following Kluctl command:
|
1 |
kluctl deploy -t simple |
Kluctl begins to initialize various steps including updating Kluctl, loading the project, rendering templates and Helm charts, and building Kustomize objects. Once the differences are displayed and you’re prompted to proceed, type y to confirm and Kluctl will finalize the deployment by applying the necessary Kubernetes objects such as namespaces, services, and deployments, confirming each step along the way.
Once this process is done, you should have something very similar to the following (chose Y (yes) when prompted if you do):
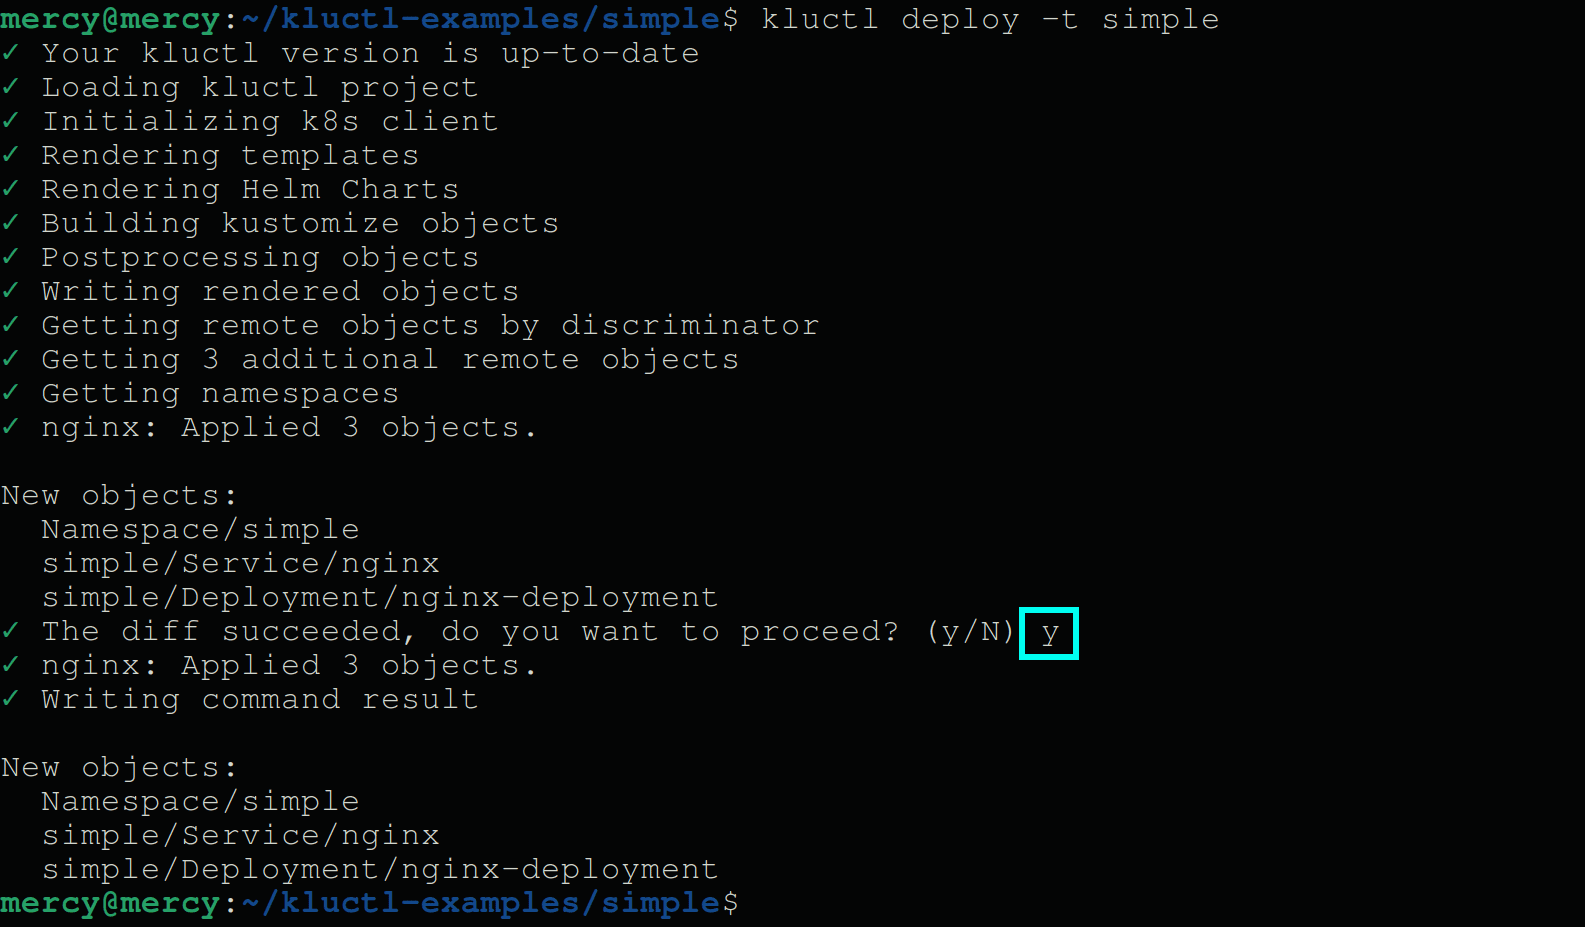 Fig 1: Creating a Kluctl deployment
View the deployments, pods and services created by Kluctl using the following kubectl commands:
|
1 2 3 |
kubectl -n simple get deployments kubectl -n simple get pods kubectl -n simple get svc |
Your output should be something like this:

Fig 2: Viewing pods
Modify the replica count in your deployment, adjust the replicas field in the deployment/nginx/deploy.yml file from 3 to 1. After updating the file, redeploy the project by executing the same Kluctl command: kluctl deploy -t simple.
This will apply the updated configuration and reflect the new number of replicas in your deployment. You should a diff showing the following output:
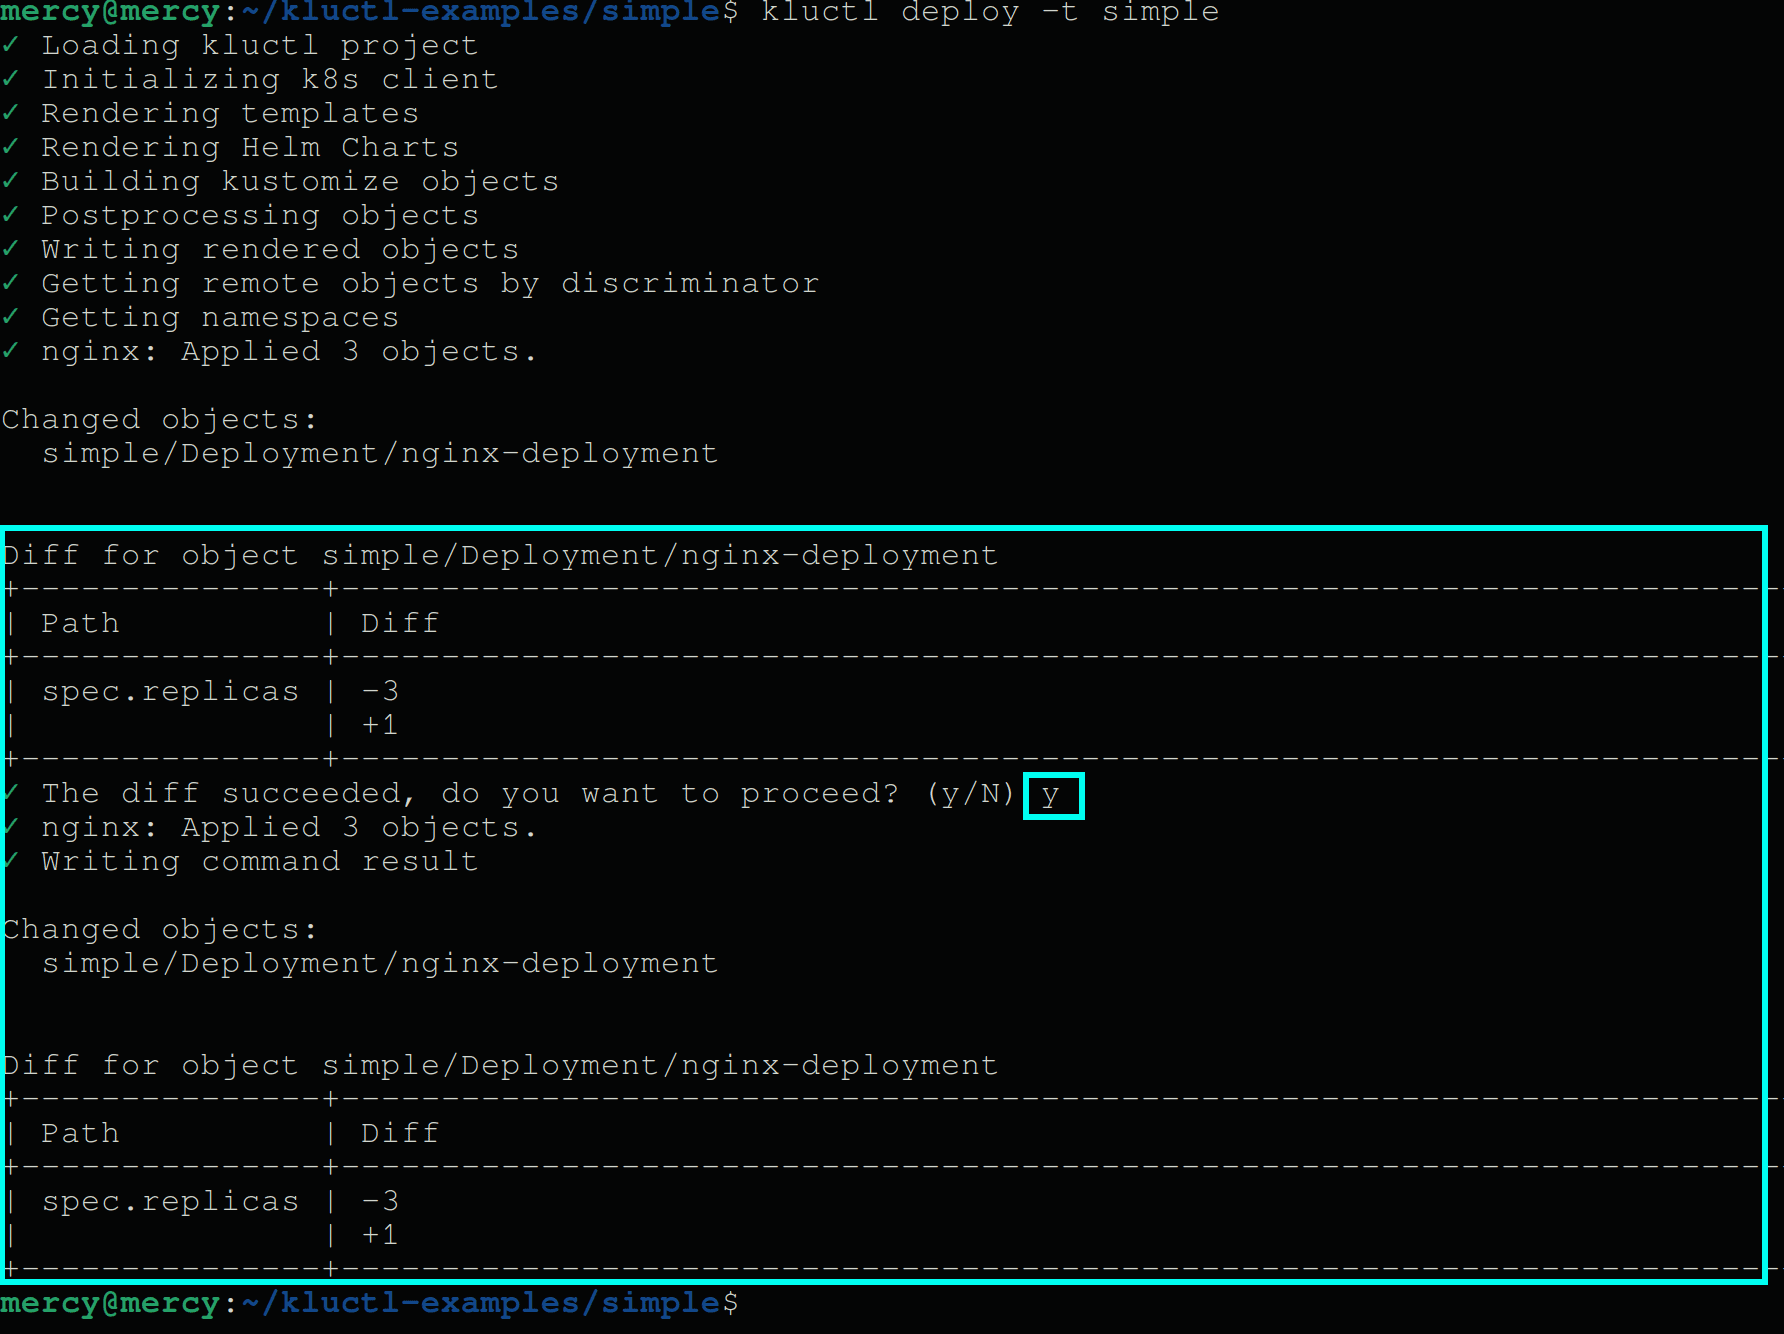
Fig 3: Creating a Kluctl deployment and viewing diff
From the output above, during the deployment with Kluctl detected a change in the nginx-deployment within the simple project. Specifically, the number of replicas specified in the deployment configuration was reduced from 3 to 1. Kluctl highlighted this change in a diff output showing a decrease in spec.replicas from 3 to 1.
Running Multi-environment deployments
The true power of Kluctl lies in managing configurations effectively across multi-environment deployments. To see this capability in action, navigate to the kluctl-examples/simple-helm directory and edit the .kluctl.yml file as shown below:
|
1 2 3 4 5 6 7 8 9 10 11 12 13 14 15 16 17 |
discriminator: kluctl-examples-simple-helm-{{ target.name }} targets: - name: simple-helm args: environment: simple-helm env_type: simple-helm - name: testing args: environment: testing env_type: testing - name: production args: environment: production env_type: production args: - name: environment |
This configuration in the .kluctl.yml file establishes three distinct deployment targets for managing different stages of the application lifecycle: simple-helm, testing, and production. Each target is associated with its own set of arguments, specifically environment and env_type, which will be used to dynamically tailor the deployment settings according to the specific needs of each stage.
Head over to the kluctl-examples/simple-helm/deployment.yml and add both a vars section and a new line in the commonLabels section:
|
1 2 3 4 5 6 7 |
vars: #add this section - file: ./vars/{{args.env_type }}.yml ... commonLabels: ... # Add this line examples.kluctl.io/deployment-target: "{{ target.name }}" |
The Vars section represents a dynamic way to inject configuration variables based on the environment or deployment target. In this case, it will be used to load environment-specific settings from variable files located in the ./vars/ directory you will create later, where each file is named after the env_type argument of each target. This enables the deployment to adjust parameters like replica counts, resource limits, and other configurable aspects of the Helm charts based on the specific needs of each environment.
A common label on the other hand is what Kluctl uses to uniquely identify and manage resources across different deployments. Without these labels, accurate tracking and differentiation of resources deployed under varying conditions would not be possible, which will lead to potential conflicts and management difficulties.
At the root of the simple-helm directory create a vars directory and populate it with yml files for all deployment targets; simple-helm.yml, testing.yml and prod.yml. Paste the following configuration settings in each target yml file as shown below:
|
1 2 3 4 5 6 7 8 9 10 11 |
#simple-helm.yml nginx: replicas: 2 # production.yml nginx: replicas: 4 # testing.yml nginx: replicas: 4 |
Finally, go into the deployment/nginx directory and edit the helm-values.yml file to include the following setting; to dynamically adjust the replicaCount based on the environment-specific variable.
|
1 2 3 |
replicaCount: {{ nginx.replicas }} resources: ... |
Create these deployments using the following commands:
|
1 2 3 |
kluctl deploy -t simple-helm kluctl deploy -t testing kluctl deploy -t production |
Execute the following commands to confirm the number of nginx instances (pods) deployed for each target:
|
1 2 3 |
kubectl get pods -n simple-helm kubectl get pods -n testing kubectl get pods -n production |
You should see something very similar to the following output:
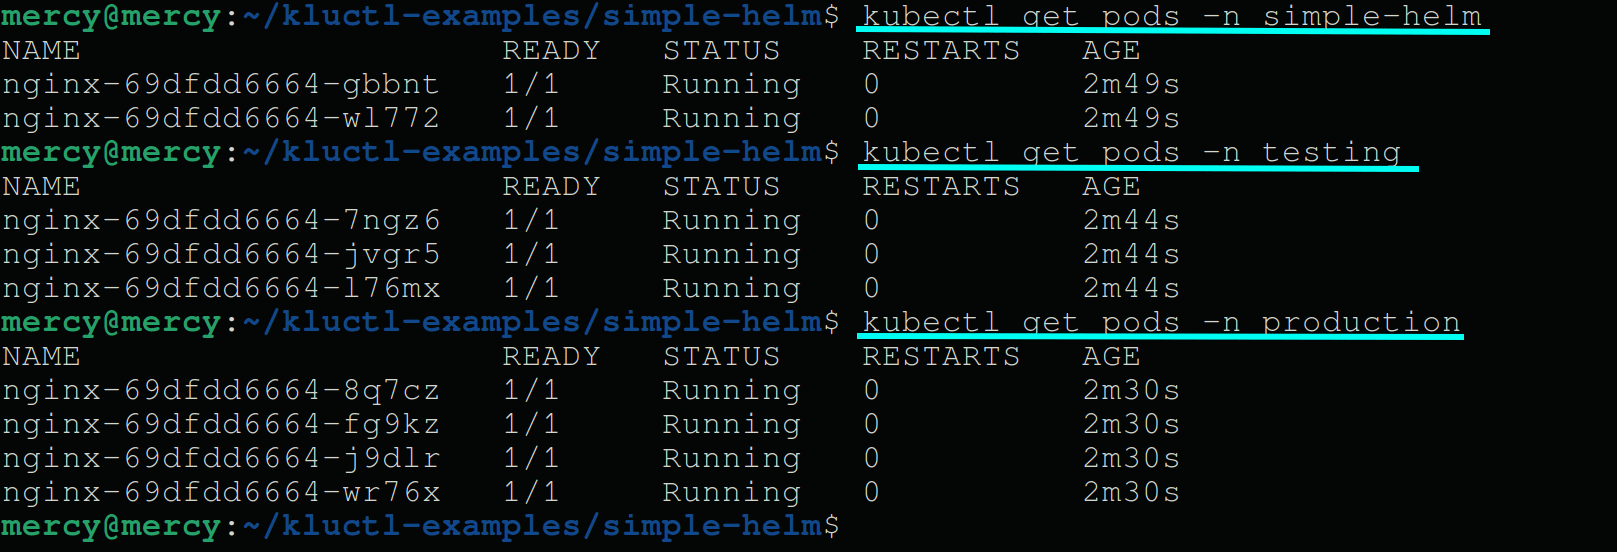
Fig 4: Viewing pods for all targets
From the output above, simple-helm target has two pods, testing has three pods and production has four pods which is what is expected.
Running the Kluctl WebUi
Kluctl also offers a Web UI that provides a visual interface to manage and monitor your deployments more intuitively. This is particularly helpful if you prefer a graphical interface over the command-line.
To run the Kluctl Web UI, you have two options either running it locally or installing it in your kubernetes cluster. A quick walk around is to run it locally using the following command:
|
1 |
kluctl webui run |
This command will start the Kluctl Web UI server and will provide a URL where you can access the Web UI, such as http://localhost:8080 as shown below:
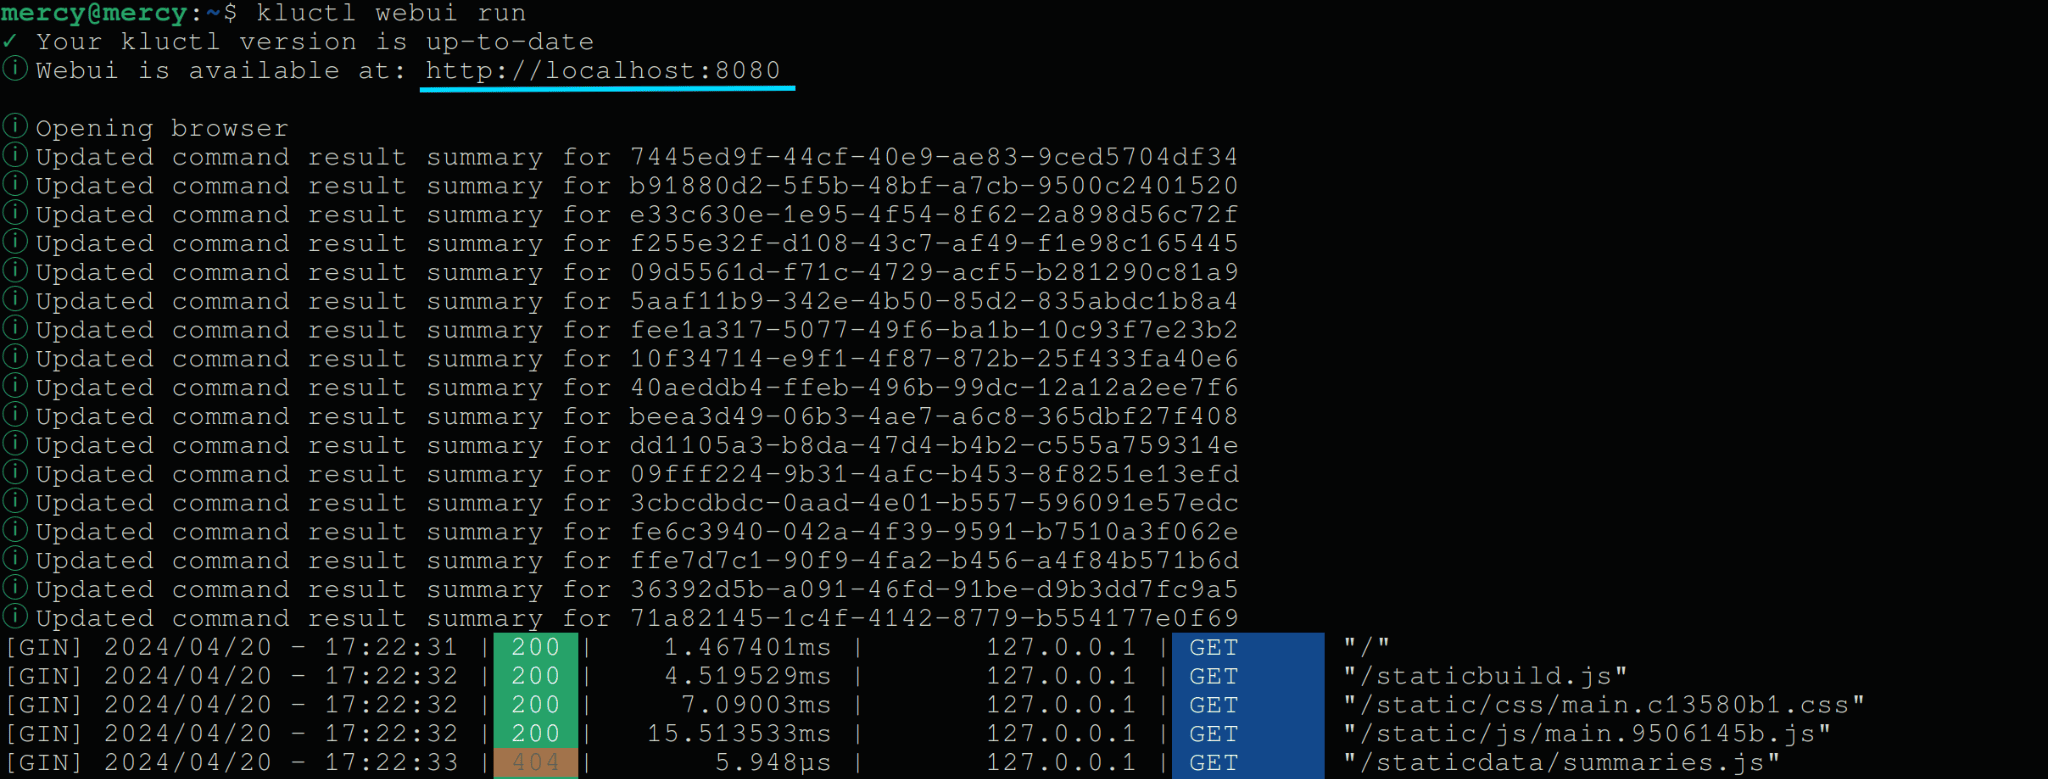
Fig 5: Initiating kluctl web UI
When you visit the URL in your preferred web browser you should see the deployments you created with Kluctl and their respective targets:
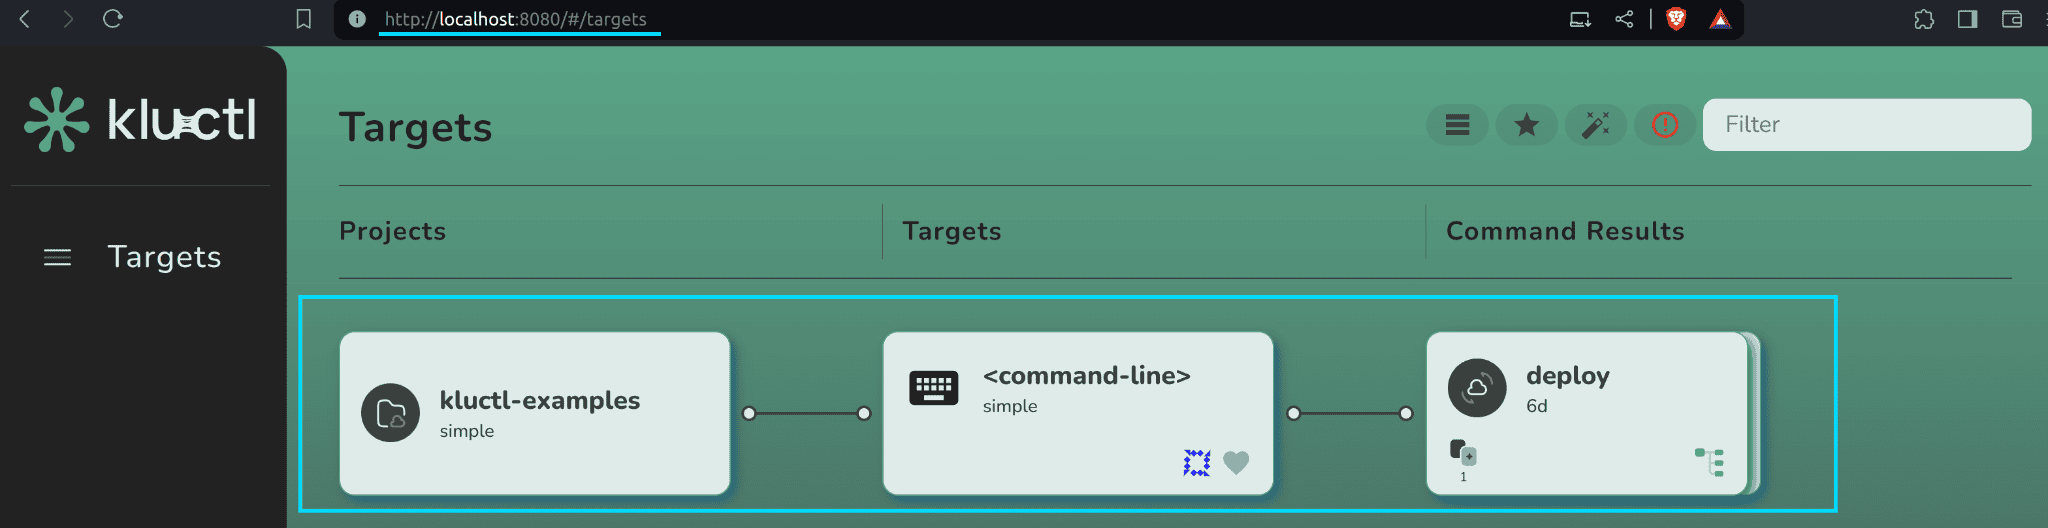
Fig 6: Viewing targets for kluctl-examples/simple deployment
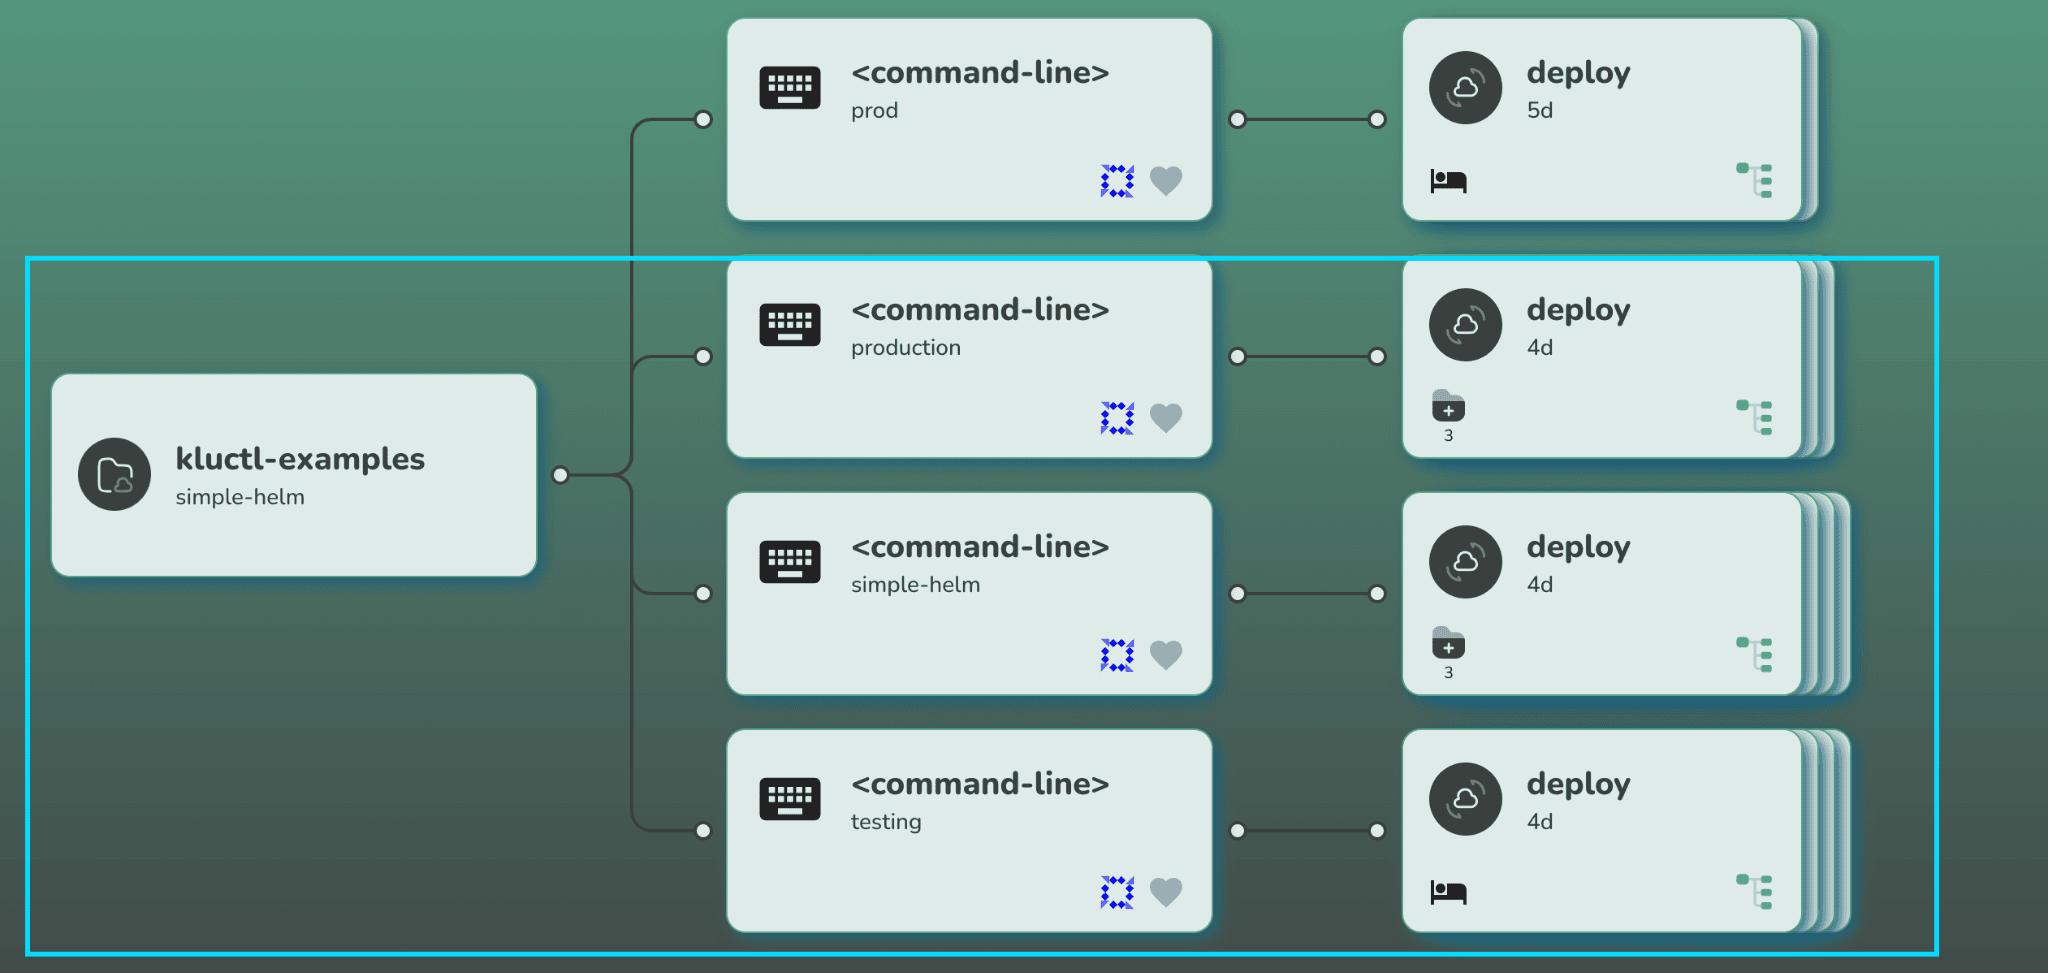
Fig 7: Viewing targets for kluctl-example/simple-helm deployment
To view the summary of the targets, you can click on the target, and you should have a pop up like the one below:
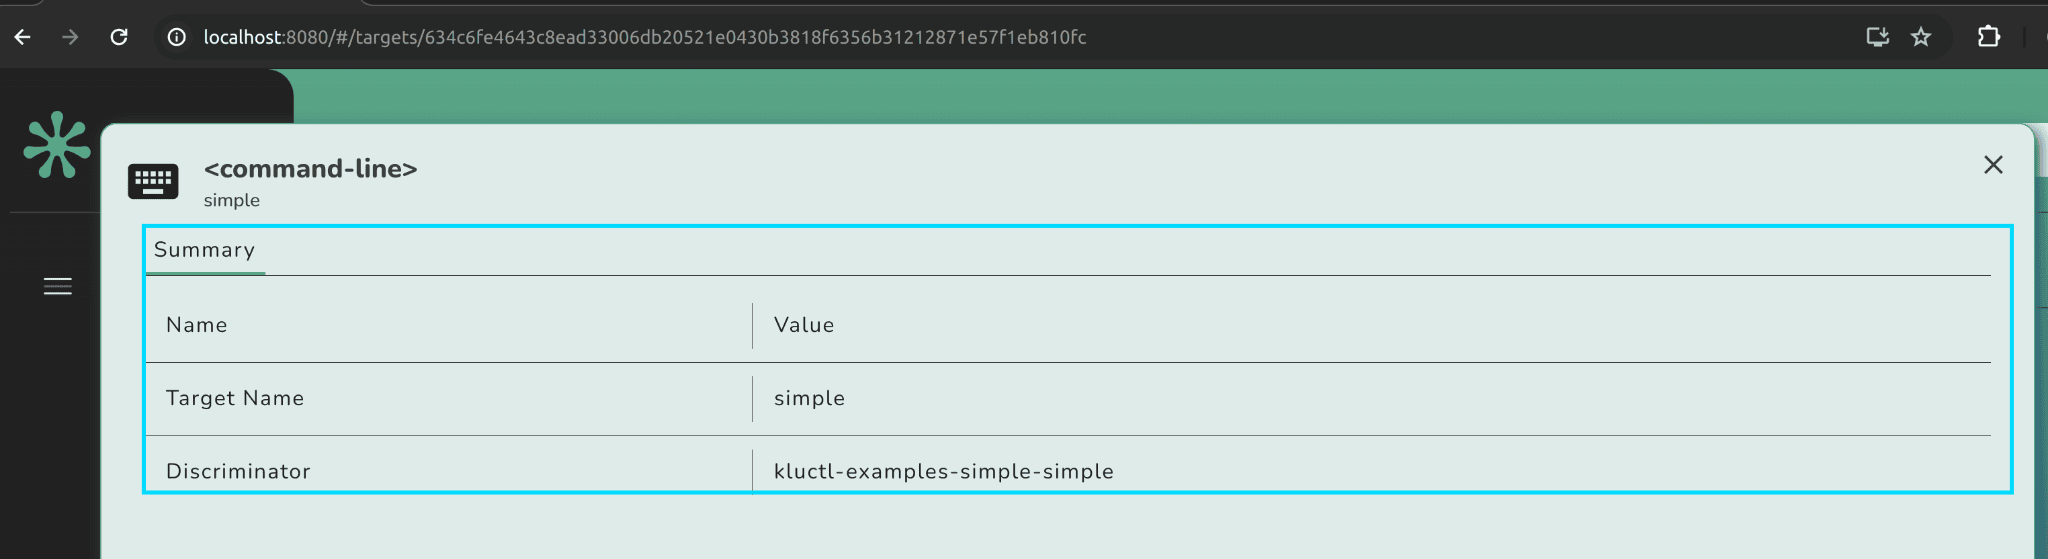
Fig 8: Viewing summary of kluctl-examples/simple target
Conclusion
In this article, I have covered how Kluctl enhances Kubernetes deployment management across multiple environments, leveraging the integration of tools like Helm and Kustomize to provide a robust, unified deployment strategy. With Kluctl you have a simplified deployment process, reduce the potential for human error, and ensure consistency across all deployment stages from development through production.
However, you still have Kluctl GitOps to uncover. With Kluctl GitOps, you can integrate your deployment workflows directly with your version control system. This integration enhances transparency, traceability and roll backs when working with Kluctl. To find out more about Kluctl GitOps visit the Kluctl official documentation.


Load comments