
SQL Server Management Objects (SMO) is a .NET framework for programmatic management of SQL Server and Azure SQL Database. With SMO, you interact with SQL Server objects (databases, tables, indexes, logins) using C# or any .NET language instead of T-SQL strings. Since SQL Server 2017, SMO is distributed as the Microsoft.SqlServer.SqlManagementObjects NuGet package.
This article demonstrates three practical scenarios: connecting to a SQL Server instance, creating tables and generating DDL scripts programmatically, and automating backup and restore operations. The examples use C# with the NuGet package and include a combined SMO + SQLCLR library for server-side automation.
Introduction
The SQL Server Management Objects (SMO) Framework is a set of objects designed for programmatic management of Microsoft SQL Server and Microsoft Azure SQL Database. This article talks about how to manipulate SQL Server objects by using SMO. There are many situations in which you can use SMO, for example:
- You would like to develop a custom application to install or update your software. It means a solution to distribute a new version to your clients. Part of that solution is to make database changes, save database state before the process of database changes start and revert to the original state if the process of database changes fails.
- You would like to develop your custom solution, which implements database changes incrementally. Every developer should suggest a set of DDL changes in the standard database model.
- You have or would like to develop a custom application for monitoring SQL Server.
Of course, there are many more scenarios than what I mentioned here. For example, in Microsoft’s documentation, the following scenarios are listed:
- An SMO application might be used to include third-party hardware or software seamlessly into the database management application.
- You might have to create an application for creating and monitoring the efficiency of indexes, etc.
Beginning with SQL Server 2017, SMO is distributed as the Microsoft.SqlServer.SqlManagementObjects NuGet package to allow users to develop applications with SMO.
In this article, I will demonstrate a few practical examples that will show you part of the power of SMO. Explaining everything about SMO could take a lot of time and would not be fit inside one article.
- In the first example, I will show you how to establish a connection to SQL Server.
- In the second example, I will show you how to make some DDL changes, create a table and based on that newly created table, create a T-SQL script for the table re-creation.
- Finally, I will show you how to programmatically make a backup, restore, and build an SMO library, which will help you in some situations. In the example, I will combine SMO and SQLCLR methods.
Installing the SMO NuGet Package
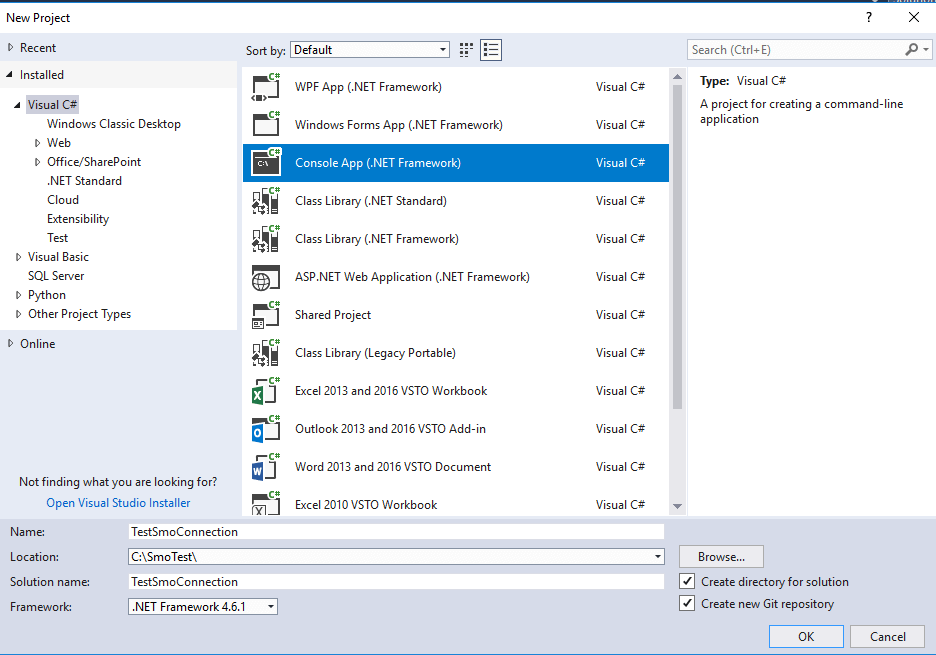
In order to use SMO NuGet package, you must start Visual Studio Community Edition (or any licensed edition). Create a new project using C# (you can use any .NET language, but these examples are in C#) and choose Console App (.NET Framework). Name this project as you wish; for example, TestSmoConnection, as shown in the image below.
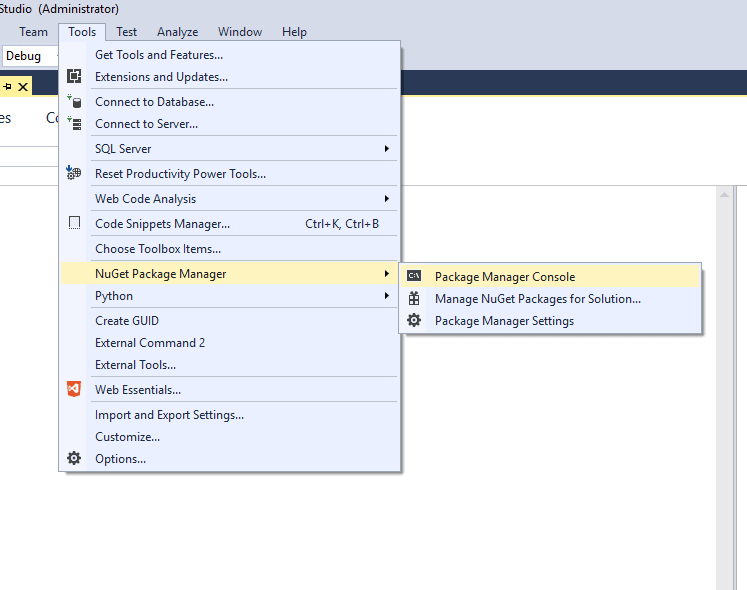
Then start the NuGet Package Manager Console.
In the Package Manager Console, paste the following instruction and press enter.
|
1 |
Install-Package Microsoft.SqlServer.SqlManagementObjects -Version 140.17218.0 |
Several DLLs will be loaded into the solution. In the figure below, I highlighted four DLLs that will be used in the examples.
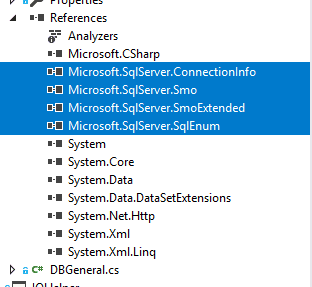
The highlighted SMO assemblies are described in the table below
|
Microsoft.SqlServer.Management.Smo |
Contains instance classes, utility classes, and enumerations that are used to manipulate Microsoft SQL Server programmatically. |
||
|
Microsoft.SqlServer.SqlEnum |
Contains definitions of various enumerators that exists inside SQL Server. For example, database recovery model is defined like in the snippet below
|
||
|
Microsoft.SqlServer.ConnectionInfo |
Contains instance classes, utility classes, and enumerations that are used to manipulate connection objects programmatically |
||
|
Microsoft.SqlServer.SmoExtended |
Contains some base classes for backup, restore, devices, etc. |
The First Example – Connecting to SQL Server
Once the project is created and the SMO assemblies are added, the next thing to do is to include namespace references like the listing below:
|
1 2 3 |
using Microsoft.SqlServer.Management.Common; using Microsoft.SqlServer.Management.Smo; using System; |
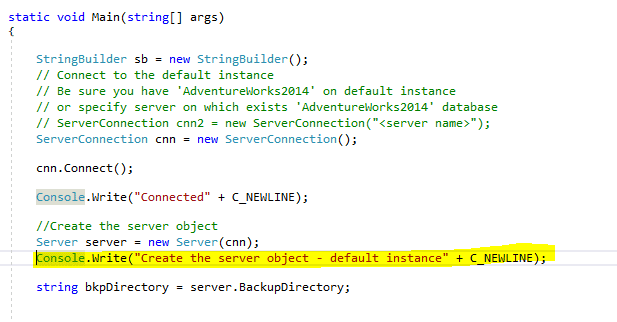
The remainder of the source code is displayed in the listing below. Copy and paste this code snippet into your Program.cs file.
|
1 2 3 4 5 6 7 8 9 10 11 12 13 14 15 16 17 18 19 20 21 22 23 24 25 26 27 28 29 30 31 32 33 34 35 36 37 38 39 40 41 42 43 44 45 46 47 48 |
namespace TestSmoConnection { class Program { private const string C_DATABASENAME = "AdventureWorks2014"; private const string C_NEWLINE = "\r\n"; static void Main(string[] args) { // Connect to the default instance // Be sure you have 'AdventureWorks2014' //on default instance // or specify server on which exists //'AdventureWorks2014' database // ServerConnection cnn2 = // new ServerConnection("<server name>"); ServerConnection cnn = new ServerConnection(); cnn.Connect(); Console.Write("Connected" + C_NEWLINE); //Create the server object Server server = new Server(cnn); Console.Write("Create the server object " + "- default instance" + C_NEWLINE); string bkpDirectory = server.BackupDirectory; //Create the database object Database db = server.Databases[C_DATABASENAME]; Console.Write( "Create the database object - AdventureWorks2014" + C_NEWLINE); Console.Write("Press any key to exit..." + C_NEWLINE); Console.ReadLine(); } } } |
Modify the server connection if needed. This example runs on the AdventureWorks2014 database, so be sure to connect to an instance hosting that database. Then just press F5 and the console application will start and almost immediately finish. At the end Console.ReadLine() is included in order to keep the application from exiting. At this point, you can view the application’s outputs and investigate which kind of connection is established.
At the very beginning of the first example, a connection is established by creating an object of type ServerConnection. The ServerConnection class is used to establish a connection to the instance of SQL Server. There are various ways to establish the connection. Let us explore some of them.
Just calling code as shown below will establish the connection to the default SQL instance.
|
1 2 3 |
//Connect to the default instance ServerConnection cnn = new ServerConnection(); cnn.Connect(); |
Another option is to pass the SQL Server name, as well as username and password as is shown in the snippet below.
|
1 2 3 4 5 6 |
Server srv = null; ServerConnection cnn = null; cnn = new ServerConnection("your instance name", "user name", "password"); cnn.Connect(); srv = new Server(cnn); |
In order to view what kind of connection is made (NOTE: the console application should still be running), start SSMS (SQL Server Management Server) and open Activity Monitor. You can find Activity Monitor by right-clicking on the server name. Suppose you are connected as the user sa and, by using Activity Monitor, you can easily find your connection in the Processes section. As you can see in the image below, there is no magic at all. Behind the scenes is the .Net SqlClient Data Provider. SMO is built upon the System.Data and System.Data.SqlClient namespaces. Instead of writing T-SQL inside your .NET code, in the case of SMO, you will use dot notation.

The most interesting property of the ServerConnection object is called LoginSecure, which will switch between integrated and SQL Server security. In order, to establish a connection to the server by using SQL Server Authentication, set this property to false. The following code checks the value to determine which way to log in:
|
1 2 3 4 5 6 7 8 9 10 11 |
cnn = new ServerConnection(); cnn.LoginSecure = secureLogin; if (cnn.LoginSecure) //Integrated security cnn.ConnectAsUserName = UserName; else { //SQL Server authentication cnn.Login = UserName; cnn.Password = Pass; } |
Working with SMO Objects
SMO objects are loaded only when specifically referenced. Object properties are only partially loaded when the object is created. The remaining objects and properties are loaded when they are referenced directly.
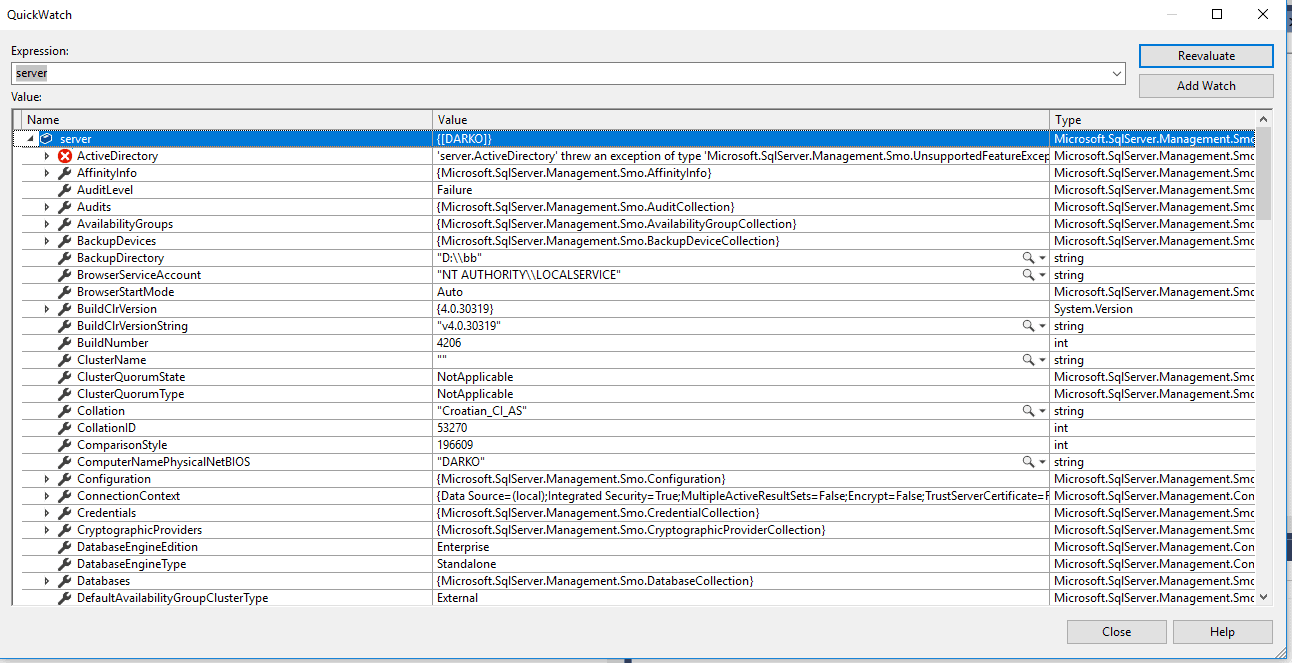
To illustrate, first press any key to quit the first demo. Then put the cursor to the highlighted line, as shown in the image below, and press CTRL + F10 or, from the context menu, choose Run To Cursor. The console application will start again and stop on the highlighted line.
Right-click on the server variable and choose Quick Watch from the context menu. You will notice a delay because we are accessing the server properties for the first time and, to determine property values, SMO must execute T-SQL in the background. After expanding server properties by clicking on the plus sign, the Quick Watch window will look like the image below.
For example, if you would like to access the server.BackupDirectory property…
|
1 |
string bkpDirectory = server.BackupDirectory; |
…the following T-SQL is executed in the background, which can be proved easily by starting SQL Profiler.
|
1 2 3 4 5 6 7 8 9 10 11 12 13 14 15 16 17 18 19 20 21 22 23 24 25 |
DECLARE @SqlServiceRegPath SYSNAME; DECLARE @HkeyLocal NVARCHAR(18); DECLARE @ServicesRegPath NVARCHAR(34); DECLARE @BackupDirectory NVARCHAR(512); -- Instance-based paths DECLARE @MSSqlServerRegPath SYSNAME; DECLARE @InstanceRegPath SYSNAME; -- Instance-based paths SELECT @MSSqlServerRegPath = N'SOFTWARE\Microsoft\MSSQLServer'; SELECT @InstanceRegPath = @MSSqlServerRegPath + N'\MSSQLServer'; SELECT @HkeyLocal = N'HKEY_LOCAL_MACHINE'; IF 1 = isnull(CAST(SERVERPROPERTY('IsLocalDB') AS BIT), 0) SELECT @BackupDirectory = CAST(SERVERPROPERTY('instancedefaultdatapath') AS NVARCHAR(512)); ELSE EXEC master.dbo.xp_instance_regread @HkeyLocal ,@InstanceRegPath ,N'BackupDirectory' ,@BackupDirectory OUTPUT; SELECT @BackupDirectory; |
Stop code execution before continuing with the rest of the article.
Creating Objects
Let’s take another example. The source code of this example is located in CreateTable.cs inside the SmoIntroduction project which you can download here. The purpose of this demo is to show how easy it is to create a table and generate the T-SQL script to recreate the newly created table. At the end of this example, you will have the table and the T-SQL script.
In the project, there is one configuration file named app.config. Open app.config and adjust the connection string settings to point to the SQL Server instance that contains AdventureWorks2014. Make sure that SmoIntroduction is set as the startup project. The startup object in the project should be SmoIntroduction.CreateTable.

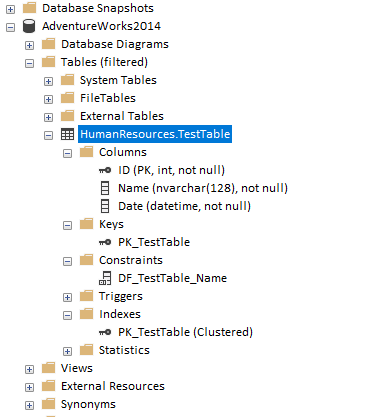
After pressing F5, the result of execution will be the creation of the table. The table name is hardcoded into the solution. The result, the newly created table with primary key and clustered index is displayed in the image below.
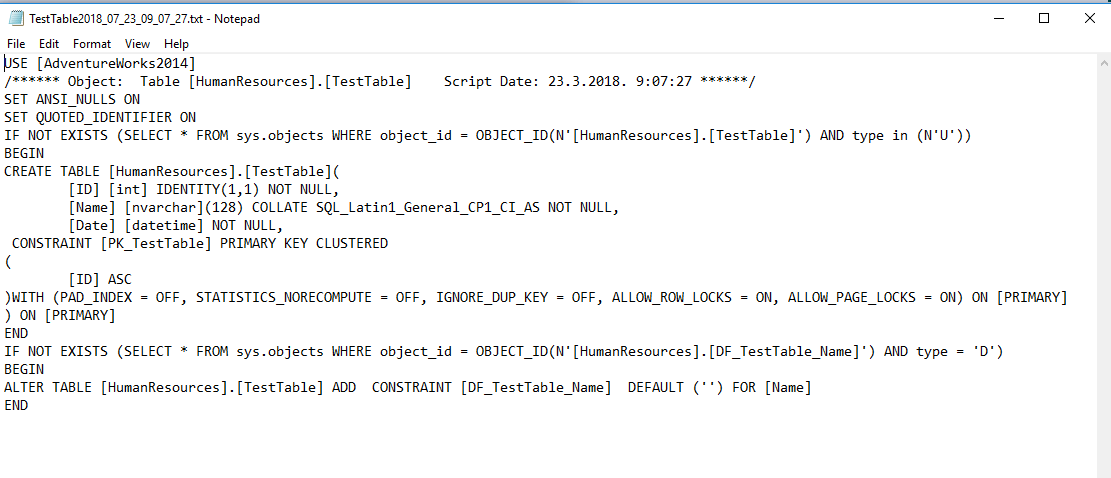
The T-SQL script is displayed in the Notepad window is shown in the image below.
Stop the execution and open up the CreateTable.cs file to review the code required to create the table. The Table object represents a SQL Server table. There are three possible constructors available to make an instance of the table object. In the example, I used the one in which you have to specify the table and the schema name, as well as the database name as shown in the snippet below.
|
1 2 3 4 5 6 7 8 |
// the table name private const string C_TEST_TABLE = "TestTable"; // the schema name private const string C_TEST_SCHEMA = "HumanResources"; //..... //..... // Create a new table object Table tbl = new Table(db, C_TEST_TABLE, C_TEST_SCHEMA); |
To add a column to the table, a column object is created with the table name, column name and data type. You can add other properties such as a default value.
|
1 2 3 4 5 6 |
// Add the nvarchar column Column col = new Column(tbl, @"Name", DataType.NVarChar(128)); tbl.Columns.Add(col); col.AddDefaultConstraint(null); col.DefaultConstraint.Text = "''"; col.Nullable = false; |
You can add constraints, keys, and indexes. The following code shows how to add the primary key index.
|
1 2 3 4 5 6 7 |
// Add the primary key index Index idx = new Index(tbl, @"PK_" + C_TEST_TABLE); tbl.Indexes.Add(idx); idx.IndexedColumns.Add(new IndexedColumn(idx, col.Name)); idx.IsClustered = true; idx.IsUnique = true; idx.IndexKeyType = IndexKeyType.DriPrimaryKey; |
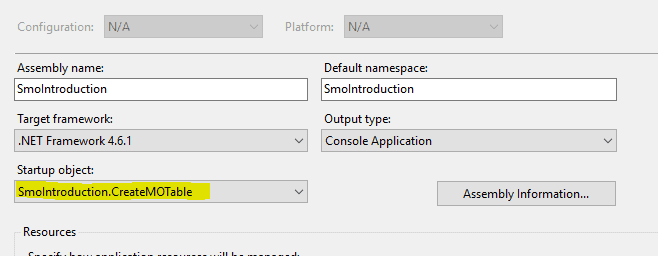
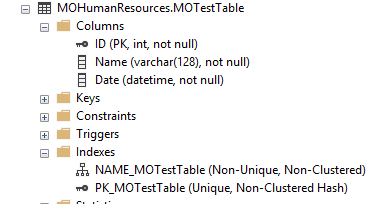
You can also create a memory-optimized table if you are running SQL Server 2016 SP1 or later. To create the memory-optimized table instead, right-click the project and change the startup object to SmoIntroduction.CreateMOTable. The SmoIntroduction project should also be set as the startup project.
When creating a memory-optimized table, you have to specify two properties as shown in the snippet below. The source code of this example is located in CreateMOTable.cs inside the SmoIntroduction project.
|
1 2 |
tbl.IsMemoryOptimized = true; tbl.Durability = DurabilityType.SchemaAndData; |
The table property Durability is the type of DurabilityType, which is an enumerator. As you probably guess, the enumerator values could be SchemaOnly and SchemaAndData.
When working with memory-optimized tables, there are two types of indexes, Hash index and Range index. To create a Range index, you could use the snippet as shown below.
|
1 2 3 4 5 |
Index idx = new Index(tbl, @"PK_" + C_TEST_TABLE); idx.IndexType = IndexType.NonClusteredIndex; idx.IndexKeyType = IndexKeyType.DriPrimaryKey; tbl.Indexes.Add(idx); idx.IndexedColumns.Add(new IndexedColumn(idx, col.Name)); |
In order to create a Hash index, you have to change the IndexType property to IndexType.NonClusteredHashIndex,and to specify the BucketCount property as shown in the snippet below.
|
1 2 3 4 5 6 |
Index idx = new Index(tbl, @"PK_" + C_TEST_TABLE); idx.IndexType = IndexType.NonClusteredHashIndex; idx.BucketCount = 128; idx.IndexKeyType = IndexKeyType.DriPrimaryKey; tbl.Indexes.Add(idx); idx.IndexedColumns.Add(new IndexedColumn(idx, col.Name)); |
The result is shown in the image below.
Of course, as you probably know, any database that will contain memory-optimized tables needs to have a single MEMORY_OPTIMIZED_DATA filegroup having at least one container, which stores the checkpoint files needed by SQL Server to recover the memory-optimized tables.
You can create the filegroup by using SMO as shown in the snippet below. Notice that it passes as the third parameter in the FileGroup constructor a value FileGroupType.MemoryOptimizedDataFileGroup.
|
1 2 3 4 5 6 |
// C_FILE_GROUP is constant defined as // private const string C_FILE_GROUP = "mofg"; FileGroup mo = new FileGroup(db, C_FILE_GROUP, FileGroupType.MemoryOptimizedDataFileGroup); db.FileGroups.Add(mo); db.FileGroups[C_FILE_GROUP].Create(); |
The result is shown in the image below.

The code for creating a container (data file) for memory-optimized data is similar. You can do that using SMO, by using snippet as shown below.
|
1 2 3 4 5 6 7 8 |
string path = C_MO_PATH; // Create the file ( the container ) DataFile df = new DataFile(db.FileGroups[C_FILE_GROUP], C_FILE_NAME,path); // Add the container to the memory optimized file group db.FileGroups[C_FILE_GROUP].Files.Add(df); // Actually create. Now it exists in the database db.FileGroups[C_FILE_GROUP].Files[C_FILE_NAME].Create(); |
(NOTE: Describing how to work with memory-optimized table is beyond the scope of the article. If you would like to know more about memory-optimized tables, please read SQL Server Internals: In-Memory OLTP (Second Edition) by Kalen Delaney, which can be found here. )
Once the table is in place, the Script method of the table object is used to generate a table creation script.
|
1 2 3 4 5 6 7 |
StringBuilder sb = new StringBuilder(); StringCollection coll = tbl.Script(MakeOptions()); foreach (string str in coll) { sb.Append(str); sb.Append(C_NEWLINE); } |
In this example, the function MakeOptions(), is used to control exactly what will be scripted out. The partial function is shown below.
|
1 2 3 4 5 6 7 8 9 10 11 |
private static ScriptingOptions MakeOptions() { ScriptingOptions o = new ScriptingOptions(); try { o.AllowSystemObjects = false; o.AnsiFile = true; o.AppendToFile = false; o.AnsiPadding = true; o.ClusteredIndexes = true; |
A key concept in using the SMO object library is the Unique Resource Name (URN). The URN uses a syntax similar to XPath. The XPath is a hierarchy path used to specify an object in which each level has qualifiers and functions. In SMO, the URN has two elements, the path and attribute naming that has limited functionality. The path is used to specify the location of the object whereas the attribute naming allows for a degree of filtering.
An example of a URN for our table is .
|
1 2 |
Server[@Name='DARKO']/Database[@Name='AdventureWorks2014']/Table[@Name='TestTable' and @Schema='HumanResources'] |
The URN of an object can be retrieved by referencing its URN property.
Another method of scripting database and object properties in SMO can be accomplished by the Scripter class. The Scripter class also uses URNs as parameters that pass object references to the method of the Scripter object. An example of using URN is shown in the snippet below. Notice that the code passes table.URN to the Scripter object.
|
1 2 3 4 5 6 7 8 9 10 11 12 13 14 |
Scripter scrp = new Scripter(server); StringBuilder sb = new StringBuilder(); scrp.Options.ScriptDrops = false; scrp.Options.WithDependencies = true; scrp.Options.Indexes = true; // To include indexes scrp.Options.DriAllConstraints = true; // to include referential constraints in the script StringCollection sc = scrp.Script(new Urn[] { tbl.Urn }); foreach (string st in sc) { sb.Append(st); sb.Append(C_NEWLINE); } |
Using SMO for Managment
And finally, let’s take a look at our most complex example.
There is a situation when you have to do a lot of DDL changes, as a part of applying the new version of your software to your client. In that case, there are a couple of tasks you have to accomplish.
- First, you have to check that the database is online.
- Then you have to save the database state before start process of DDL changes. Unfortunately, this can not be accomplished by taking a database snapshot because database snapshot is limited only to Enterprise Edition. The most general solution is to take a copy-only backup. But, before taking a copy-only backup ( NOTE : A copy-only backup is a SQL Server backup that is independent of the sequence of conventional SQL Server backups. Usually, taking a backup changes the database and affects how later backups are restored. However, occasionally, it is useful to take a backup for a special purpose without affecting the overall backup and restore procedures for the database. Copy-only backups serve this purpose), you have to be sure that there is enough disk space to save the copy-only backup file.
- Then you have to put your database in Restricted User Access mode in order to prevent connections to the database when the process of DDL changes start.
- After that, it’s safe to start the process of DDL changes.
- If the process of DDL changes does not finish successfully, you have to restore the database state by starting restore process using the backup taken at the very beginning.
- And finally, you have to put the database back in Multi-User Access mode.
This is a very simplified scenario in which SMO & SQLCLR can help for databases up to 100GB and works with SQL Server Standard Edition.
Before explaining how to accomplish some of the tasks listed above, let’s see how the source code that comes with the article is organized.
In the solution, you can find four projects as shown in the image below.
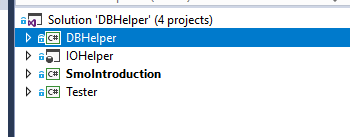
The table below explains what each of the solution projects does do.
|
DBHelper |
SMO library which has, as a result, a DLL. In the library, you can find a lot of methods to work with SQL Server database. |
|
IOHeLper |
SQLCLR project which has, as a result, a DLL that could be published on the database server. The resulting assembly contains methods to determine free disk space on the particular drive, list files in a particular directory and delete a file in particular directory. |
|
Tester |
A console application that could be useful to make some tests. |
|
SmoIntroduction |
A console application that was our first example |
At this stage, you have Visual Studio already started and open to the solution file dbHelper.sln. If not so, please do that. Next thing to do is to publish the SQLCLR project on your database server.
Using SMO with SQLCLR
In the solution, there is an SQLCLR project named IOHELPER. Because this is the article about SMO, I will just briefly describe IOHELPER. The result of compiling the IOHELPER project is an assembly as shown in the image below.
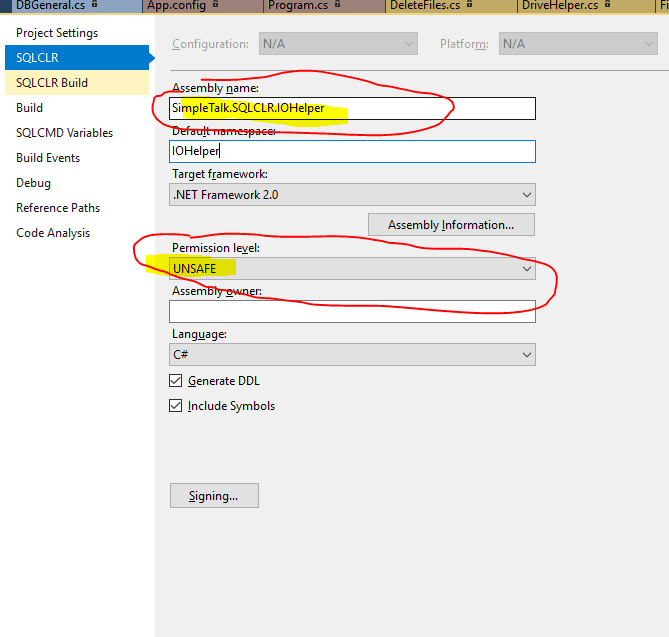
The assembly SimpleTalk.SQLCLR.IoHelper should be deployed to the database server. It is an UNSAFE assembly and should be signed with the asymmetric key. You should change the key path and password in the PreDeployment.sql file before publishing the assembly, as shown in the listing below.
|
1 2 3 4 5 6 7 8 9 10 11 12 13 14 15 16 17 18 19 20 |
----------------------------------------------------------------------- --Create asymmetric key -- --Replace the path 'D:\Cloud\DataBaseHelper\DBHelper\IOHelper\' --with your path -- ---------------------------------------------------------------------- IF ( SELECT COUNT(*) FROM master.sys.asymmetric_keys WHERE name = 'askIoHelper' ) = 0 BEGIN EXEC sp_executesql N'USE MASTER; CREATE ASYMMETRIC KEY [askIoHelper] FROM FILE = ''D:\Cloud\DataBaseHelper\DBHelper\IOHelper\IoHelper.snk'' ENCRYPTION BY PASSWORD = ''SimpleTalk'''; END; |
After publishing the assembly, the database model is extended by two stored procedures and one function as shown in the image below.
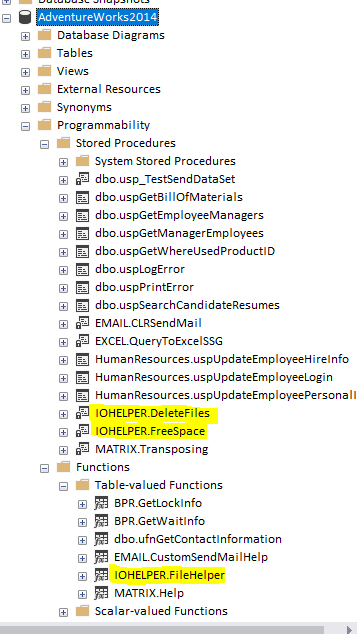
IOHELPER.FreeSpace determines free space on the specific drive. The logic of determining free space on the particular drive is accomplished in DriveHelper.cs.
IOHELPER.DeleteFiles, as the name implies, deletes files on the file system. It takes two mandatory input parameters, @path, and @filter. The source code is located in DeleteFiles.cs.
Finally, IOHELPER.FileHelper will give us information about files in a specified directory. .NET code is located in FileHelper.cs. In order to list all files in specified directory, the DirectoryInfo class is used.
SQLCLR objects can be used with SMO as shown in the snippet below.
|
1 2 3 4 5 6 7 8 9 10 11 12 13 14 15 16 17 18 19 |
server = new Server(cnn); db = server.Databases[cnn.DatabaseName]; string dataBaseName = cnn.DatabaseName; string filter = "dbHelper_" + dataBaseName + "_*.BAK"; string backupDirectory = server.BackupDirectory; if (server.BackupDirectory.EndsWith(@"\") == false) backupDirectory += @"\"; // setup calling the stored procedre. Notice the procedure //is the result of publishing SQLCLR project string command = @"DECLARE @errorMessage nvarchar(1000) EXEC [IOHELPER].[DeleteFiles] @path = N'{0}', @filter = N'{1}', @errorMessage = @errorMessage OUTPUT; SELECT @errorMessage AS N'@errorMessage'"; // Execute stored procedure and return errormessage if any DataSet ds = db.ExecuteWithResults(String.Format(command, backupDirectory,filter)); |
Testing the Solution
After publishing the SQLCLR project to the database, it is time to test the functionality.
In order to test the solution, right-click on the project Tester and from the context menu choose Set as a Startup Project. The Tester project does what its name implies.
In the project, there is only one program file named Program.cs and one configuration file named app.config. Open app.config and adjust the connection string settings to point to the SQL Server instance that contains AdventureWorks2014 or another database. To clarify, you can perform the rest of tests with a database of your choice.
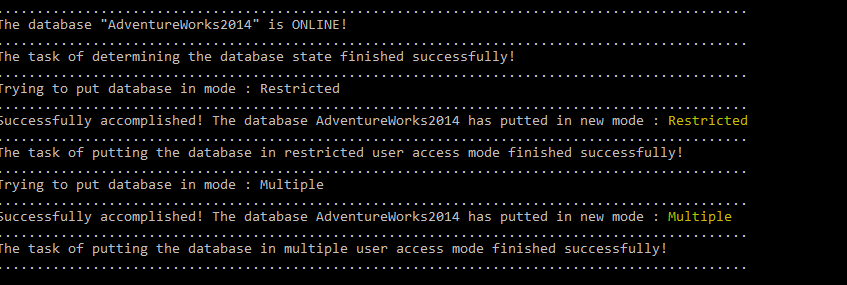
The very beginning of the Program class checks the status of the database. To do that, it simply calls IsTheDatabaseOnLine which is just a wrapper around the database property Status.
|
1 2 3 4 5 6 7 8 9 10 11 12 13 14 15 |
String connectionString = ConfigurationManager.ConnectionStrings["ConnStr"].ConnectionString; SqlConnection sqlConnection = new SqlConnection(connectionString); ServerConnection cnn = new ServerConnection(sqlConnection); //------------------------------------------------------------- // Is the database ONLINE //----------------------------------------------------------- if (DBGeneral.IsTheDataBaseOnLine(cnn, new Logger(), ref errorMessage)) Console.Write("The task of determining the database state " + "finished successfully!"); else Console.Write("The task of determining the database " + "state failed with following error message :" + errorMessage); |
DBGeneral is a static class found in the DBHelper project that contains a few static methods. One of them is IsTheDatabaseOnLine. That method uses the property of the SMO class Database called Status to determine the status of the database. The Database class, as the name implies, represents an SQL Server database.
It is interesting to find out what T-SQL command is executed by SMO behind the scenes. In the code, you will find every static method with the T-SQL equivalent.
|
1 2 3 4 5 6 7 8 9 10 11 12 13 14 15 16 17 18 19 20 21 22 23 24 25 26 27 28 29 |
#region "Is the database online? " /// <summary> /// T-SQL equivalent /// ------------------------------- /// SELECT /// CASE /// WHEN HAS_DBACCESS(N'AdventureWorks2014') = 1 THEN 'true' /// ELSE 'false' /// END /// ------------------------------- /// Remarks /// HAS_DBACCESS returns 1 if the user has access /// to the database, /// 0 if the user has no access to the database, /// and NULL if the database name is not valid. /// HAS_DBACCESS returns 0 if the database /// is offline or suspect. /// HAS_DBACCESS returns 0 if the database is /// in single-user mode and the database is /// in use by another user. /// </summary> /// <param name="cnn">ServerConnection connection</param> /// <param name="logger">Do we capture errors /// & informations</param> /// <param name="errMessage"></param> /// <returns>True - user has access to the database /// false if the database does not exists /// or if the database is offline /// </returns> |
The result of the first test is displayed in the console windows as shown in the image below.

The next test demonstrates how to put the database in Restricted User Access Mode and after that revert back to Multiple User Access Mode. In order to do that, the code calls PutDbInUserMode as shown in the listing below.
|
1 2 3 4 5 6 7 8 9 10 11 12 13 14 15 16 17 18 19 20 21 22 23 24 25 |
//------------------------------------------------------------- // Put the database in Restricted UserAccess Mode //------------------------------------------------------------- if (DBGeneral.PutDbInUserMode(cnn, DatabaseUserAccess.Restricted, true,new Logger(), ref errorMessage)) Console.Write("The task of putting the database in restricted user access mode finished successfully!"); else Console.Write("The task of putting the database in restricted user access mode failed with following error message :" + errorMessage); //------------------------------------------------------------- // Put the database in Multiple UserAccess Mode //------------------------------------------------------------- if (DBGeneral.PutDbInUserMode(cnn, DatabaseUserAccess.Multiple, true, new Logger(), ref errorMessage)) Console.Write("The task of putting the database in multiple " + "user access mode finished successfully!"); else Console.Write("The task of putting the database in multiple user " + " access mode failed with following error message :" + errorMessage); |
As the name implies, the enumerator DatabaseUserAccess which has three values Single, Restricted and Multiple is required. The second parameter here is boolean which determines whether to kill the current user processes. If the database already in the specified mode, nothing happens. Otherwise, the UserAccess property is set to the new value. After that, you should call Alter and Refresh methods of the database object, as shown in the snippet below.
|
1 2 3 4 5 6 7 8 9 10 11 12 |
// dbMode is the argument we passed to this routine db.UserAccess = dbMode; // killUserProcess is passed, kill user process if (killUserProcess) { KillAllProcessesForOneDatabase(cnn, ref errorMessage); } // execute Alter db.Alter(TerminationClause.RollbackTransactionsImmediately); // after that Refresh is needed db.Refresh(); server.Refresh(); |
It is very interesting which T-SQL command is executed by SMO behind the scenes. SMO is interested only in user processes that perform locking. So, the following T-SQL is executed to find out session ids. And after that SMO uses a simple KILL<session_id>.
|
1 2 3 4 5 6 |
SELECT DISTINCT request_session_id FROM master.sys.dm_tran_locks WHERE resource_type = 'DATABASE' AND resource_database_id = DB_ID(N'AdventureWorks2014') AND request_session_id > 50; |
In order to put the database in Restricted User Access Mode, following T-SQL command is executed behind the scenes.
|
1 2 |
ALTER DATABASE [AdventureWorks2014] SET RESTRICTED_USER WITH ROLLBACK IMMEDIATE; |
The output from the console application looks similar like in the image below.
The next test shows how to do a copy-only backup. SMO classes include two categories: instance classes and utility classes. The instance classes represent SQL Server objects such as servers, databases, tables, triggers, and stored procedures. On the other hand, the name Utility could be confusing and someone may think that this class is not instantiated and that they are static. That is not true, these classes use the new operator in order to create objects. The word Utility means that they are used to accomplish some tasks.
In SMO, the Backup class and the Restore class are utility classes that provide the tools to accomplish the specific tasks of backing up and restoring a database. A Backup object represents a specific backup task that is required instead of a Microsoft SQL Server object on the server instance.
As you can see in the snippet below, there are only a few parameters passed to the BackupDatabase method. The method is just wrapper around the Backup and Restore classes defined in SMO.
|
1 2 3 4 5 6 7 8 9 |
//------------------------------------------------------------- // Test Backup //------------------------------------------------------------- if (DBGeneral.BackupDatabase(cnn, logger, ref errorMessage, true)) Console.WriteLine( "The task of backup the database finsihed successfully!"); else Console.WriteLine("The task of backup the database failed with following error message : " + errorMessage); |
Part of the method implementation is displayed in the snippet below.
|
1 2 3 4 5 6 7 8 9 10 11 12 13 14 15 16 17 18 19 20 21 22 23 24 25 26 27 28 29 30 31 32 33 34 35 36 37 38 |
// create the backup object source = new Backup(); // Depends on SQL Server Edition bool canIUseCompression = false; if (server.EngineEdition == Edition.EnterpriseOrDeveloper || server.EngineEdition == Edition.Standard) canIUseCompression = true; source.Action = BackupActionType.Database; source.CopyOnly = true; source.Checksum = true; source.Incremental = false; source.BackupSetDescription = "dbHelper BACKUP " + dataBaseName; source.BackupSetName = "COPY ONLY(FULL) dbHelper BACKUP " + dataBaseName; source.ContinueAfterError = false; if (useCompression && canIUseCompression) source.CompressionOption = BackupCompressionOptions.On; source.SkipTapeHeader = true; source.UnloadTapeAfter = false; source.NoRewind = true; source.FormatMedia = true; source.Initialize = true; // setup percent complete notification source.PercentCompleteNotification = 5; // setup backup destination source.Database = dataBaseName; destination = new BackupDeviceItem(backupFileName, DeviceType.File); source.Devices.Add(destination); //backup starts here //--------------------------------------------------------------------- source.SqlBackup(server); |
As I wrote earlier, the test will take a copy-only backup. In order to avoid user input in determining backup file name, the naming convention is used. Every backup file has following naming convention.
|
1 2 3 4 5 |
string backupFileName = server.BackupDirectory + (server.BackupDirectory.EndsWith("") ? @"\" : string.Empty) + "dbHelper_" + dataBaseName + "_" + DateTime.Now.ToString("yyyyMMdd_HH_mm_ss.bak"); |
The backup file name is written as an extended property LastBackup on the database level.
|
1 2 3 4 5 6 7 8 9 10 11 12 13 14 15 |
if (db.ExtendedProperties[LAST_BACKUP] == null) { ExtendedProperty extProperty = new ExtendedProperty(); extProperty.Parent = db; extProperty.Name = LAST_BACKUP; extProperty.Value = backupFileName; extProperty.Create(); } else { ExtendedProperty extProperty = db.ExtendedProperties[LAST_BACKUP]; extProperty.Value = backupFileName; extProperty.Alter(); } |
The backup file name is as shown in the image below as an extended property.

The backup file is saved on the server.BackupDirectory which is described earlier in the article. Compression is turned on by default in the function, and there is an option to verify the backup file. So, if the backup file does not pass verification, the method returns False. In the snippet below is shown the process of verifying the backup file.
|
1 2 3 4 5 6 7 8 9 10 11 12 13 14 15 16 17 18 19 20 21 22 23 24 25 26 27 28 |
//----------------------------------------------------// Verify backup //----------------------------------------------------if (doVerify) { - restore = new Restore(); restore.Devices.AddDevice(backupFileName, DeviceType.File); restore.Database = dataBaseName; if (restore.SqlVerify(server)) { if (isLogging) { logger.Log( "The backup file could be used for restoring." + "Everything seems to be OK!"); logger.Log(@".............................................." ); } } else { if (isLogging) { logger.Log("The backup file could not be used for restoring." + "There are errors in the backup file!"); logger.Log(@".................................................." ); } retValue = false; } } |
You can explore several of the tests on your own. In short, they include shrinking the database log, changing the database recovery model, determine the log size, etc. The two last tests determine free disk space on the server drive and deleting old backup files.
In order to determine free disk space( NOTE : There is a possibility to determine free disk space by executing T-SQL EXEC master..xp_fixeddrives, but it has many limitations), there is no need to access an ADO.NET method. Instead, it is possible to call ExecuteWithResults in context of database objects. The method returns an object of type DataSet, as shown in the following snippet.
|
1 2 3 4 5 6 7 8 9 10 11 12 13 14 15 16 17 18 19 20 21 22 23 24 25 26 27 28 29 30 31 |
cnn.Connect(); server = new Server(cnn); db = server.Databases[cnn.DatabaseName]; double dataBaseSize = db.Size; double freeToUse = 0; string driveLetterToCheck = server.BackupDirectory.Substring(0, 1); string command = @"DECLARE @freeSpace float DECLARE @errorMessage nvarchar(1000) EXEC [IOHELPER].[FreeSpace] @driveLetter = N'{0}', @freeSpace = @freeSpace OUTPUT, @errorMessage = @errorMessage OUTPUT; SELECT @freeSpace AS N'@freeSpace', @errorMessage AS N'@errorMessage'"; DataSet ds = db.ExecuteWithResults(String.Format(command, driveLetterToCheck)); if (ds.Tables.Count > 0 && ds.Tables[0].Rows.Count > 0) freeToUse = (double)ds.Tables[0].Rows[0]["@freeSpace"]; if ((freeToUse > dataBaseSize)) { if (isLogging) { logger.Log("Free on disk " + driveLetterToCheck + " in MB is : " + freeToUse.ToString() + " , and the expected backup size is " + dataBaseSize.ToString() + " in MB"); } retValue = true; } |
Summary
Instead of a conclusion, as a final word I would like to say that SMO is a great framework, which will help you in many situations. When in combination with SQLCLR, it can help you develop a very robust solution. Instead of using T-SQL syntax inside the .NET code, you can develop solutions by using standard dot notation.
The solution source code can be found on GitHub here.
Updated on 2 December 2019
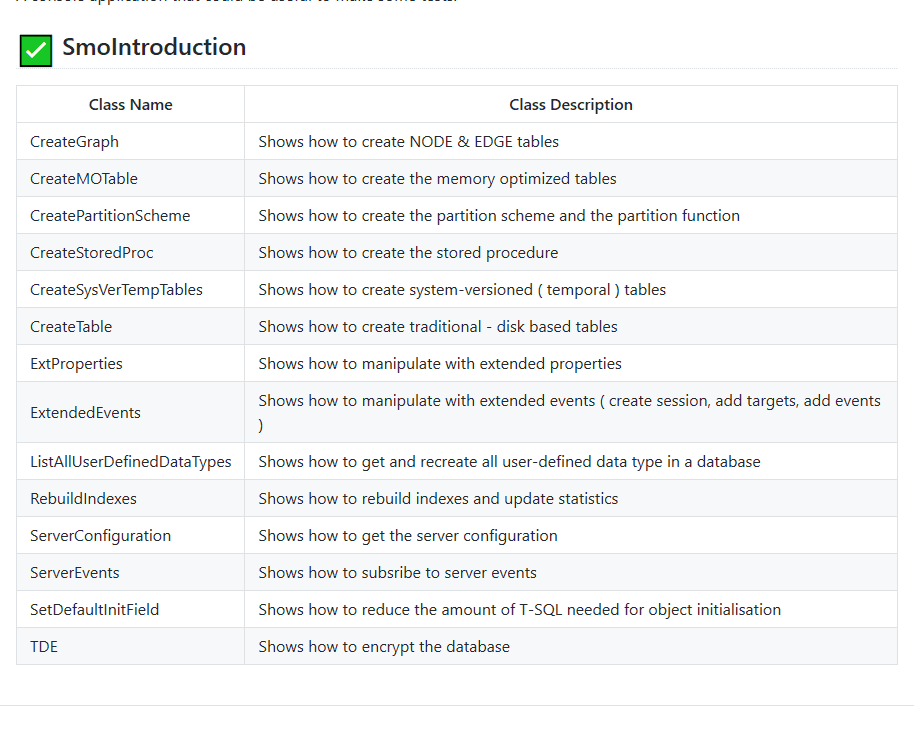
I would like to inform readers that during the time I added more examples about using SMO. You can see a shortlist of them in the image below. I will continue adding new examples as readers suggest in their comments.
Fast, reliable and consistent SQL Server development…
FAQs: SMO (SQL Server Management Objects) in SQL Server
1. What is SMO (SQL Server Management Objects) and how do you use it?
SMO is a .NET object model for managing SQL Server programmatically. Install via NuGet: Install-Package Microsoft.SqlServer.SqlManagementObjects. Then create a Server object (new Server(“ServerName”)), access databases (server.Databases[“AdventureWorks”]), and manipulate objects using standard .NET dot notation instead of T-SQL strings. SMO handles connection pooling, scripting, and dependency ordering automatically.
2. How do you generate T-SQL scripts from SMO?
Use the Scripter class: create a Scripter object, set ScriptingOptions (e.g., IncludeIfNotExists, ScriptDrops, Indexes), then call Script() on your URN collection. Scripter generates scripts in dependency order. For individual objects, call table.Script() or storedProcedure.Script() directly. The output is standard T-SQL that can be saved to files or executed against another server.
3. Can you combine SMO with SQLCLR for server-side automation?
Yes. SQLCLR runs .NET code inside SQL Server, so you can build SQLCLR stored procedures that use SMO to manage databases from within SQL Server itself. Common use cases include automated backup libraries, DDL change scripts, and deployment tools. However, SQLCLR assemblies must be marked UNSAFE to use SMO (it requires external access), so evaluate security implications carefully.
Load comments