
In my previous article on Simple-Talk, I explained how to setup Exchange Online in Office365. As I demonstrated, it is really easy to set this up and start using either the Outlook Web App, and Outlook 2007, or Outlook 2010. As we also saw, Lync Online is one of the powerful services being offered as part of the Office365 product suite, and now we’re going to take a closer look at setting that up.
If you’ve never used Lync before, then you should know that Lync is a core part of Microsoft’s Unified Communications solution, pulling together voice calls, video calls, instant messages, live meetings and shared whiteboard sessions into a single interface. If this sounds familiar, that’s because Lync is the next evolution of Office Communications Server.
If you’re already familiar with regular Lync, the online flavor provides all of this functionality (although full telephony will not be available to start with), but with the added bonus of the services being hosted in Microsoft’s cloud, so you don’t have to worry about installation and maintenance.
If you’re still reading, then that probably sounds like an attractive proposition to you! In this article, I will demonstrate how to correctly set up Lync Online in just 15 minutes, including using the Microsoft Online Services Connector to configure the client software running on the workstation. I’ll also give you a taste of what this great product makes possible. This is going to be aimed at giving you the Office365-specific information you need to get this working, so
But first I’d like to do a heads-up warning: Office365 is still in beta which means it is a platform in development. There are things in the Office365 environment that aren’t that nice at the moment but will probably be solved before Office365 enters the ‘general availability’.
Domain Management
In my previous article, I registered a domain in Office365, and enabled Exchange Online; to now enable Lync for this domain is literally just a matter of a few mouse clicks. To start, open the Microsoft online portal as the domain administrator, and select Domains under the Management Section (on the left of the screen):
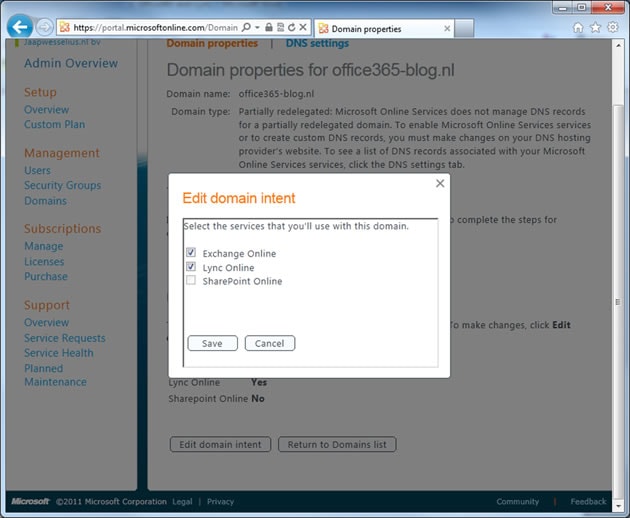
Figure 1. Domain Management in the Microsoft Online portal
Using the Edit domain intent button, additional services like Lync Online and Sharepoint Online can be enabled. Once you’ve selected the appropriate check-boxes and the domain is Lync-enabled, the DNS settings can be checked. Handily, the portal will show the exact settings for SIP and Federation of the external DNS.
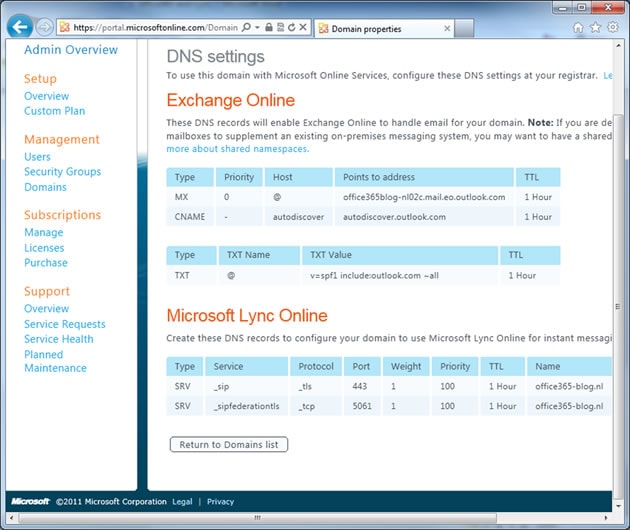
Figure 2. The DNS settings for Exchange Online and Lync online in the Management portal
Setting service records (SRV records) in an Active Directory integrated DNS (like in an internal Active Directory domain) is not that difficult, but for an external DNS it can be tricky. It also varies depending on provider and management interface.
In our example, the office365-blog.nl domain is hosted with a provider based in Holland, who is using a Linux DNS with their own interface. I did a bit of experimentation, and in the end it turned out that these were the settings (in this specific scenario!) that needed to be set:
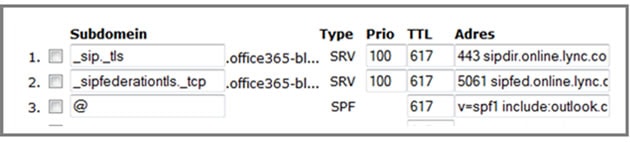
Figure 3. Setting the Lync Online DNS records in a Linux based DNS
If you’re going to have to do a little bit of testing to get this working, then you’re probably wondering “How do I check if my DNS settings are correct for Lync Online?” Luckily for you, in the management portal you’ll find an option called Troubleshoot Domain. It’s on the same page as the Edit Domain Intent option in Figure 1, and that’s where you’ll find an option to check the DNS settings. Once you’ve got everything set up correctly, you should see a message like this:

Figure 4. The external DNS settings are fine according to the management portal
It’s also possible to check the DNS settings using the NSLOOKUP command line tool. When NSLOOKUP is started, change the type to SRV and enter the FQDN‘s you want to check (see figure 5 for an example).
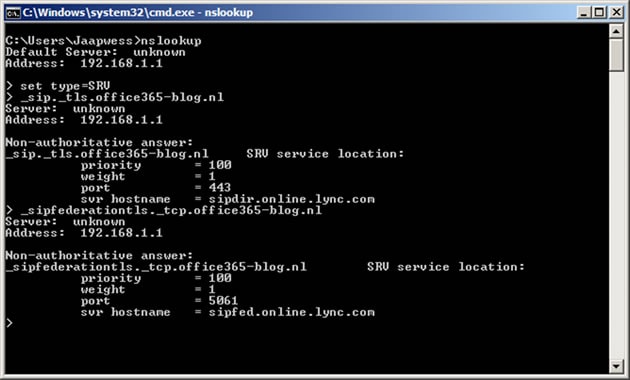
Figure 5. Checking the DNS records using NSLOOKUP
Domain Settings
That’s basically all it takes to enable Lync for your domain (I did say that it was simple). For comparison, consider the work required to implement even a basic Lync environment on-premises! It’s rather refreshing to not have to do all the hard work for once, isn’t it?
Now that the services are enabled and the DNS settings are correct, the domain itself can now be configured in detail. Don’t worry, it’s not nearly as daunting as it sounds. Inthe Management portal, select Admin Overview. In the center pane, below the Microsoft Office 365 banner, there’s an option for Lync Online. Click on the Manage button in this section to enter the Lync Online Control Panel:
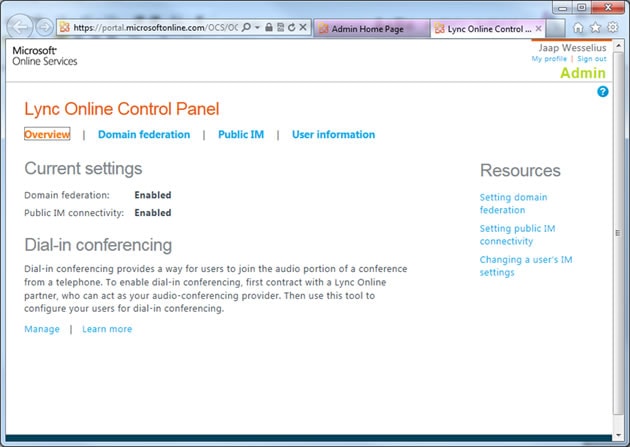
Figure 6. The Lync Online Control Panel
In the Lync Online Control Panel you can control:
- Domain Federation – this lets the Lync Online domain communicate with other Lync-enabled domains. These can be regular on-premise Lync environments, or other Lync Online enabled environments. Crucially, the partner you want to federate with either has to have an open federation, or they need to add you as a federation partner. The default setting for domain federation is closed, which means that you have to add every new domain as a federation partner. Of course, it’s also possible to opt for you domain federation to be open, so that everybody can freely federate through the Lync Online environment. That might sound a bit careless but, if needed, certain domains can be blocked from federation.
- Public IM – Using the public IM features, it is possible for the Lync Online enabled domain to interact with public IM networks like MSN or Yahoo networks.
- User Information – This section allows you to apply very fine-grained controls on your users’ behavior and permissions. For example, it is possible to do things like enable or disable the file transfer, domain federation, public IM, or audio/video settings on a per-user basis.
Unfortunately, although federation between external on-premise Lync Server 2010 and Office Communications Server (OCS) 2007 R2 environments is possible, it is not possible out of the box. To make the federating process work, the Office 365 environment needs to be added as a 3rd party IM provider in your on-premise environment. Once this has been done, the whole process works like a charm. For more details on implementing this check out the write-up on my blog. Hopefully this will change (i.e. become easier / automatic) when Office 365 is officially released.
Lync Online Client
Once the domain in fully configured, the client software can be installed on the workstation to make all that communication functionality available to your users. This can be done by your users, but I’ll walk you through the process now so that you know what they’ll need to do.
To get started, go to the Microsoft Online portal and logon as a user. Under the Start here heading, click on Set up now in step 1. This will redirect you to the download pages where you can get the client software you need. Of course, if you know what you’re doing, you can also go to the download page directly.
The first step is to download and install the Lync Client software; as with most Microsoft downloads, it is possible to select your preferred language and whether you want the 32-bit or the 64-bit version of the software:
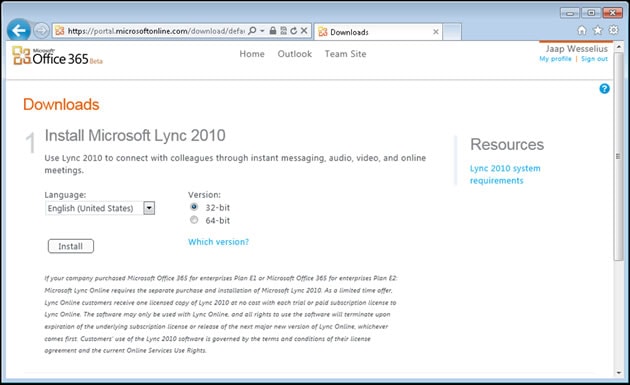
Figure 7. Install the Lync client software on the workstation
The second step is to actually configure the workstation. In the same browser window from which you just downloaded the Lync 2010 client application, scroll down to the bottom of the page (where you’ll find step 2) and click the Set up button. This will download the Microsoft Online Services Connector, sometimes referred to as the Office365 Desktop Setup application. This connector is just a small utility which will automatically configure your client software.
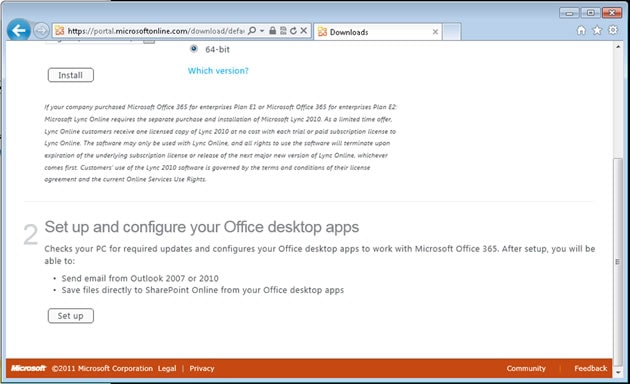
Figure 8. Download and run the Office365 Desktop Setup application to configure the client software
When the connector is started, a security warning is presented, asking you if you really want to run this application. Naturally, you just need to select Run to continue.
The setup application itself just looks like an Office365 web application. Logon using your normal Office365 user credentials, which were created earlier:
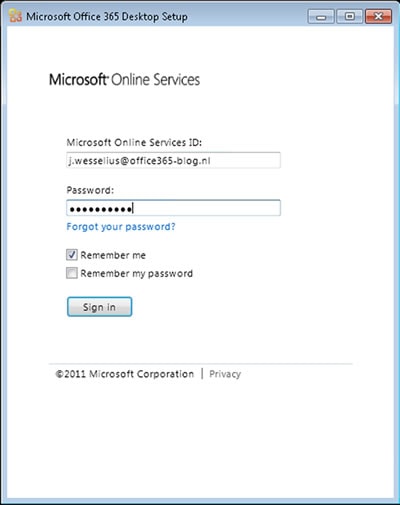
Figure 9: starting the Microsoft Online Services Connector.
The setup application installs a few updates, and configures the workstation to make the most of the Office365 applications (It is possible to select which applications are configured, so you’ll always be in full control of what’s happening):
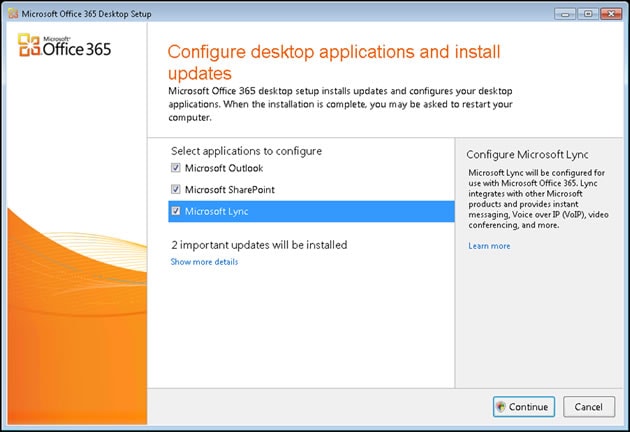
Figure 10: Deciding which applications you want to configure.
Once you’re happy with that will be done, just click Continue to start installing the necessary fixes and configure the workstation. If the Lync 2010 client application is already running as a result of the previous steps, a warning message is shown – the Lync 2010 application should be closed and exited before the Setup process continues. Just follow the wizard, and if you want more information you can always click on show more details:

Figure 11: Configuring your workstation to connect to the Office365 product suite.
Once the wizard is finished, an overview provides more details on what has changed, and there are a few things to keep in mind at this stage. For example additional hotfixes for Outlook 2010 will be downloaded and installed, but configuration is still a manual process. This means that, ultimately, an appropriate Outlook profile will still be created manually, although autodiscover can be used to make this easier, as explained in my previous article.
When requested, reboot the workstation, and everything is good to go.
Start the Lync client
If you’ve used Lync in the past, then this section will be familiar to you. The joy of Lync online is precisely that it behaves the same as on-premises Lync, so don’t be surprised if you find this next section a little uninformative.
Now that the setup and reboot has been performed, the Lync 2010 client will now automatically start during the boot sequence of the workstation, so you just need to open the client and click the Sign in button. If everything is configured correctly, and it should be, it will logon within 20 seconds (although please remember the beta heads-up warning). Otherwise, it will ask for the username and password.
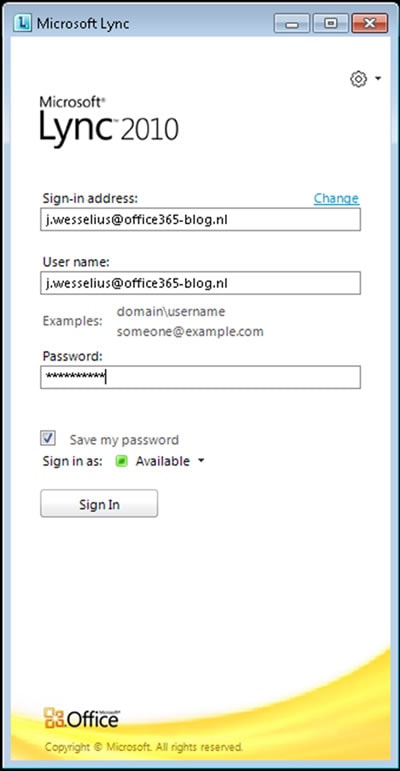
Figure 12. Enter the username and password
Once you’re logged in to the client, you’re ready to go; you can start adding contacts, and other people can start adding you as a new contact. This all behaves exactly as if your Lync service was being hosted locally. So, when somebody does add you as a contact, a pop-up invitation is shown, which you can either accept the invitation (and add this contact to a group in your Lync client), or just ignore it:

Figure 13. You are notified when somebody adds you to their contact list
One of the nice things about Lync is that is gives presence information for your contact list. By that I mean not only information about whether the user is behind their desk, but also calendar information, if published. When your contact is in a meeting, or when their out-of-office message is enabled, those details are shown in the Lync client. To accomplish this, the Lync client is using the Exchange Web Services to communicate with the Exchange Server (in this case the Exchange Online environment) – a very cool feature!
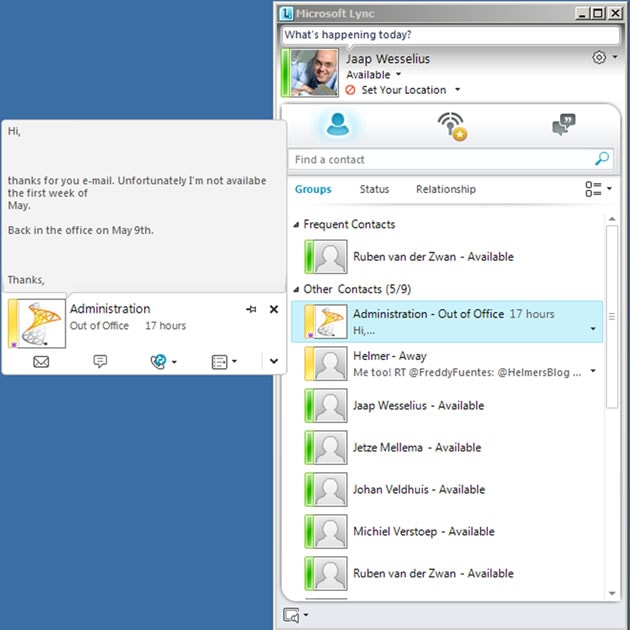
Figure 14. The Lync Client is using Exchange Web Services to retrieve status information
In addition to chat, you can also now use the audio and video features in the Lync client. Most microphone and speaker systems are supported (both built-in and plug-in options) and, when a web cam is connected to your PC, you can use the video capabilities of Lync Online and create a video conference (which is actually peer-to-peer functionality).

Figure 15. Video conferencing possibilities in Lync Online
At this moment it is not possible to use the enterprise voice functions which you would normally have available in an on-premise Lync Server 2010 implementation, so calls to a ‘normal’ telephone are not possible at this moment. Other than that, it rocks!
The Lync team have implied that the full suite of enterprise functionality will be made available in later updates, but this isn’t stated in so many words, and no time frames are given, so don’t hold your breath just yet.
Conclusion
Lync Online is at the very least the Instant Messaging and presence solution in Office 365, and a full Unified Communications solution if you take full advantage of it. It integrates very nice with Exchange Online, is configured in only 15 minutes, and is really easy to use. Right now it still has some rough edges, but these will probably be smoothed off when the official release of Office 365 becomes available later this year.
The only way in which Lync Online currently falls short (relative to an on-premises environment) is that doesn’t contain the enterprise voice functionality at this stage. You can make voice calls between Lync clients, but there’s currently no connectivity to external phone numbers. To achieve this, an on-premise Lync implementation is needed. Other than that, Lync Online is a great solution!
Load comments