
- PowerShell Desired State Configuration – Part 1: The Basics
- PowerShell Desired State Configuration – Part 2: LCM and Push Management Model
- PowerShell Desired State Configuration – Part 3: Pull Mode
- PowerShell Desired State Configuration – Part 4: Automating and Monitoring Pull Mode
I, like most other system administrators, want to be able to completely automate the configuration of a server. It means that you can copy files, deploy registry key, software, remove a Windows Feature, etc… It is not just to simplify the task of maintaining it, but also to control the configuration to the extent that I can be confident that it hasn’t been changed. PowerShell 4 upwards provides the functionality to do this, with a feature known as ‘Desired State Configuration’ (DSC).
This article aims to provide an initial overall view of the Desired State Configuration. It will introduce to DSC, its syntax and its use. It will show you a simple example of how to apply a DSC configuration
What is Desired State Configuration?
The management and maintenance of servers quickly becomes complex without standardisation. PowerShell allows us many ways of responding to different problems and occasionally bypassing certain restrictive techniques. The danger is that we end up with a plethora of scripts in order to manage a server, all more complicated than the other, and this works. We do much better with a standard way of automating a task
DSC gives us a declarative model for system configuration management. What that really means is that we can specify how we want a workstation or server (a ‘node’) to be configured and we leave it to PowerShell and the Windows Workflow engine to make it happen on those target ‘nodes’. We don’t have to specify how we want it to happen.
The main advantages of DSC are:
- To simplify your sysadmin taks by configuring one or more devices automatically
- To be able to configure machines identically with the aim to standardise them
- To ensure, at a given time, that the configuration of a machine always be identical to its initial configuration, so as to avoid drift
- Deployment on demand as a Cloud strategy, or ‘en masse’, is largely automated and simplified
In my articles, I often use the term ‘machine’ as if it were equivalent to a ‘server’. In this article, however, it is important to emphasise that DSC may be used on several servers but also on workstations. I like to use Group Policy Object (GPO) coupled to System Center Configuration Manager (SCCM) as my day-to-day method of installing and updating software but as time goes on, I can’t help but notice that these tools are becoming duplications in the management of the devices.
Desired State Configuration is integrated to Framework 4.0, which means that the compatible platforms with DSC are:
There are two types of architecture with DSC:
- Push mode: the configurations are sent (“pushed”) manually towards one or more units that we call “node”. This action is done by an administrator.
- Pull mode: a “pull server” is created and the nodes contact this server at regular intervals so as to obtain their configuration.
To summarise, I compiled these two architectures in a diagram so as to understand better:
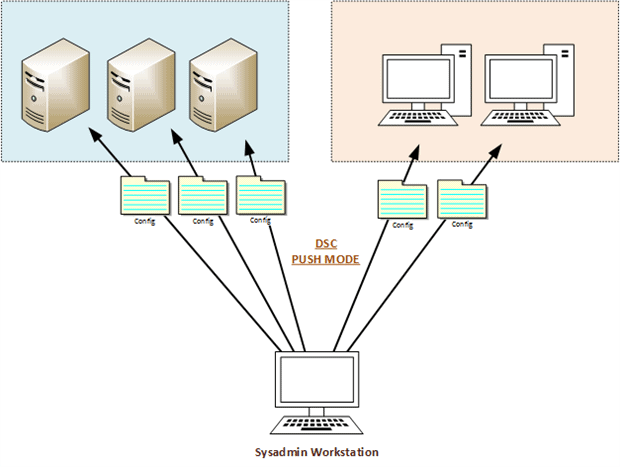
Figure 1 – DSC Push mode
In this design, only one-way communication is possible. It is the administrator that sends the configuration to the machines.
The advantages:
- Set up costs. It is not necessary to invest in a new server because the configurations are pushed from your workstation.
- The simplicity of the architecture because all configurations are stocked on your workstation.
- It is ideal to test the functioning of “Desired State Configuration”
The disadvantages:
- The complexity required to manage the machines connected. Because laptops are not always connected to the network, the sending of the configuration may fail.
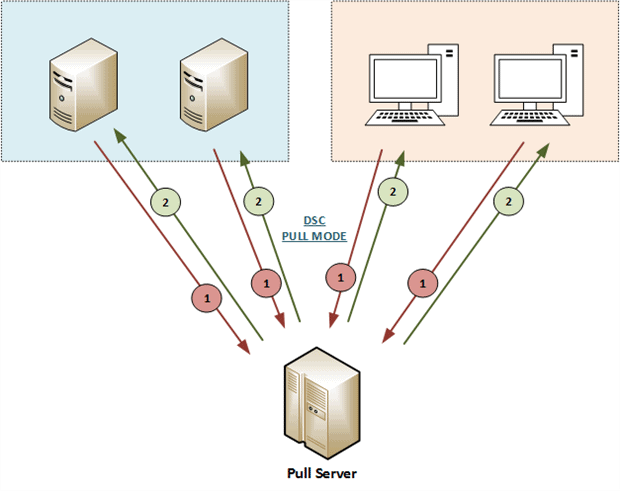
Figure 2 – DSC Pull mode
In this architecture, it is the nodes that poll the “pull server” to ask whether a configuration is available (Arrow n°1). If so, then the “pull server” sends this configuration to the compatible machines (Arrow n°2); By default, this interval of communication is set at fifteen minutes.
The advantages of this scenario are:
- Automation of the deployment of the configurations
- The management of numerous machines, connected or not. As soon as the machine is connected to the network, it asks to the “Pull Server” for its configuration.
The disadvantages:
- You need to deploy one more server
Note: You will notice that, in these two architectures, we push configurations onto the machines. By default, DSC is not used to deploy users’ configurations.
The DSC resources
What do we call a DSC resource? It is simple, this is what we will be able to configure on the nodes. By default, DSC is supplied with several resources which are listed with the Get- DSCResource cmdlet:
|
1 |
PS > Get-DscResource | select Name,Module,Properties | Ft -AutoSize |
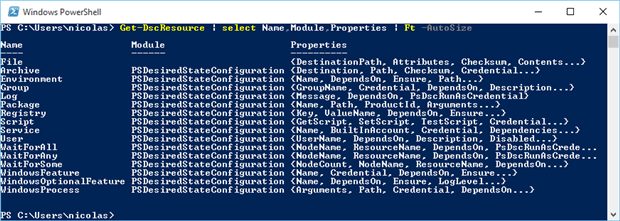
Figure 3 – List DSC Resources
Therefore, with these resources you have the means to configure for example Windows services, registry key or create local users. Here is a summary of basic resources with their descriptions:
- File: Manages files and folders on a node
- Archive: Decompresses an archive in the .zip format
- Environment: Manages system environment variables.
- Log: Writes a message in the DSC event log
- Package: installs or removing a package
- Registry: Manages registry key of a node (except HKEY Users)
- Script: Executes several PowerShell commands on a node
- Service: Manages Windows services (State, Startup Type)
- User: Manages local users on a node
- WindowsFeature: Adds or removes a role/feature on a node
- WindowsOptionalFeature: Adds or removes an optional role/feature
- WindowsProcess: Manages a Windows process
- WaitForAll / WaitForAny / WaitForSome: Available with PowerShell WMF 5 Production Preview. Cross-computer synchronisation allows us to use the dependency between machines during the deployment of their configuration. When there is a change in the status of a resource, another machine may be able to execute its configuration.
To simplify the notion of a DSC ‘resource’, you can compare it to a PowerShell module. It is important to note that the resources used in a configuration must be present on the nodes as well as on your workstation if you are using push mode, or they should be on the “Pull Server”.
These few resources allow you to begin using DSC, but you are likely to need more functionality as your use of DSC increases At that point, it is possible to add extra resources with the DSC Resource Kit: https://gallery.technet.microsoft.com/scriptcenter/DSC-Resource-Kit-All-c449312d
This resource kit was published by the Windows PowerShell Team. Each new publication mentions a “Wave” number. Since August 2015, the resources have been made available from the PowerShell Gallery: http://www.powershellgallery.com/
To install them, all you need to do is to copy and paste them into your PowerShell modules folder:
|
1 |
PS > Get-ChildItem -Path Env:\PSModulePath | select value | fl * |
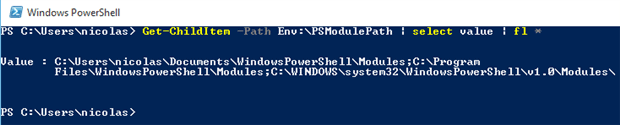
Figure 5 – PSModulePathlocation
Now if I look once again at the list of available resources on my workstation, I notice that the configuration possibilities have clearly increased. I now have the means to configure an Active Directory, SQL services…
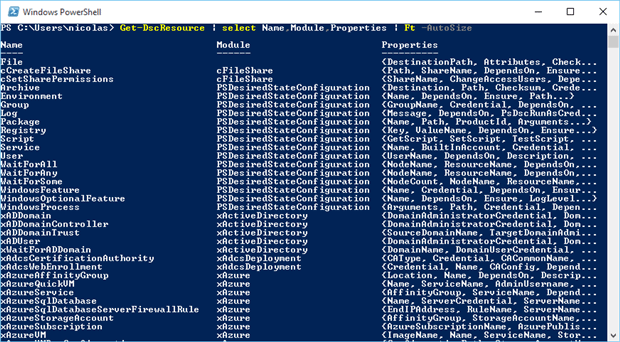
Figure 6 – List new DSC Resources
As you can imagine, it is now possible to create one’s own DSC resources by defining what you want to configure on the nodes. We shall see this in detail later.
The DSC syntax.
Until now, I have talked about several terms: Configuration, Resource and Node. These terms have a precise meaning in the context of DSC, so it is important to understand how to use them. Here is a classic DSC configuration structure:
|
1 2 3 4 5 6 7 8 9 10 11 12 13 14 15 16 17 18 19 20 21 22 23 24 25 26 27 28 29 |
Configuration ConfigName # PART1 { param( # PART2 [Parameter(Mandatory=$true)] [String[]]$Param1, [Parameter(Mandatory=$true)] [String]$Param2, [Parameter(Mandatory=$true)] [String]$Param3 ) Node $Servers # PART3 { File ResName # PART4 { ... # PART5 } } Node $Servers # PART3 bis { WindowsFeature ResName2 # PART4 bis { ... # PART5 bis } } } |
Part 1: the key word “Configuration” is followed by the name of the configuration. You are free to write what you wish.
Part 2: This block contains the parameters that are used in the configuration
Part 3: The block node indicates to DSC to deploy this configuration on these machines
Part 4: It is the resource that you want to configure. Here, I point to the resource “File” and “WindowsFeature” followed by a friendly name.
Part 5: Contains properties of the resource as “key=value” pairs
You will notice that the syntax is relatively close to the PowerShell functions. Let’s now take a simple example in which I would like to copy the “hosts” file on two nodes. Herewith the associated configuration:
|
1 2 3 4 5 6 7 8 9 10 11 12 13 14 15 16 17 18 19 20 21 22 23 24 |
Configuration DeployHostFile { param( [Parameter(Mandatory=$true)] [String[]]$Servers, [Parameter(Mandatory=$true)] [String]$SourceFile, [Parameter(Mandatory=$true)] [String]$DestinationFile ) Node $Servers { File CopyHostFile { Ensure = "Present" Type = "File" SourcePath = $SourceFile DestinationPath = $DestinationFile } } } |
My configuration is called DeployHostFile and it contains three mandatory parameters ($Servers, $SourceFile, $DestinationFile). The section “Node” indicates that it deploys a resource ‘File’ type on several machines. But how can we find out the properties of a DSC resource? The Get- DSCResource cmdlet followed by the – syntax parameter displays the syntax and the properties accepted by that resource.
|
1 |
PS > Get-DSCResource File -syntax |
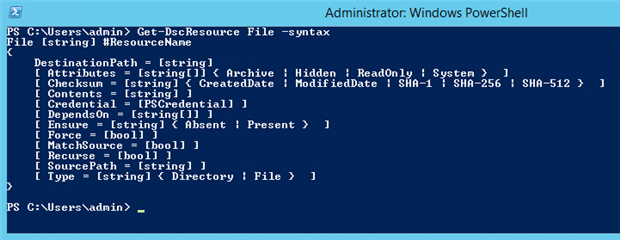
Figure 7 – DSC resource syntax
It is equally possible to obtain them from the following page: https://msdn.microsoft.com/en-us/powershell/dsc/builtinresource
Applying a DSC configuration
Now that you have configured what you wished, all you need to do is to call the DeployHostFile function as you would do for a classic PowerShell function:
|
1 2 3 4 5 |
PS> DeployHostFile -Servers @("ADM01","ADM11") -SourceFile "\\Share\Hosts" -DestinationFile "C:\Windows\System32\drivers\etc\" -OutputPath "C:\DeployHostFile\" |

Figure 8 – Two .mof files are created
Here I want to deploy this file: "\\Share\Hosts" on two machines "ADM01","ADM11" in the following folder "C:\Windows\System32\drivers\etc\"
What has really happened?
- First comment: The “Hosts” file has not been copied on my two servers
- Second comment: Files with the extension .MOF have been created for each node listed in my configuration.
A DSC configuration is based on one or more “MOF” files (Managed Object Format – more information at this address: https://msdn.microsoft.com/en-us/library/aa823192(v=vs.85).aspx). When a configuration is executed it will create a MOF file by node.
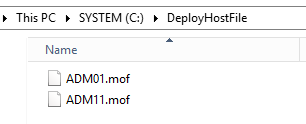
Figure 9 – List .mof files
Here I obtain two .MOF files in the directory defined with the help of parameter -OutputPath "C:\DeployHostFile\". These files are then used to describe how a machine must be configured. The MOF file contains the DSC configuration directives.
MOF Files are generally used to manage systems that use Windows Management Instrumentation (WMI) or Common Information Model (CIM). MOF files are a good way to manipulate WMI settings because MOF files contains WMI classes. MOF files are then compiled using “mofcomp.exe” into the WMI repository.
For the more inquisitive, here is the structure of the ADM11.mof file:
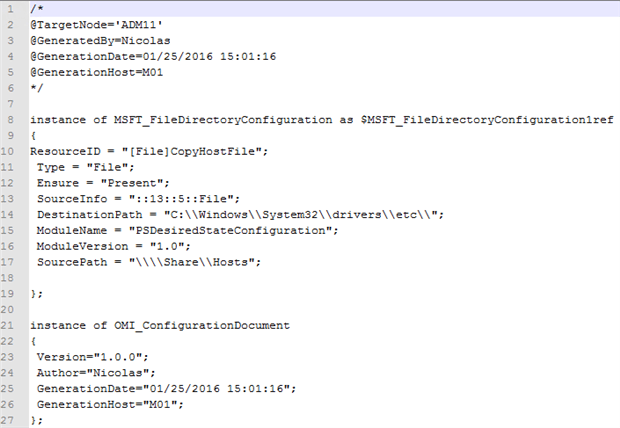
Figure 10 – MOF Document
Given that we are in a “push mode”, a manual action is requested so as to deploy this configuration on the nodes. That is done via the Start- DscConfiguration cmdlet while pointing to the directory that contains the applicable .mof files:
|
1 |
PS> Start-DscConfiguration -Wait -verbose -Path C:\DeployHostFile\ |
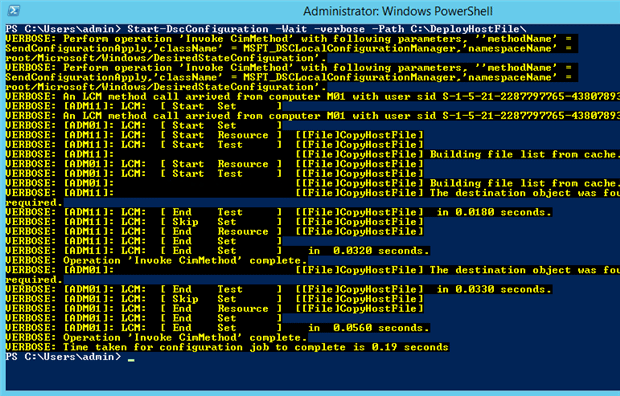
Figure 11 – Apply DSC configuration
We have just done our first configuration via DSC. The -Wait parameter tells that you want to run the command interactively. Now if I connect on one of my nodes, I notice that the file has been copied. If I delete this file and rerun the previous command, the file will again be deployed.
Finally, what have we done with these few PowerShell command lines? So as to really understand this process, I have summarised it in a diagram:
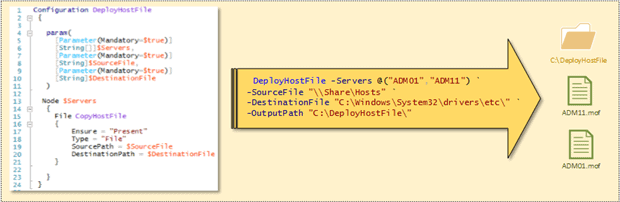
Figure 12 – Generate two . mof files
In the above diagram, the actions happen solely on my workstation. I generate the two .mof files locally by executing the DeployHostFile function.
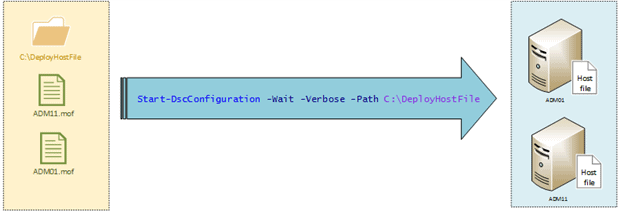
Figure 13 – Configure two nodes with DSC
The second diagram describes the deployment of the configuration contained in the .mof files on my two nodes with the Start- DSCConfiguration cmdlet.
To go further
To end this article, it is important to explain one last fundamental concept of DSC: the ‘Local Configuration Manager’ or LCM is the execution engine of DSC. It works on each node and it is this that will apply the configurations. When sending a configuration to a node, LCM will analyse the .mof file. After reading the file, it calls all DSC resources that are present on the node so as to configure the machine as requested. Finally, its role is to control configuration-drift on the machine.
The configuration of LCM may be obtained with the Get- DSCLocalConfigurationManager cmdlet:
|
1 |
PS> Get-DSCLocalConfigurationManager |
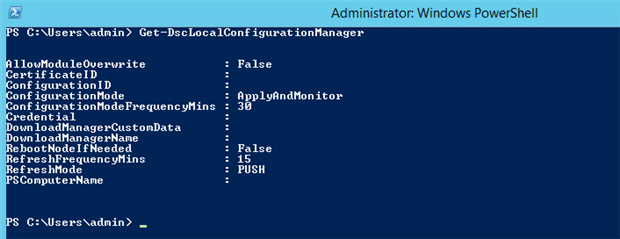
Figure 14 – LCM properties
The properties of LCM are also called “MetaConfiguration” and these can be altered. In the above screenshot, only few properties have associated values:
AllowModuleOverwrite: This property allows the modules present on the machine to be overwritten when you download a new module from internet.
ConfigurationMode: Specifies how DSC must apply the configuration:
- ApplyOnly: The configuration is applied only once
- ApplyAndMonitor: The configuration is applied and checked periodically. If a change is noticed, then an entry is created in the event log.
- ApplyAndAutocorrect: The configuration is applied and the LCM verifies periodically that there is no variation. If a change is noticed, then the configuration is reapplied.
ConfigurationModeFrequencyMins: the LCM verifies every thirty minutes (by default) that there is no configuration drift.
RebootNodeIfNeeded: Indicates whether the node can be restarted automatically. Certain actions need a reboot of the node when the configuration is applied.
RefreshFrequencyMins: This property Indicates the frequency (by default fifteen minutes) to which the LCM tries to obtain its configuration from the Pull Server.
RefreshMode:
- Push: the configuration is pushed on the node manually.
- Pull: the node regularly verifies from the “Pull Server” if there has been an update of its configuration. If ‘yes’, then the configuration is downloaded and then applied.
Conclusion
I hope that this article has helped you to increase your knowledge about DSC. We have mainly studied the “Push mode” because this mode provides a simple and rapid way of using DSC. But we shall see in a subsequent article that the more suitable mode in a production environment is the “Pull mode”.
Before one can get into practical details, there are many DSC ideas and terms to become familiar with. and that is why this article is divided into several sections so as to explain DSC and illustrate all its power. You will soon notice that DSC is a wonderful tool for administrators because it allows great flexibility of use and will simplify your regular tasks. Furthermore, everyone who has a minimum knowledge on PowerShell will quickly be able to use DSC.
All these examples are intended to provide a basis that you can adapt to your environment in order to let you explore DSC in more details.
This document contains proprietary information and is protected by copyright law.
Copyright © 2026 Red Gate Software Limited. All rights reserved
Load comments